Pastéis de Nata, also known as Portuguese custard tarts, are a famous pastry made with a crispy, flaky pastry shell and a rich, creamy custard filling. Their blistered, shiny top sets these tarts apart, giving them their signature look and taste. They are a favorite in Portugal, and with this recipe guide, you'll achieve authentic results at home.
The combination of a thin, flaky, crispy crust and smooth, velvety custard makes pastéis de nata one of the most irresistible pastries in the world. Enjoy them fresh out of the oven with a cup of coffee, and you'll understand why they've become such a popular treat worldwide.
While they originated in Portugal, pastéis de nata are now enjoyed in bakeries across the globe. They are particularly famous from Pastéis de Belém, a bakery near the Jerónimos Monastery in Lisbon, which has been serving the original version since 1837. Though they are widely referred to as pastéis de nata elsewhere, Pastéis de Belém remains the most iconic and guarded version.
In this step-by-step guide, I'll show you how to make the perfect pastéis de nata from scratch. With the proper techniques, you'll learn how to prepare the custard, laminate the dough for the perfect flaky texture, and bake the tarts to get that signature golden, blistered top-everything you need to replicate the same quality and flavor found in an authentic Portuguese bakery.
Jump to:
- Watch how to make it
- Ingredients for the pastry
- Ingredients for the custard
- Making the Custard
- Preparing the pastry
- Baking the tarts
- How they should look when baked
- Tips for success
- Common problems and how to fix them
- Substitutions and variations
- Equipment
- Storage and reheating
- FAQ
- More dessert recipes
- Recipe
- Comments
Watch how to make it
Ingredients for the pastry
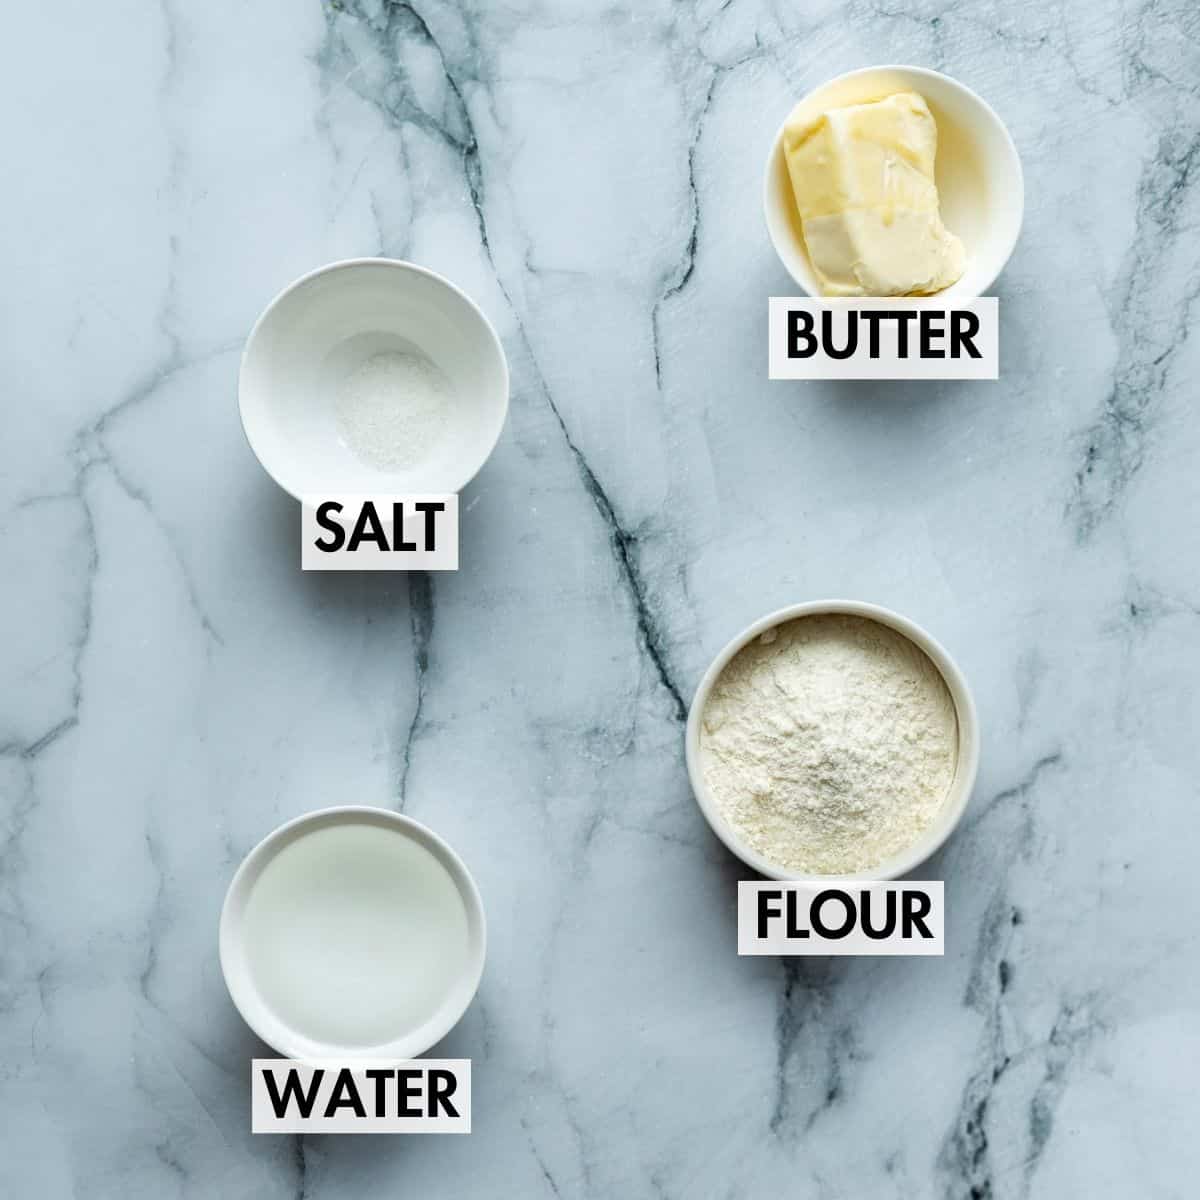
- Flour - All-purpose flour.
- Butter - Unsalted butter. Either normal or lactose-free. The butter needs to be very soft so take it out of the fridge or microwave on low for a few seconds.
See the recipe card for quantities.
Ingredients for the custard
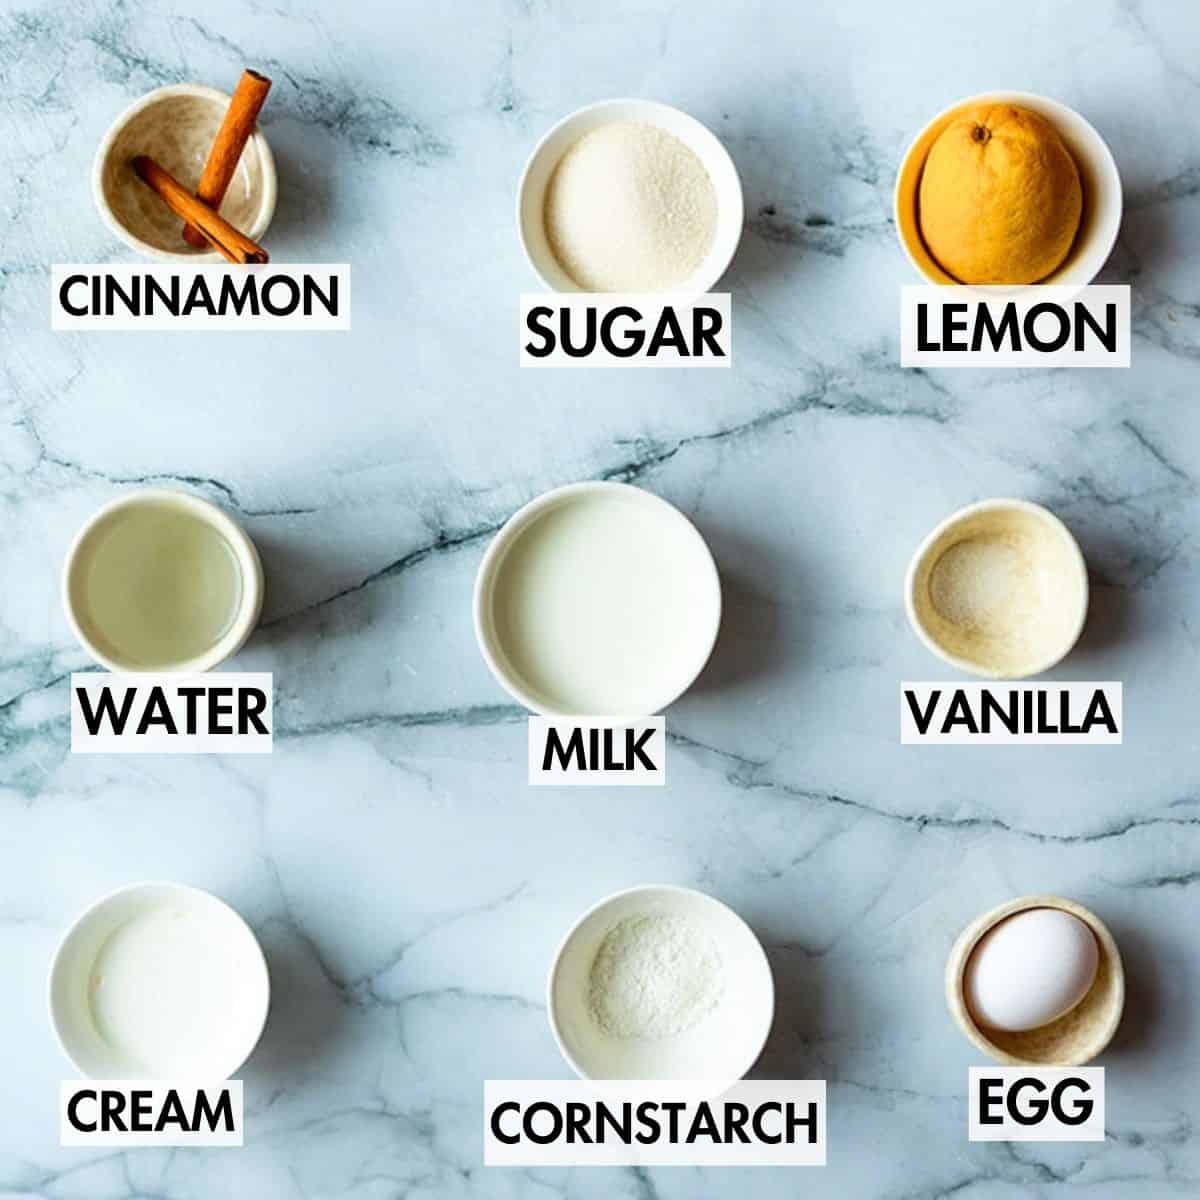
- Milk - Whole milk works best for richness. Lactose-free milk is also fine.
- Cream - Double cream or whipping cream both work. Regular or lactose-free.
- Vanilla - Vanilla essence or extract is classic but if you want to make them a bit more luxurious, splash out on fresh vanilla beans or vanilla paste.
- Sugar - Regular white sugar. Sweeteners won't work.
- Egg - We only use the yolks. Use pasteurized egg yolk from cartons or separate fresh eggs.
See the recipe card for quantities.
Making the Custard
Making the custard for pastéis de nata is an essential part of creating the perfect balance of texture and flavor. We use a unique method to get a smooth, creamy custard filling with that signature silky consistency.

- Make the syrup - In a saucepan, combine sugar, water, vanilla, cinnamon sticks, and lemon peel. Bring to a boil over medium heat, stirring occasionally. Once the syrup reaches 106 °C or 223 °F, remove it from the heat and set aside to cool.
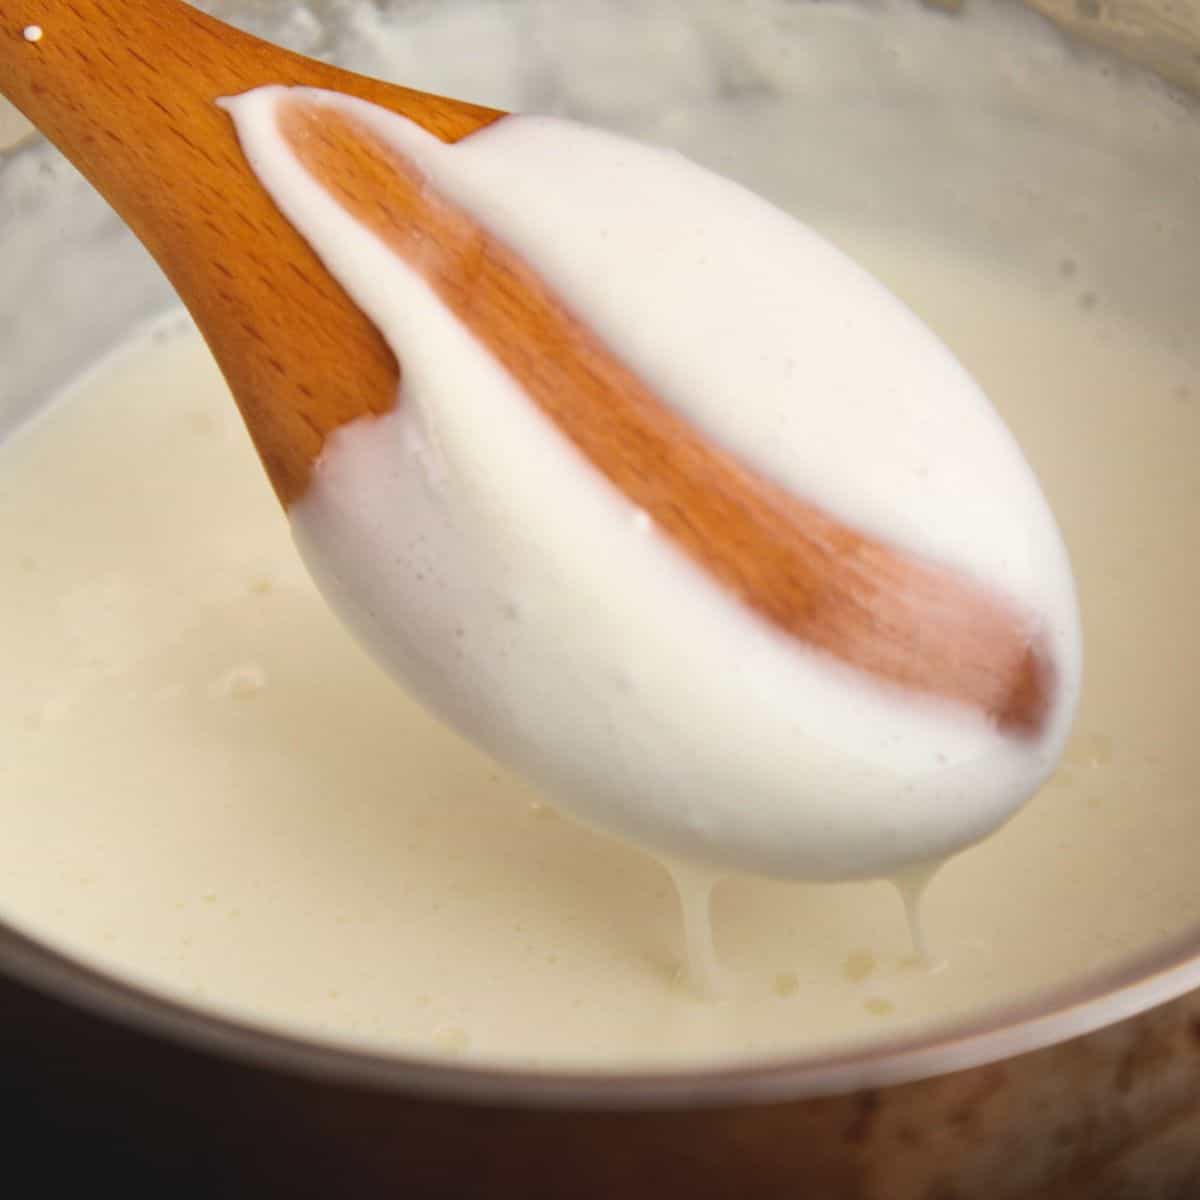
- Cook the starch - In a separate saucepan, combine milk, double cream, and cornstarch. Whisk the mixture continuously over medium heat until it starts to bubble and thicken, ensuring there are no lumps. Once it begins to thicken, remove it from the heat.
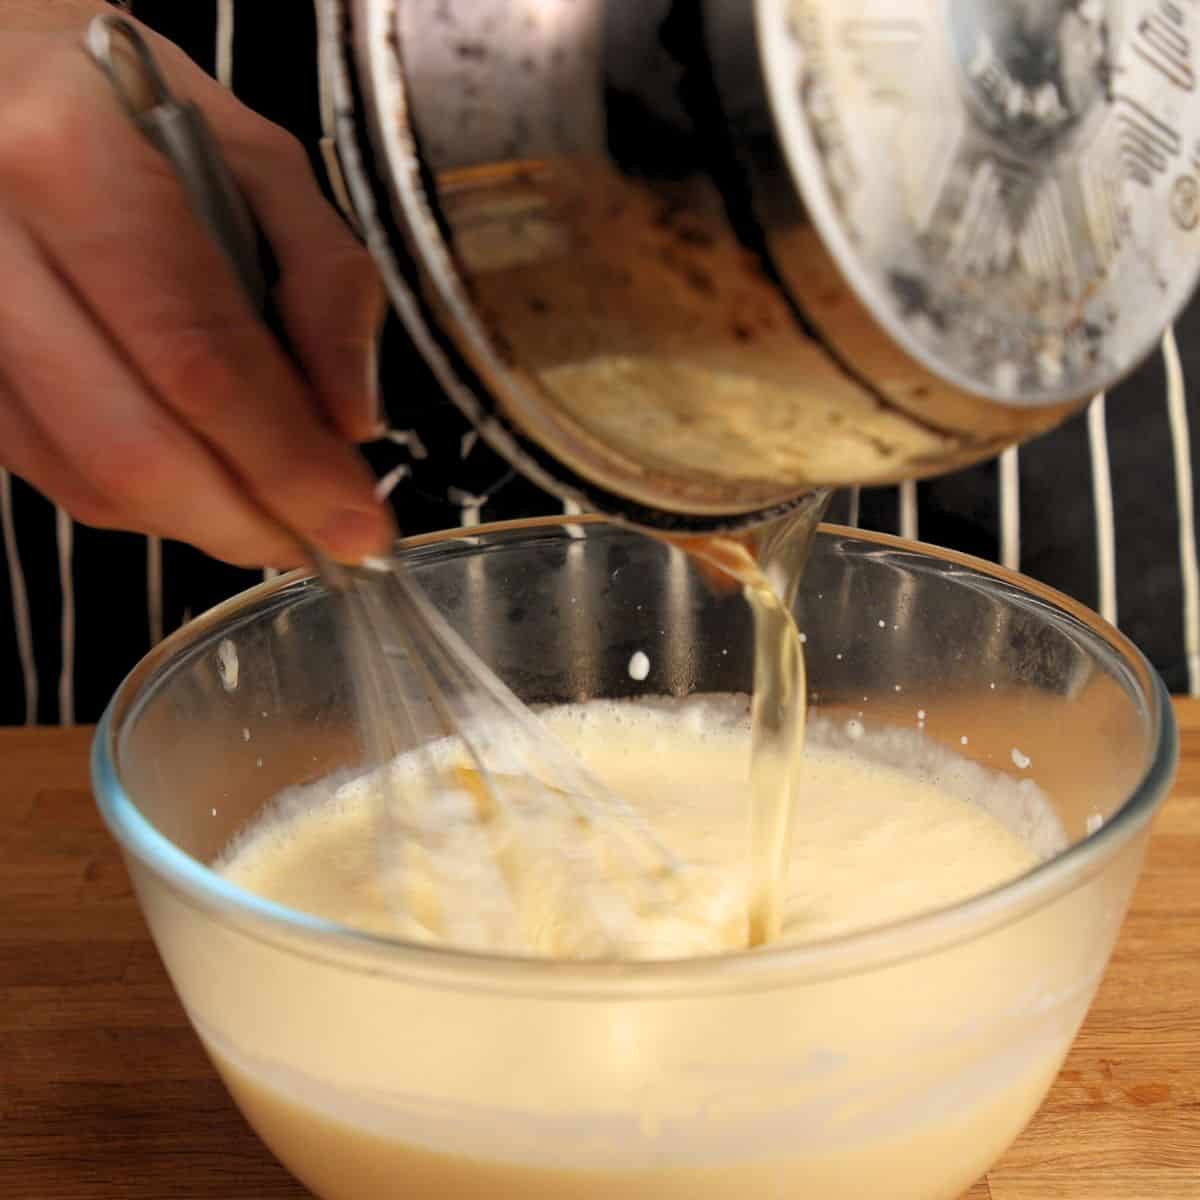
- Mix with egg - Separate the egg yolks into a bowl and whisk them lightly. Gradually pour the hot starch mixture into the egg yolks while continuously whisking to temper the eggs and avoid curdling. Add the syrup and whisk to combine.
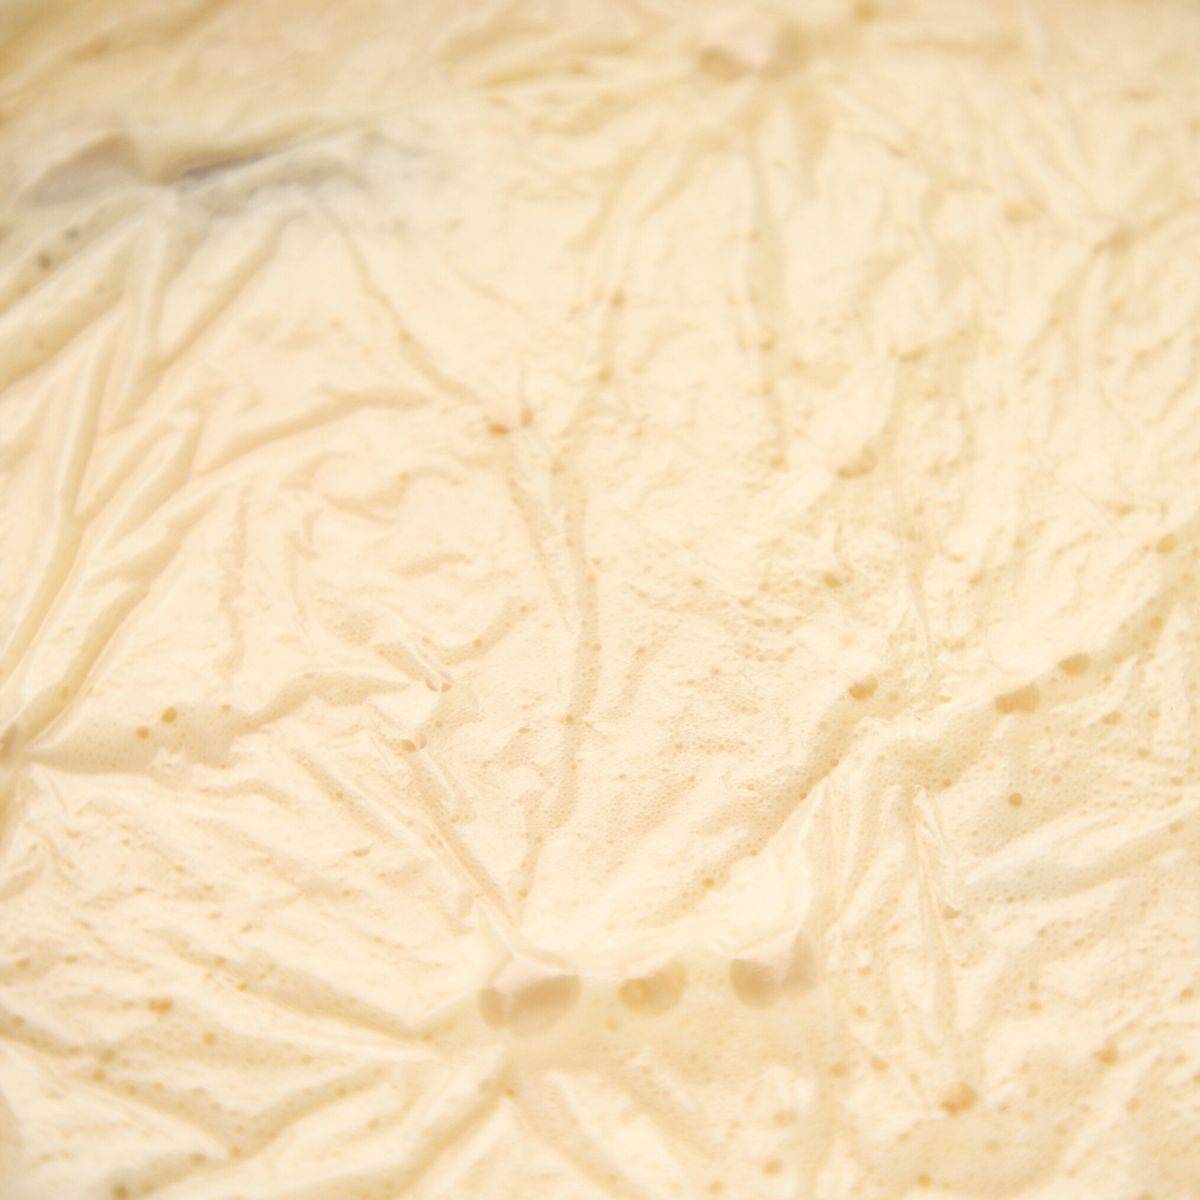
- Chill and infuse - Cover the custard with plastic wrap, ensuring the wrap touches the surface of the custard to prevent a skin from forming. Allow the custard to chill in the fridge overnight to let the flavors infuse and the texture set. If you are short on time strain through a sieve straight away.
Preparing the pastry
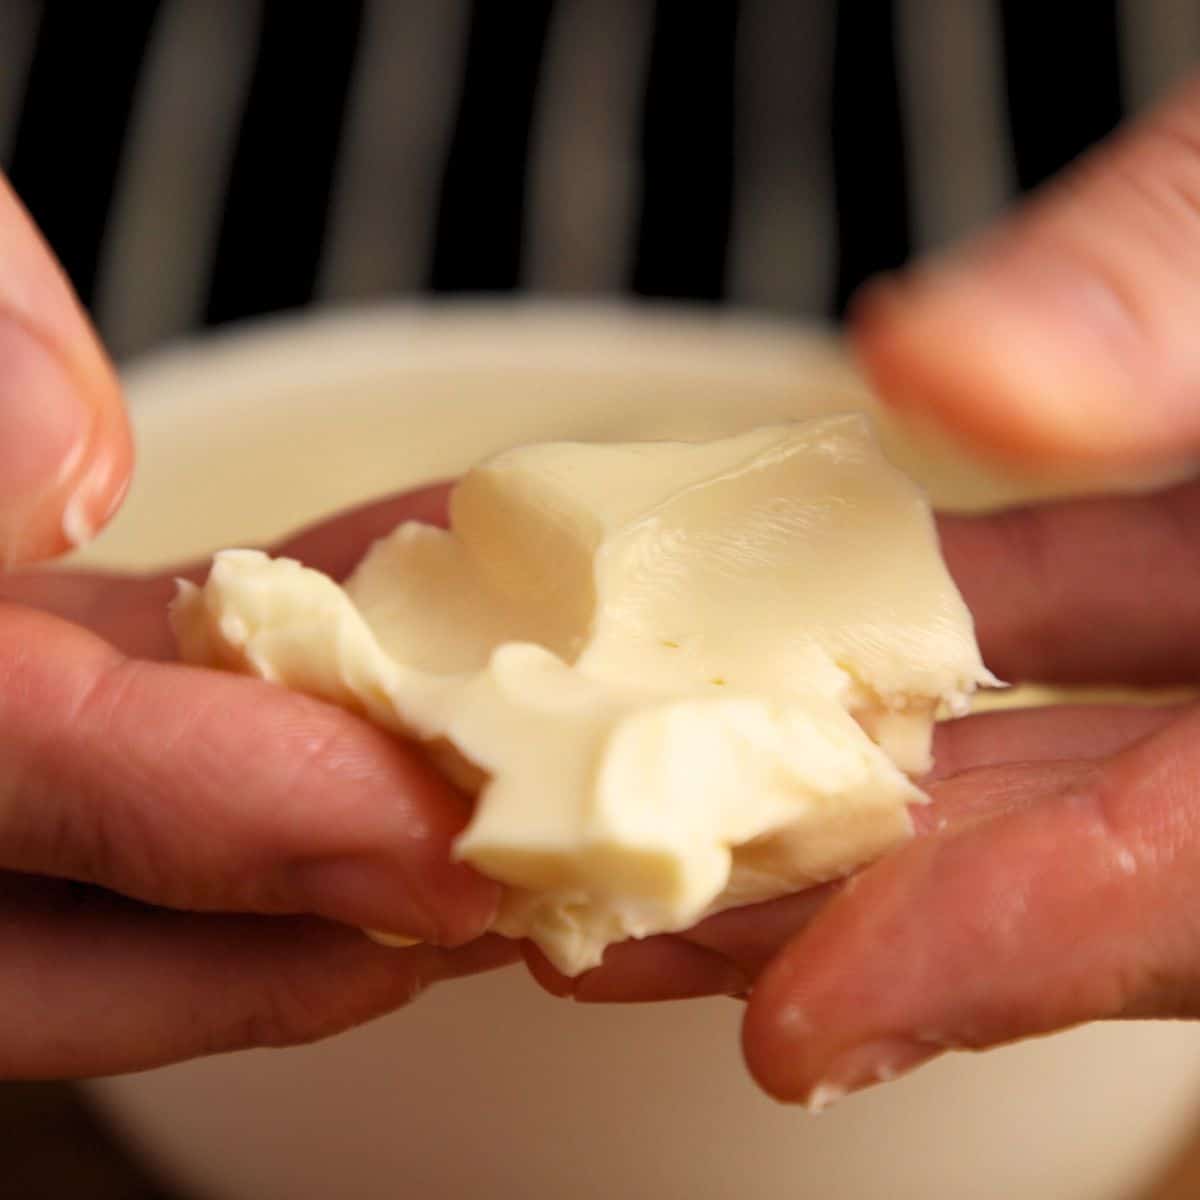
- Soften butter - Place the butter in a warm place to soften it. It should be pliable but not melted, which will make it easier to laminate the dough later.
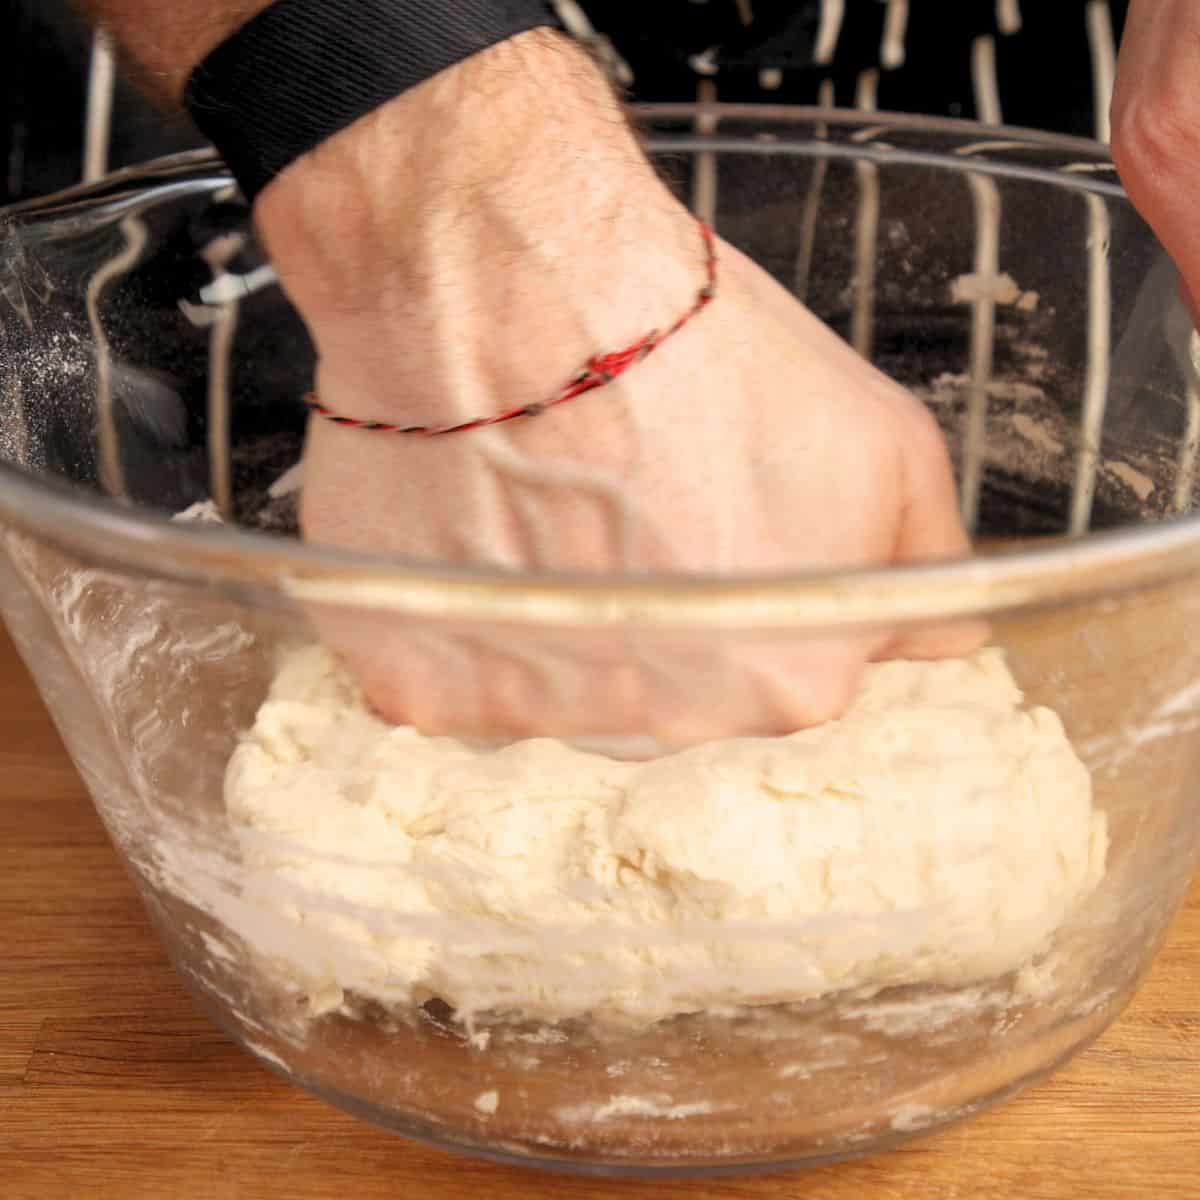
- Prep dough - n a mixing bowl, combine the flour, salt, and water to form a dough. Mix until smooth, then cover the dough with a damp cloth and let it rest for about 30 minutes. This step helps hydrate the dough, making it easier to work with.
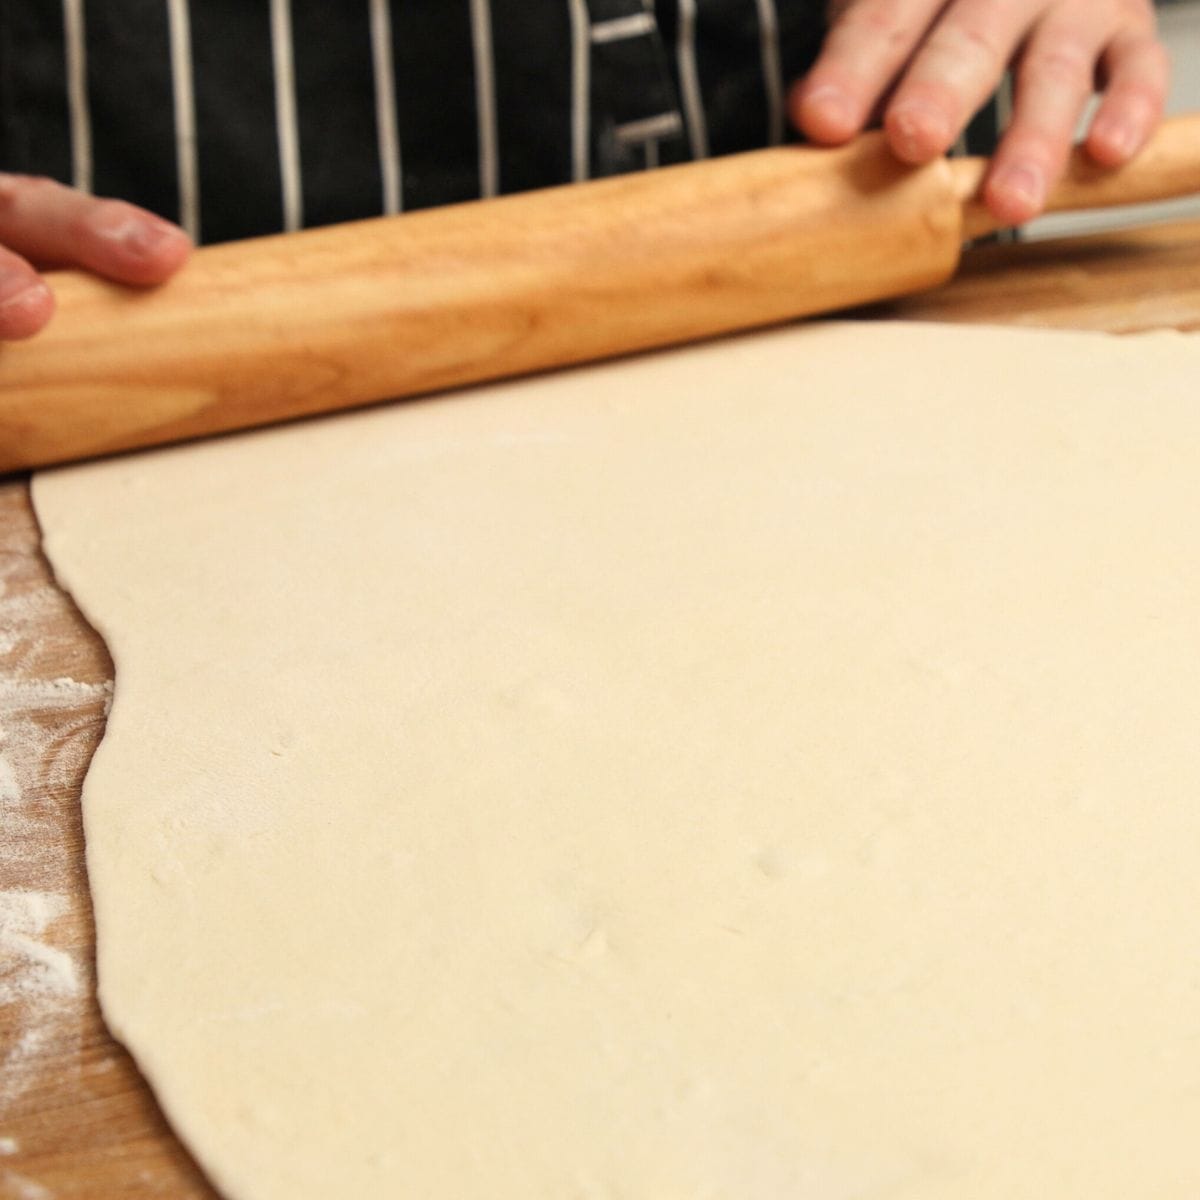
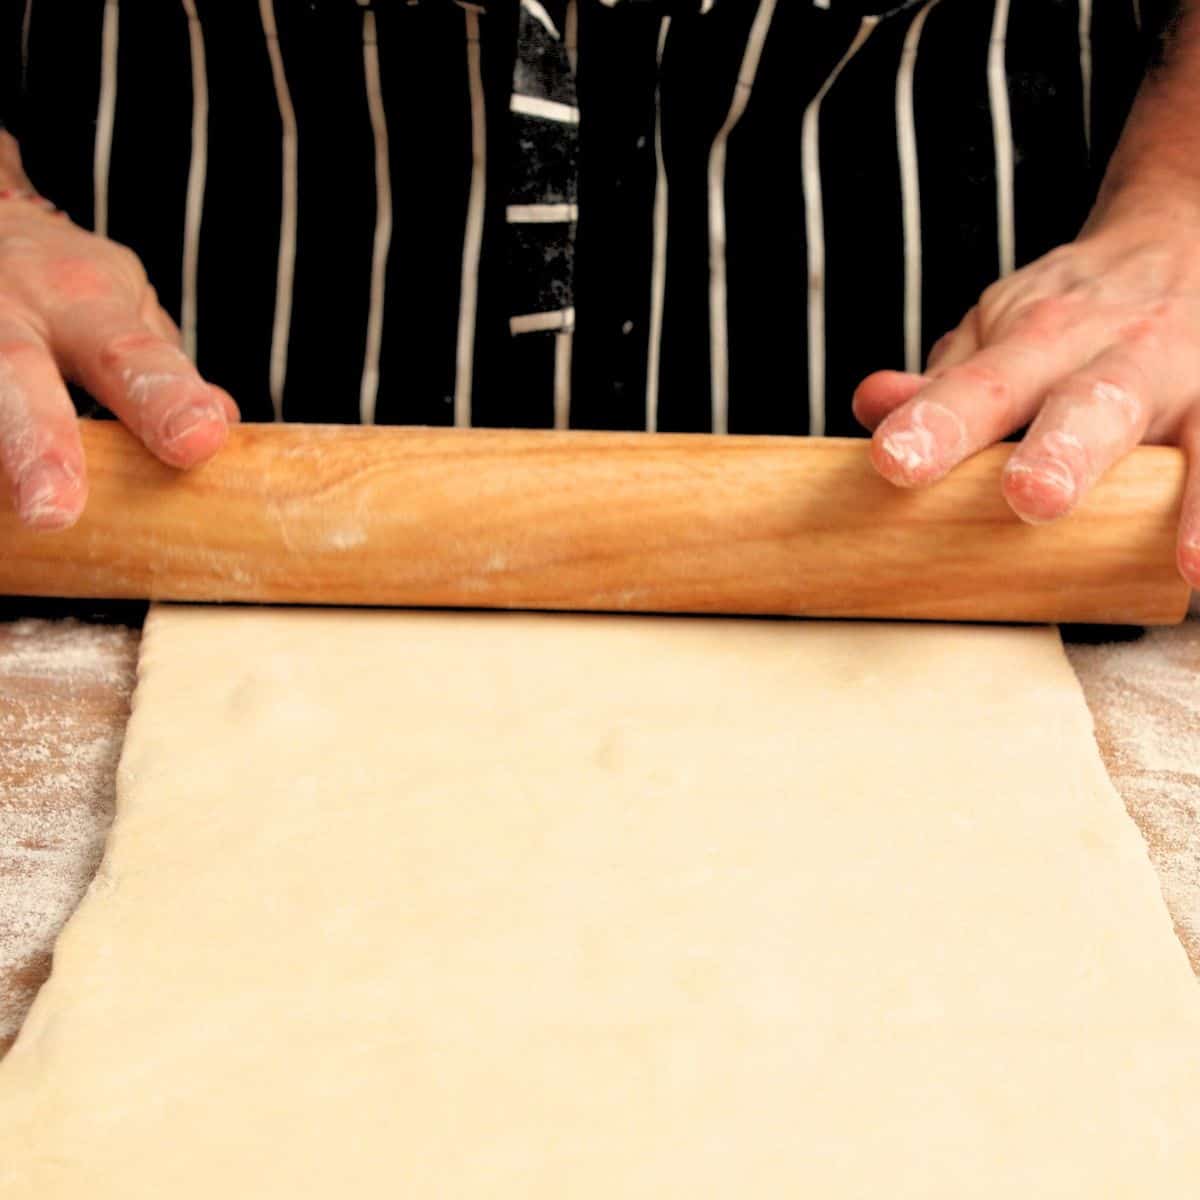
- Roll out - After the dough has rested, roll it out on a lightly floured surface into a 40 cm x 50 cm (16-inch x 17-inch) rectangle. Focus on making it thin but not too fragile, about 3 credit card thickness.
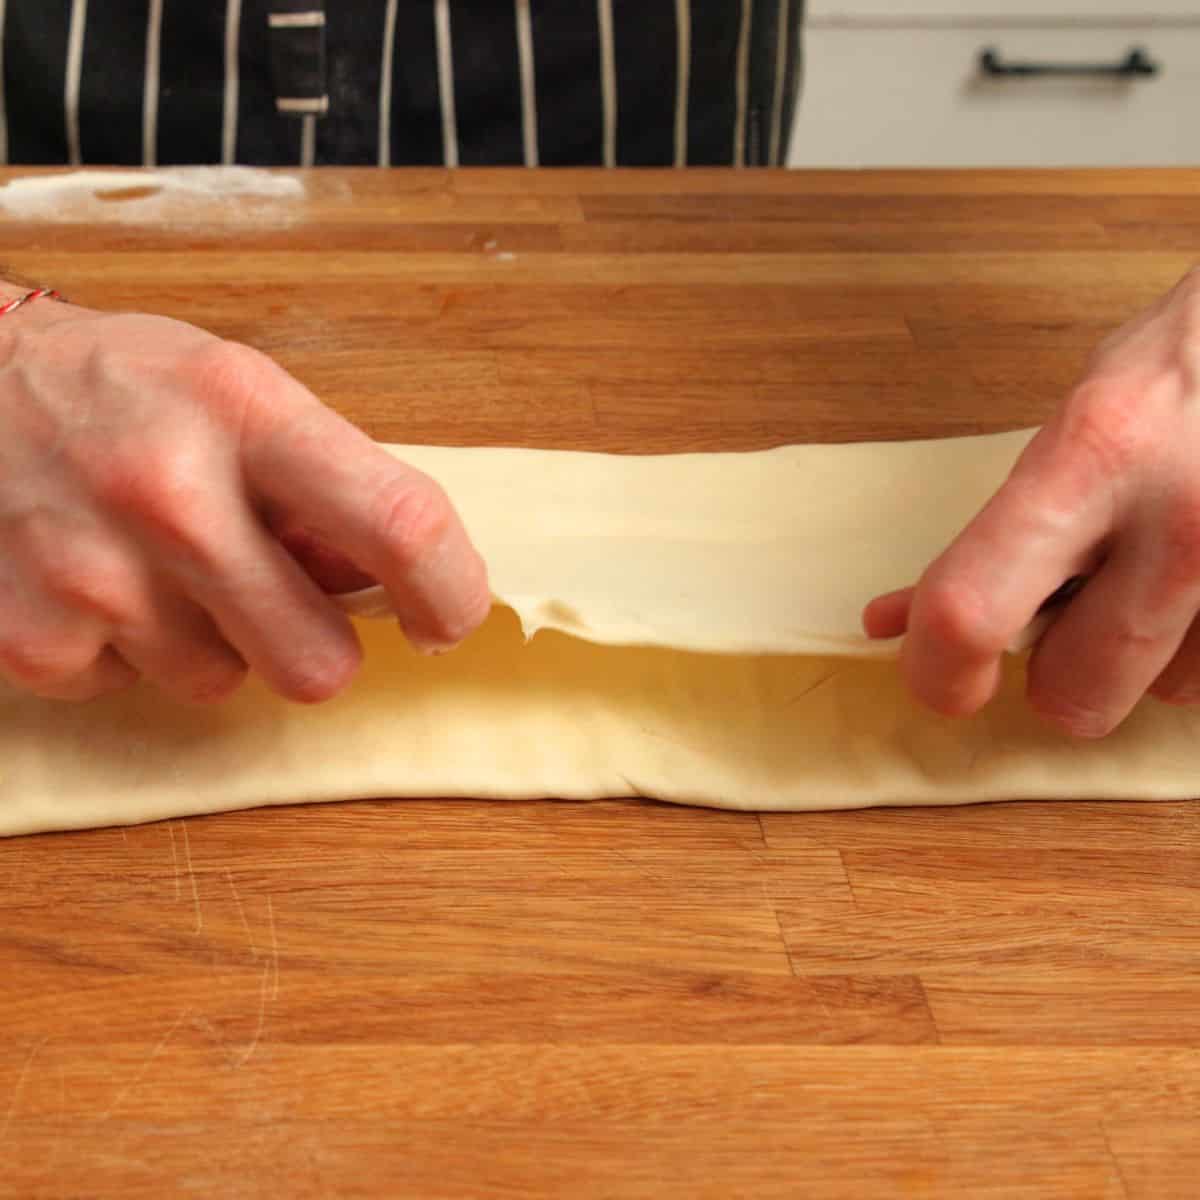
- Spread with butter -Spread ⅕th of the softened butter evenly over two-thirds of the dough. Leave the top third unbuttered.
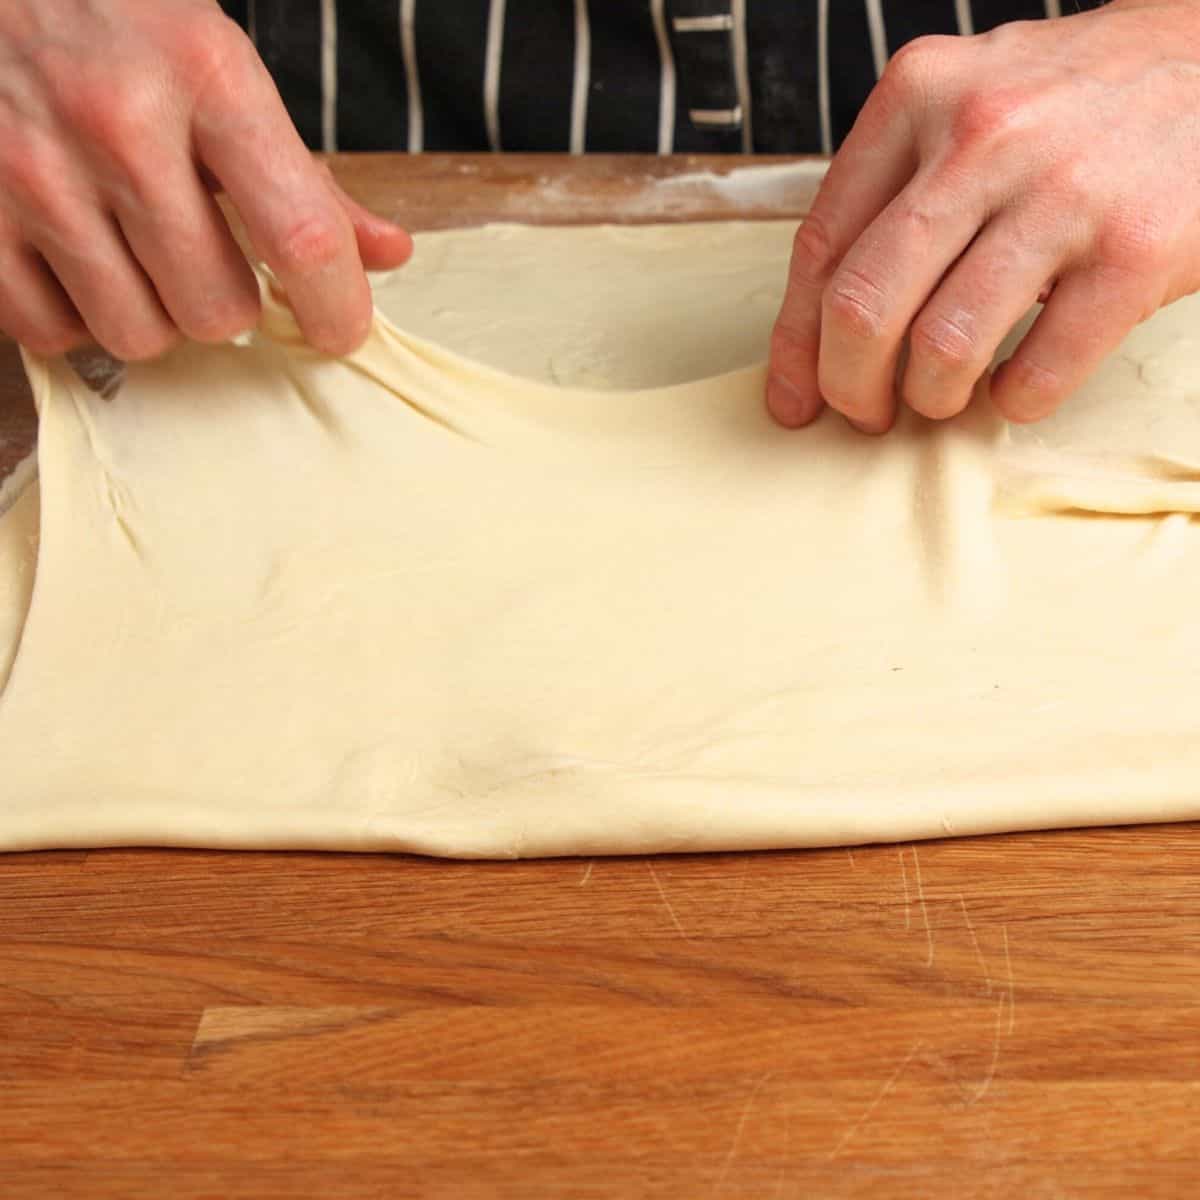
- Letter fold - Fold the unbuttered third of the dough over the buttered portion, then fold the other third on top to form a letter fold. This step creates the layers of butter and dough that will turn into the signature flaky texture.
- Repeat - Roll the dough out again and repeat the buttering and folding process. Roll it out, spread the butter, and letter fold it. If your kitchen is hot move the pastry to the fridge for 10 minutes between steps so that the butter does not melt out.
- Long roll - Once the dough has been folded twice, roll it out into a 20cm x 45cm (8 by 18 inches) rectangle. Spread another layer of butter over two-thirds of the dough.
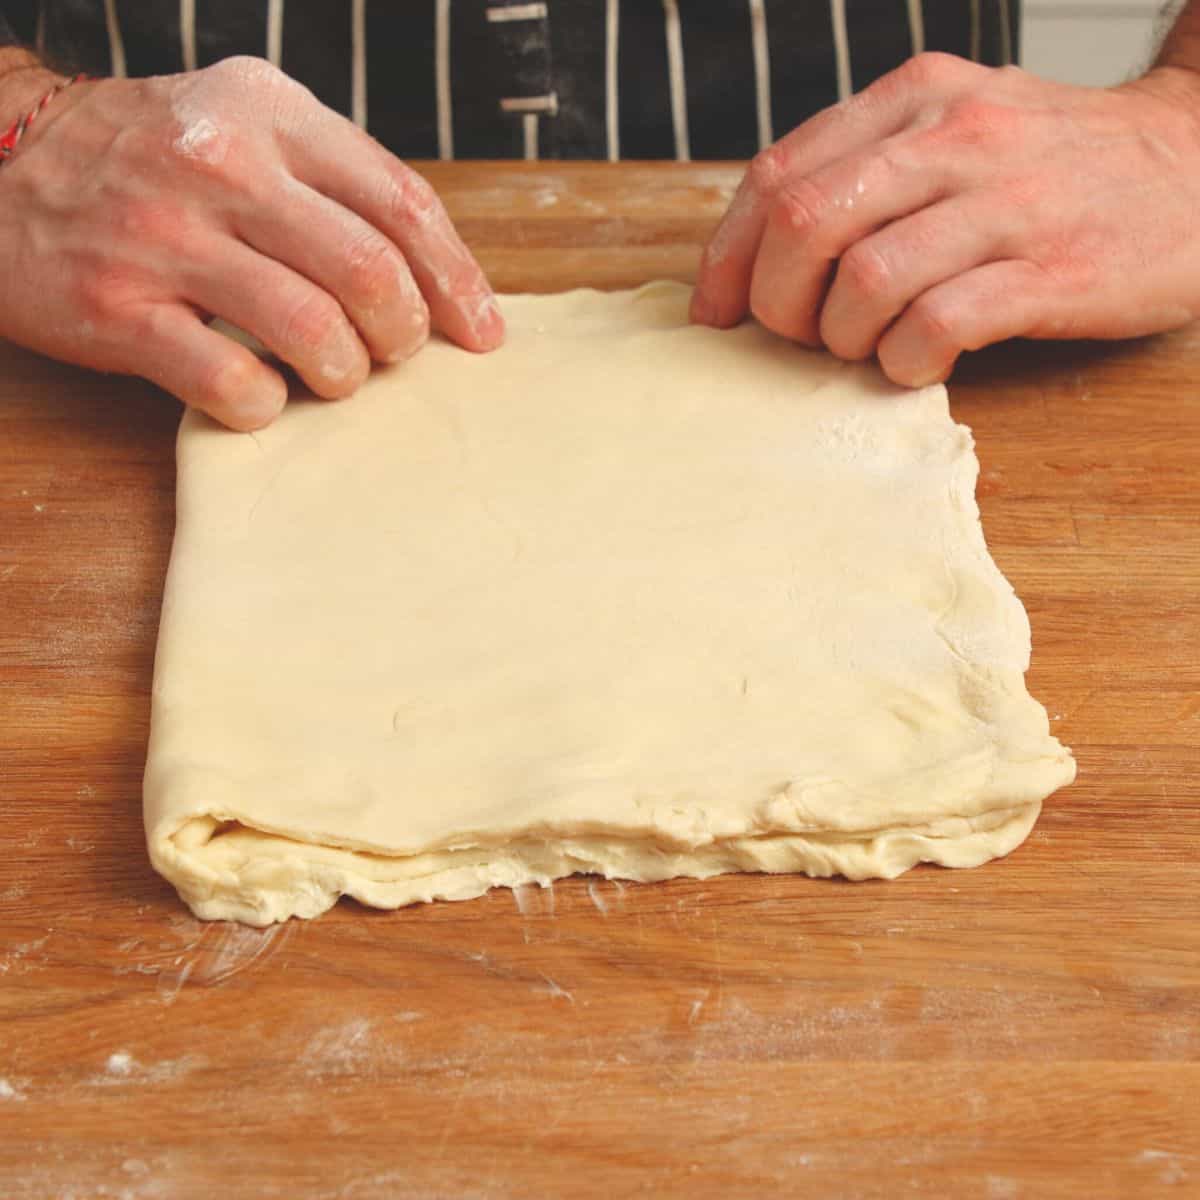
- Fold and chill - Fold the dough into thirds just like the previous times, making sure each layer is well-buttered. Then, cover it with plastic wrap and chill in the fridge for at least 30 minutes to firm up.
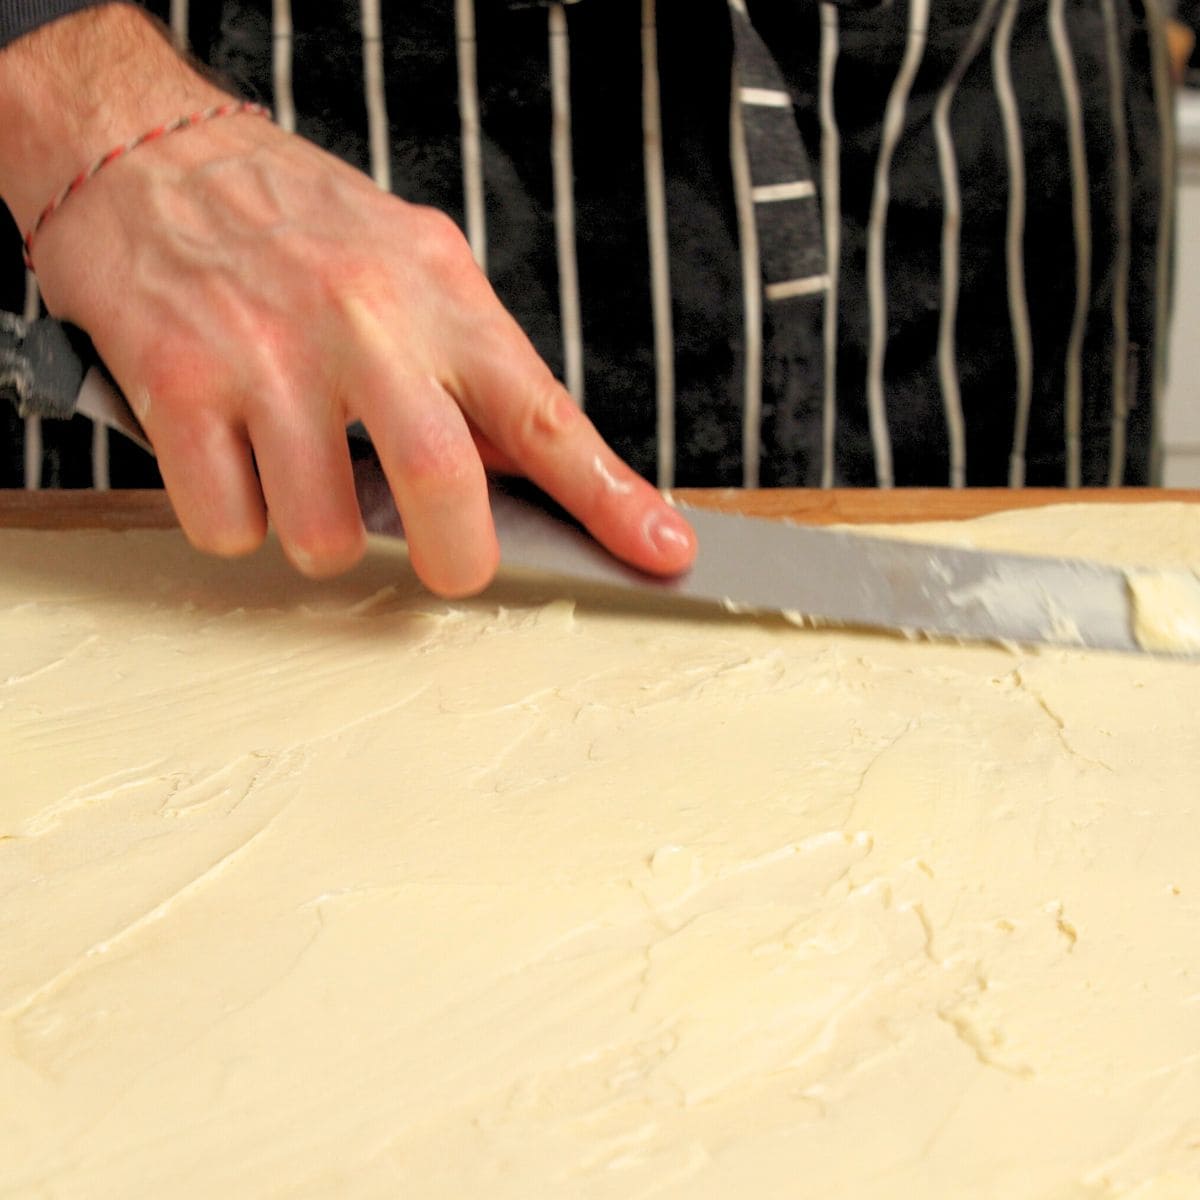
- Roll out and butter - After chilling, roll the dough out again into a 40cm x 50cm (16-inch x 17-inch) rectangle and spread the remaining butter evenly over the surface. This step gives the dough its final butter layer.
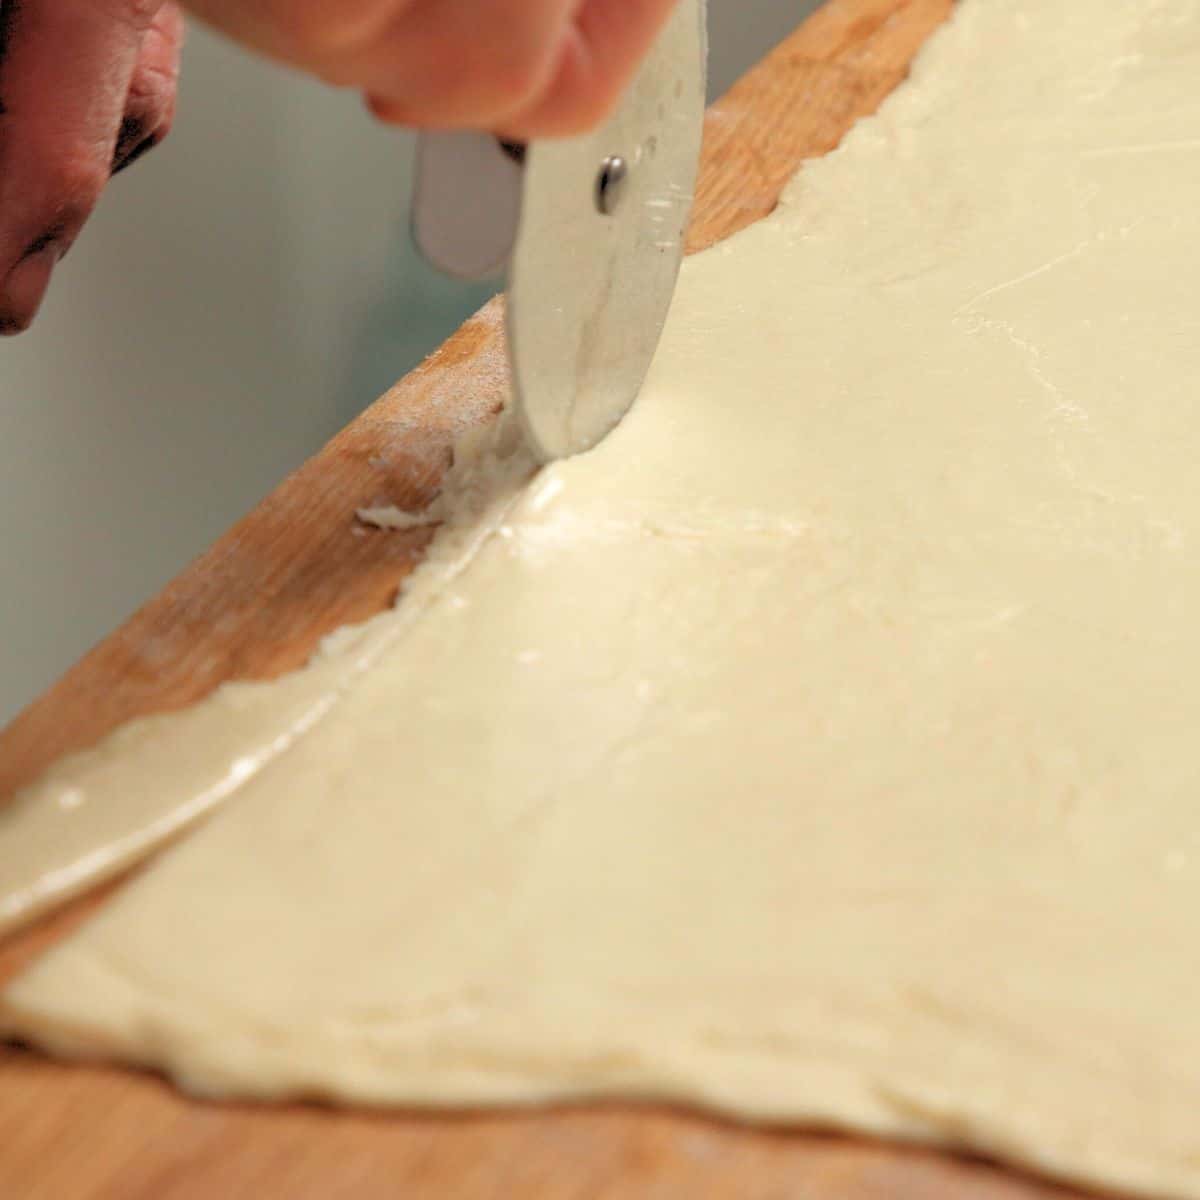
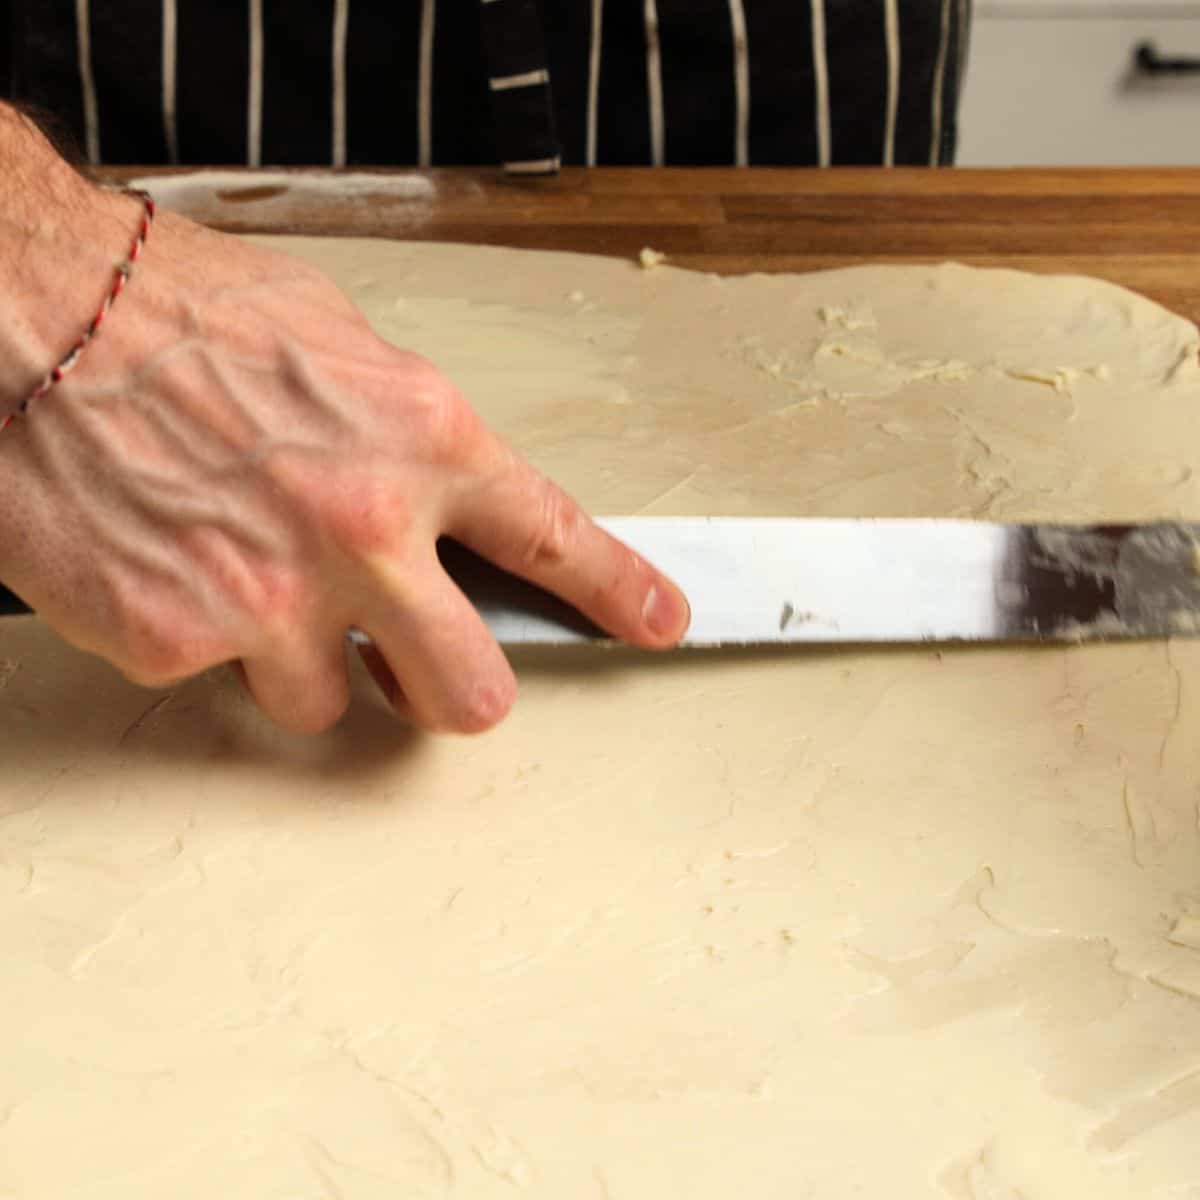
- Trim edges - Trim the edges of the dough to create a clean, even rectangle. Save the trim in the freezer for other uses.
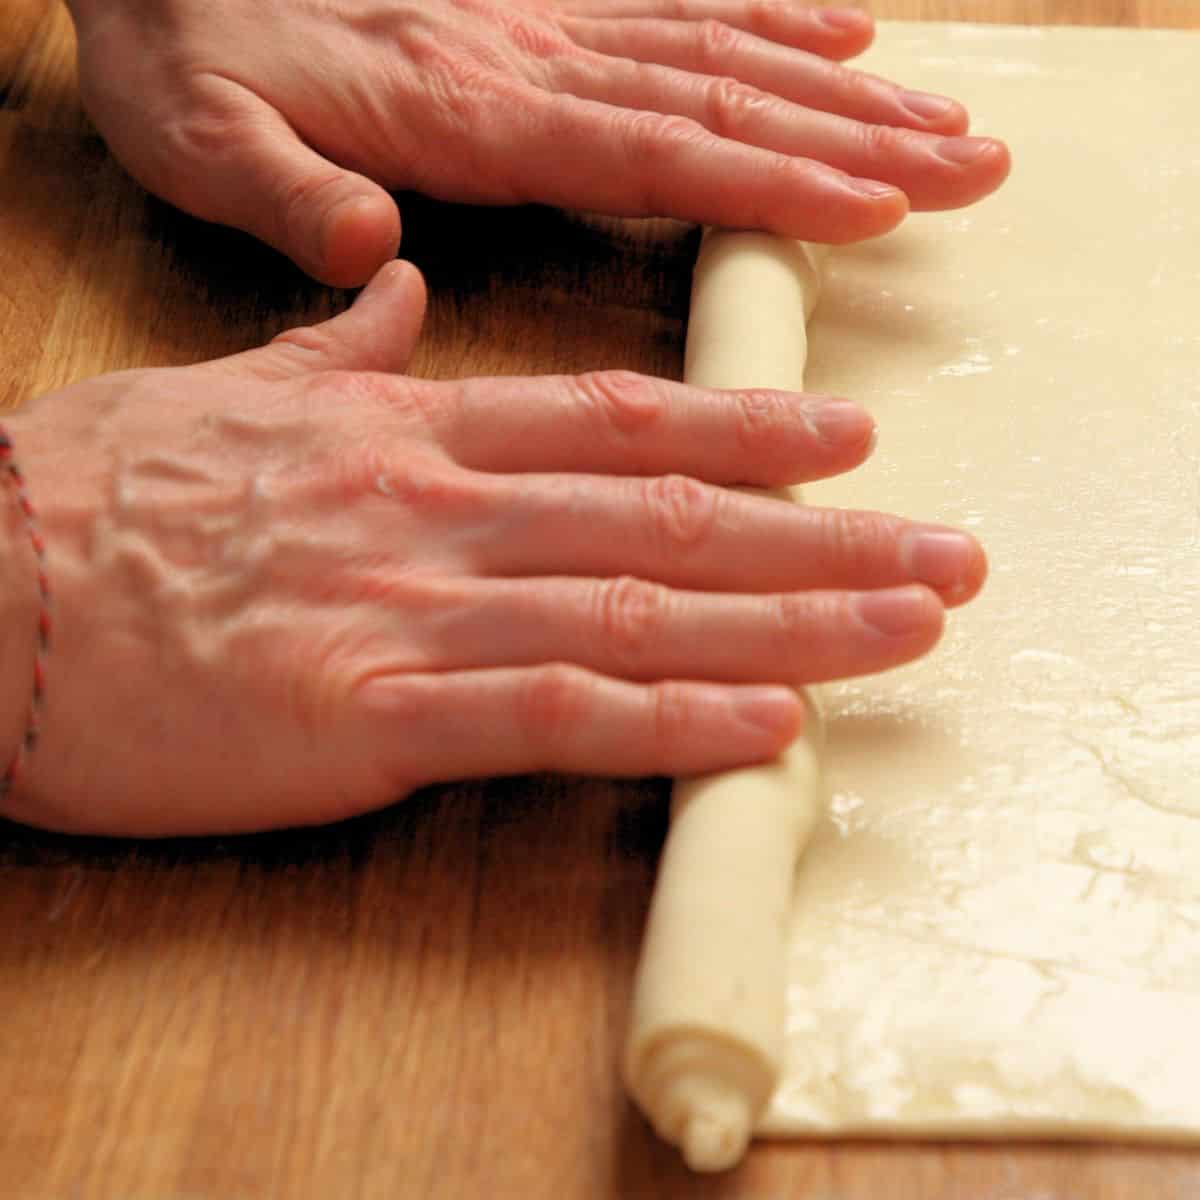
- Roll into a log - Once the dough is rolled and trimmed, tightly roll it up into a log shape. Pay special close attention to the first part of the roll that will form the bottom of the tarts. This log will be sliced into rounds that will form the tart shells.
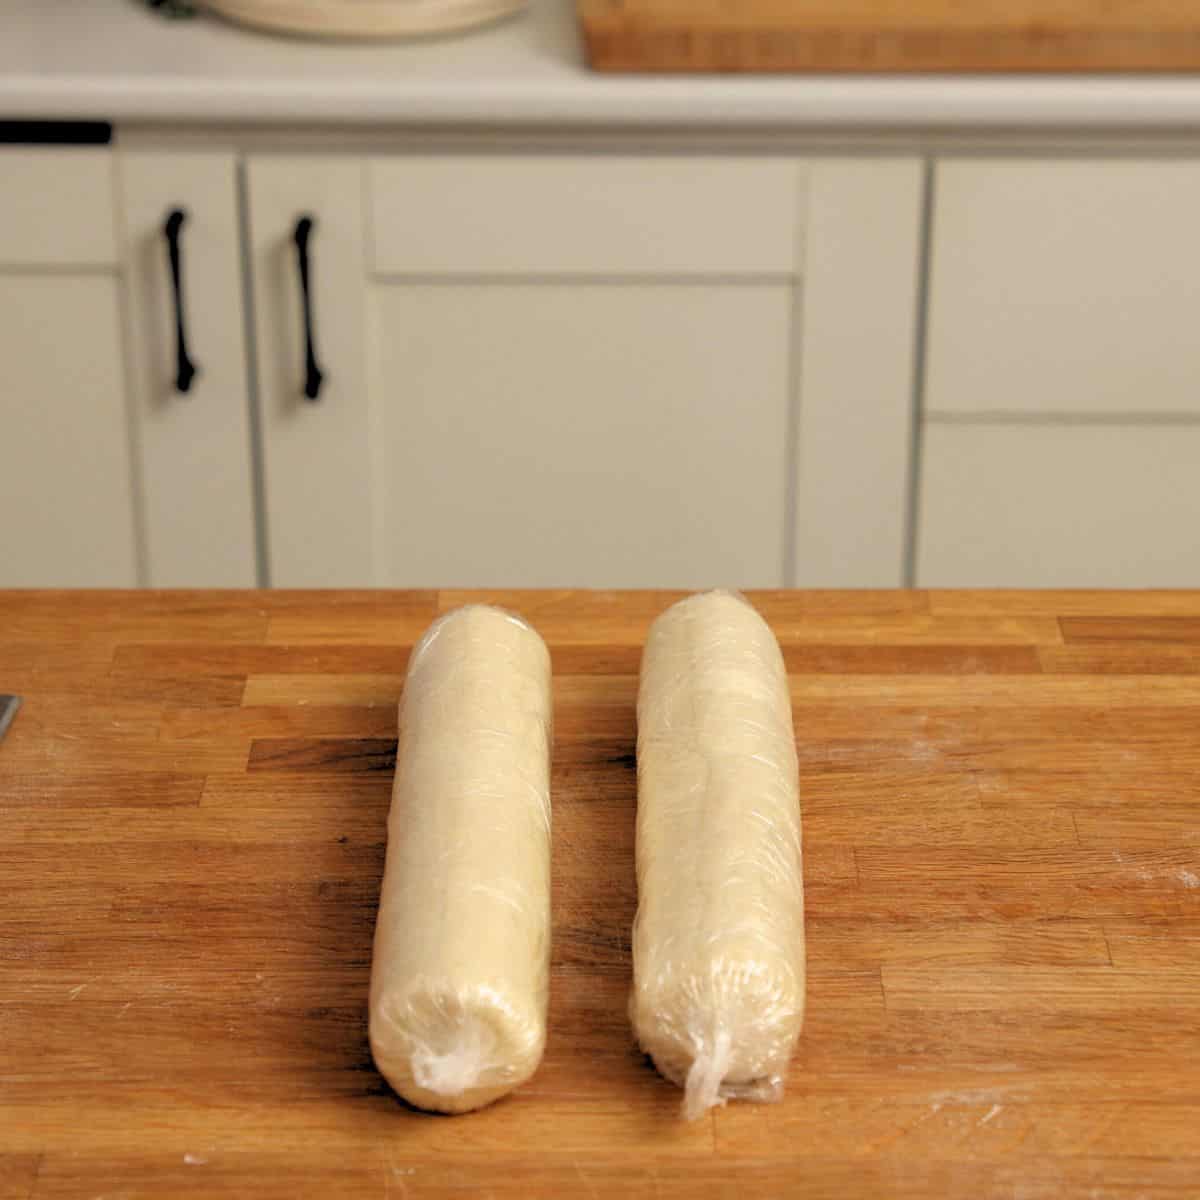
- Chil down - Wrap the log in plastic wrap and chill it in the fridge for at least 3 hours, or better, overnight. This resting period ensures the dough firms up and makes it easier to slice into rounds.
Baking the tarts
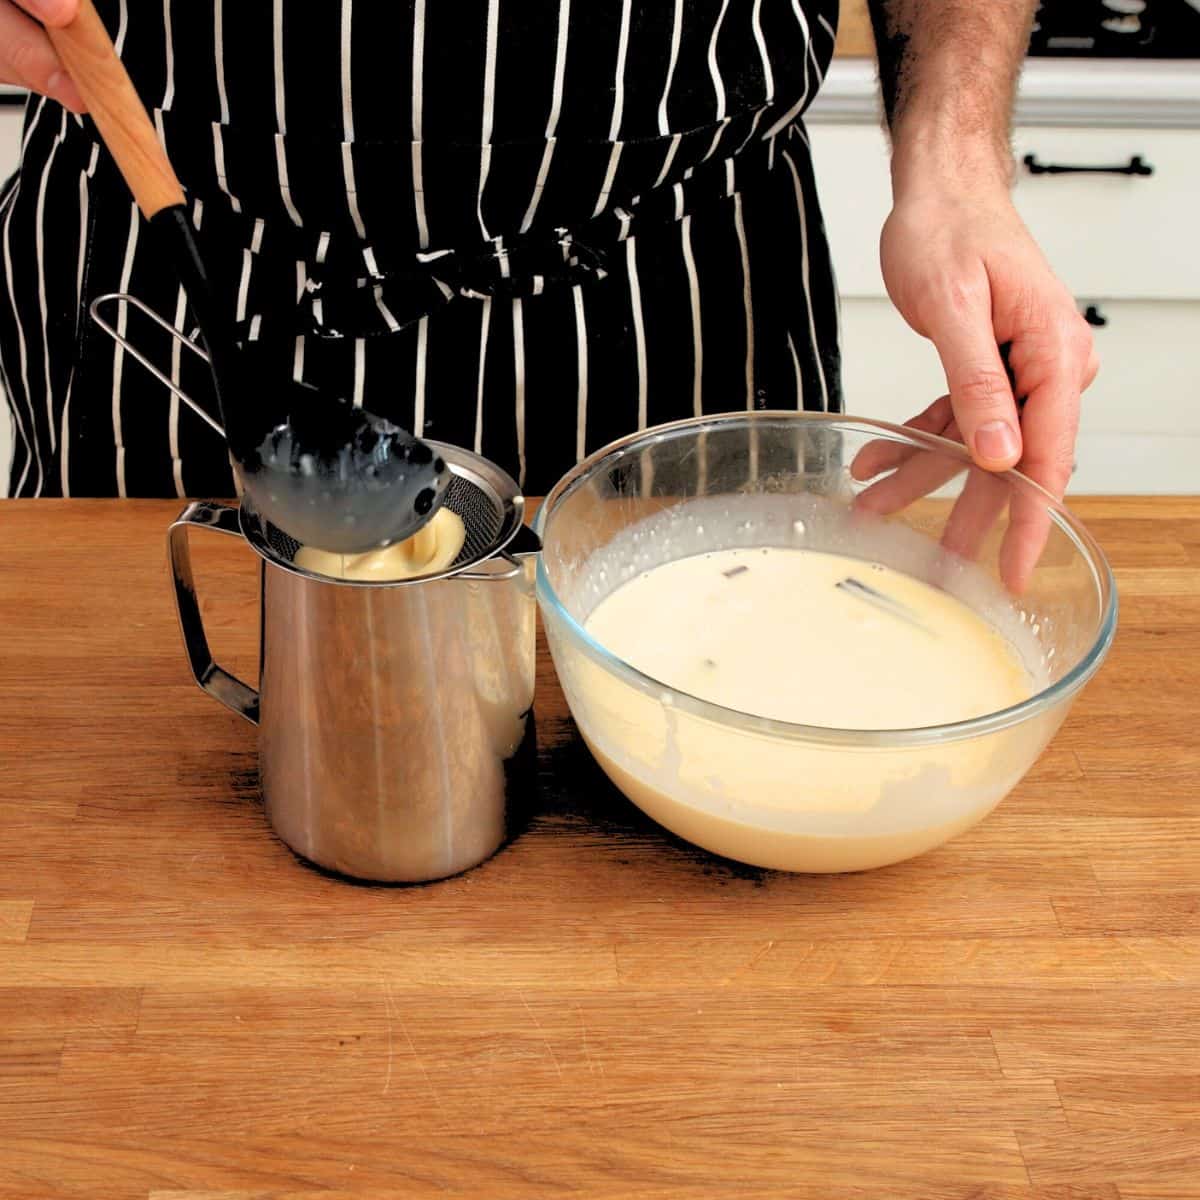
- Preheat oven and strain custard - Preheat your oven to 250°C / 482°F. While the oven heats up, strain the custard through a fine mesh sieve to remove any bits of egg or cinnamon, ensuring a smooth filling.
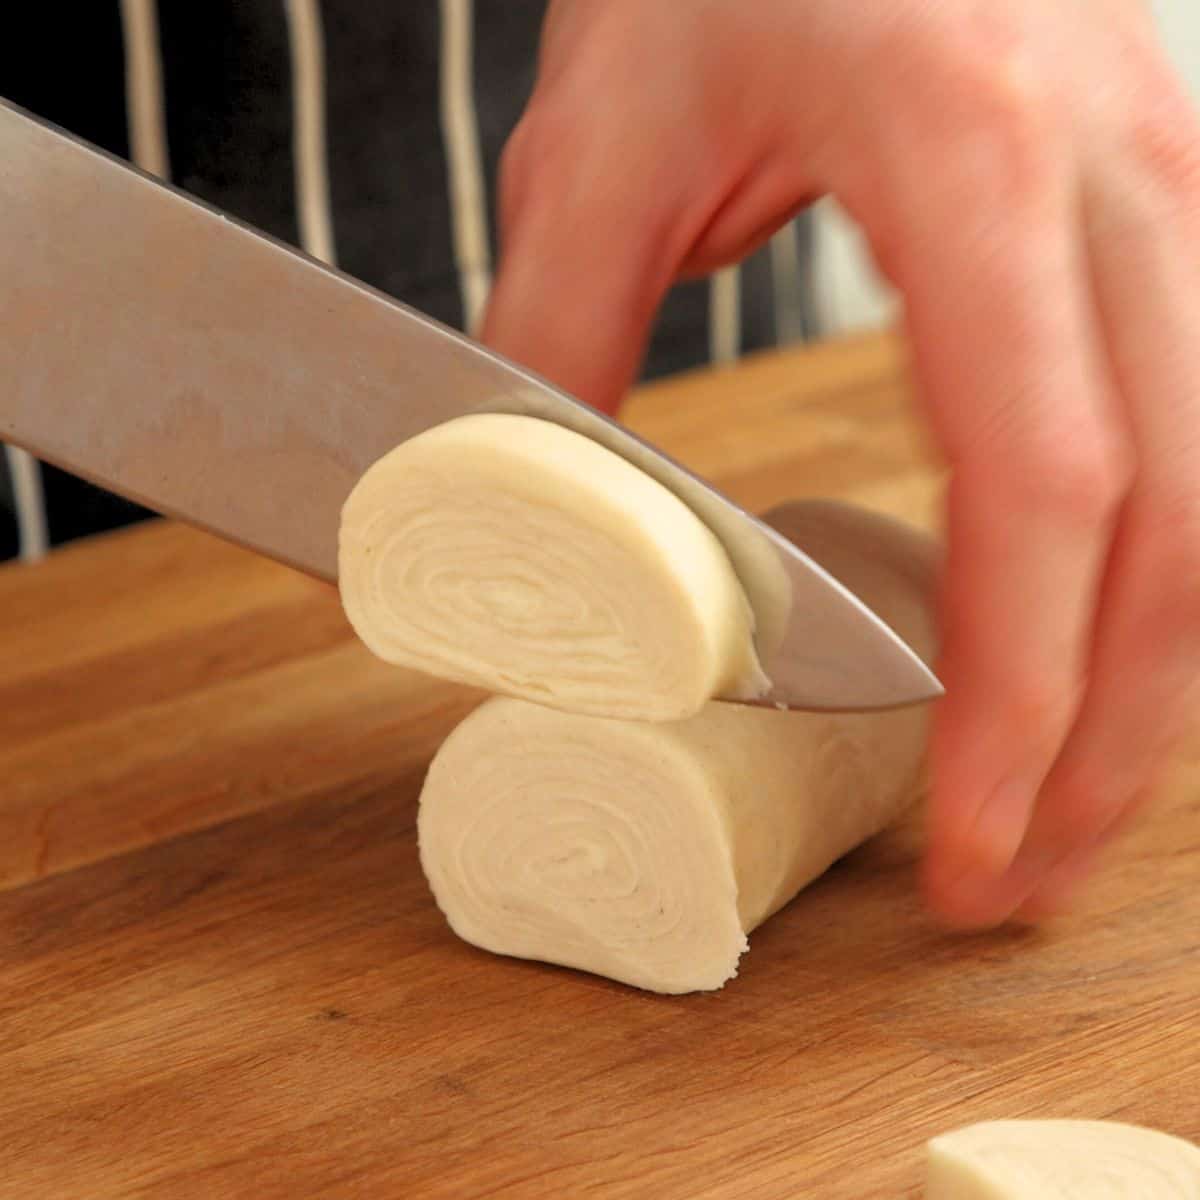
- Cut pastry - Slice the chilled pastry log into 1.5 cm (0.6 inch) rounds, ready for the tart molds.
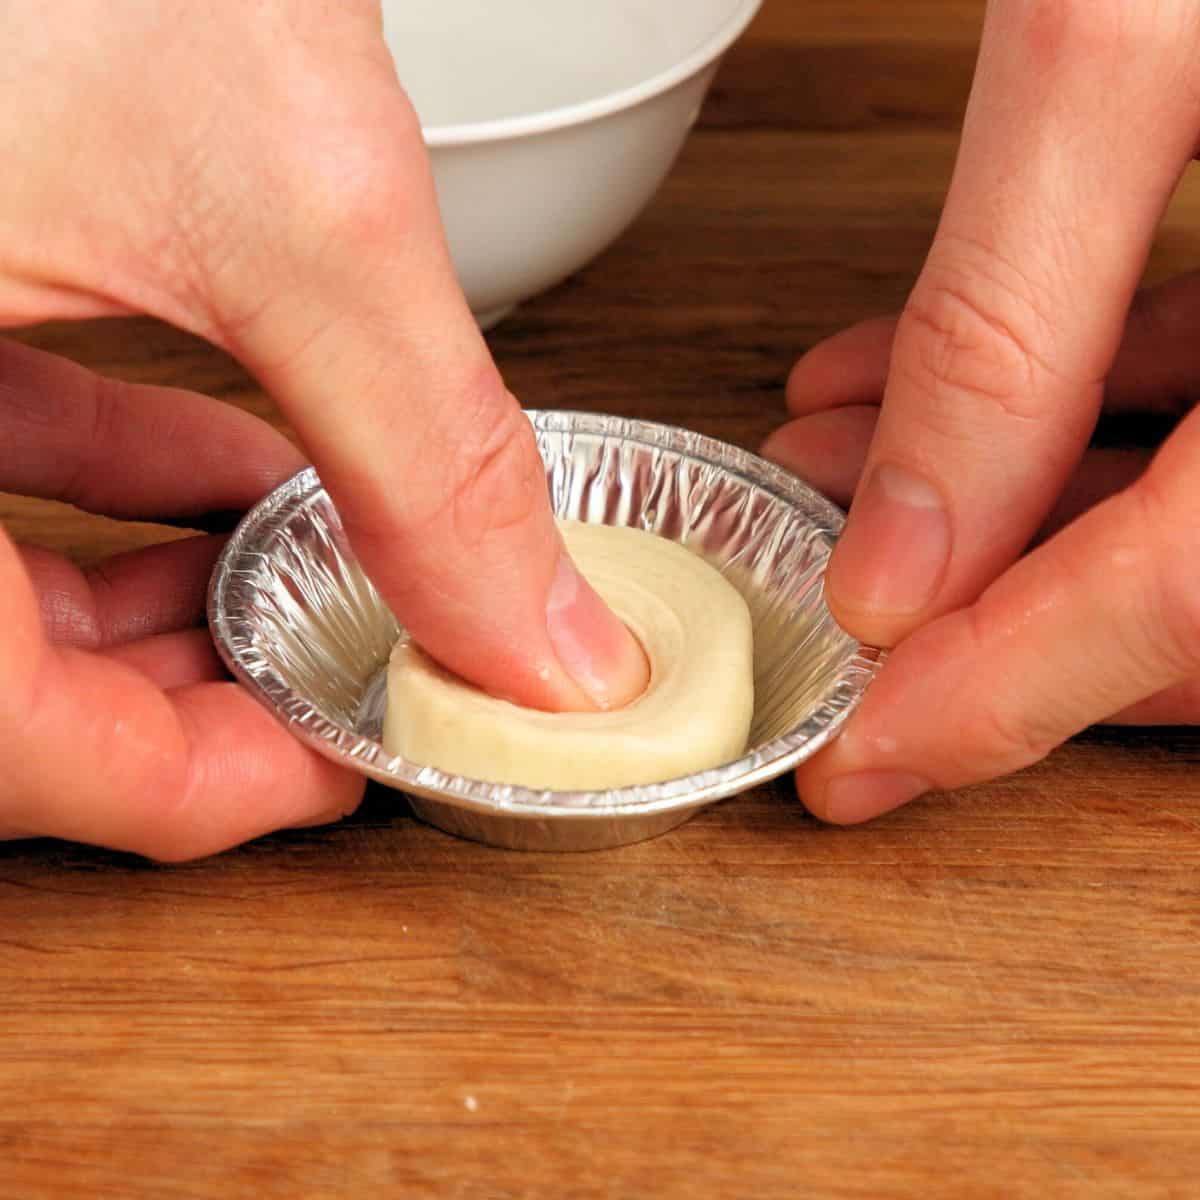
- Press down - Wet your thumbs with cold water and gently press the dough down into the center of the molds. Be careful not to make the bottom too thin.
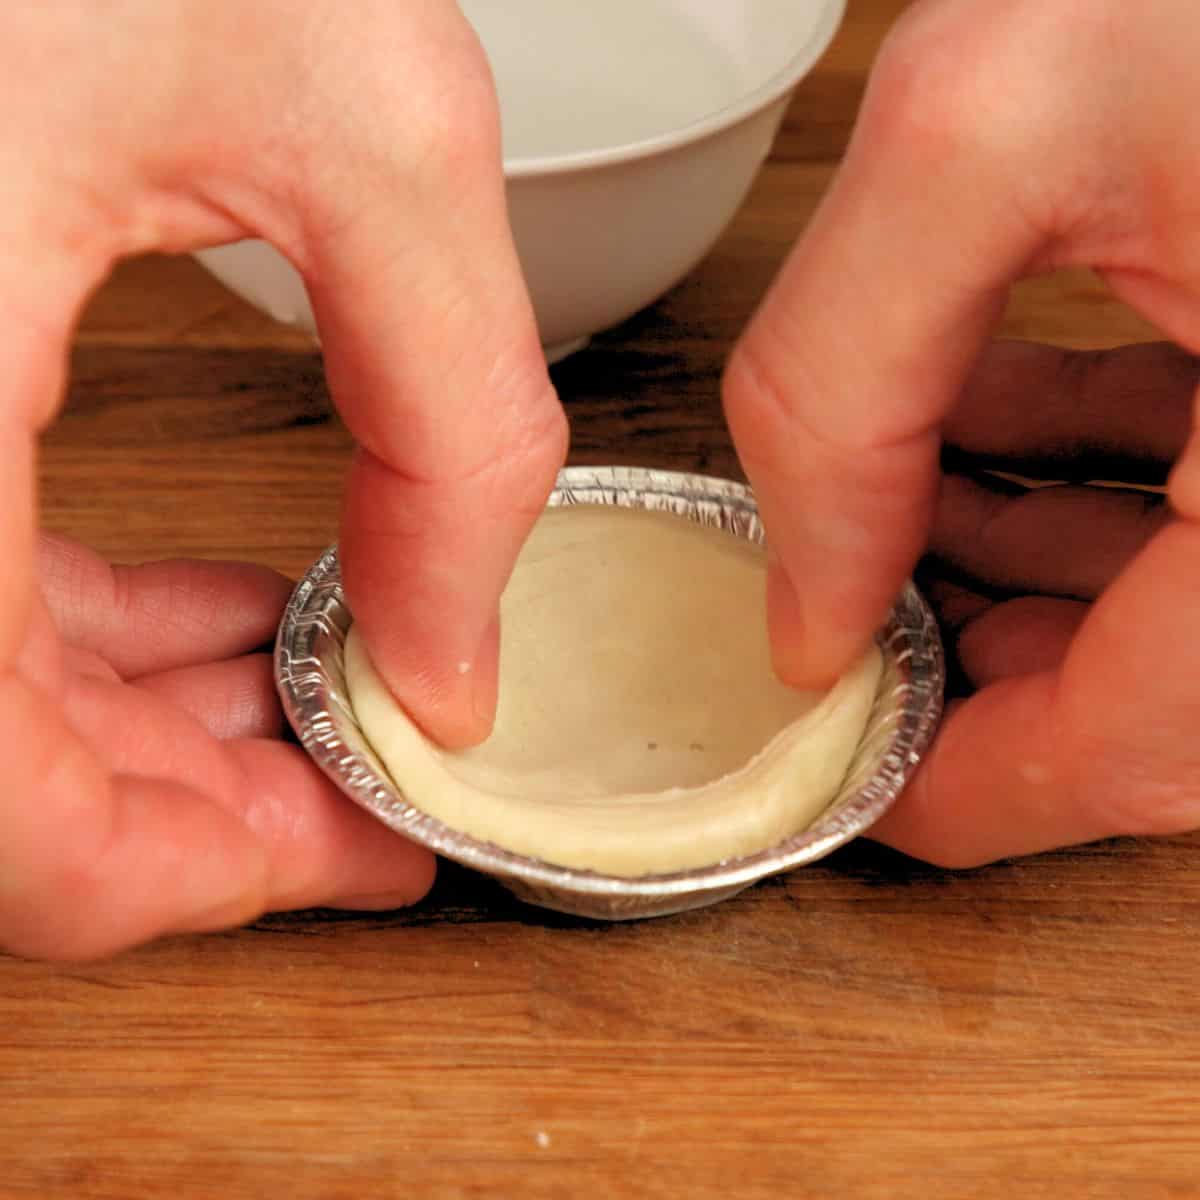
- Press out - Dip your thumbs into cold water again and work the pastry up the sides to form the tart shell in a smearing motion, taking care not to fuse the edges.
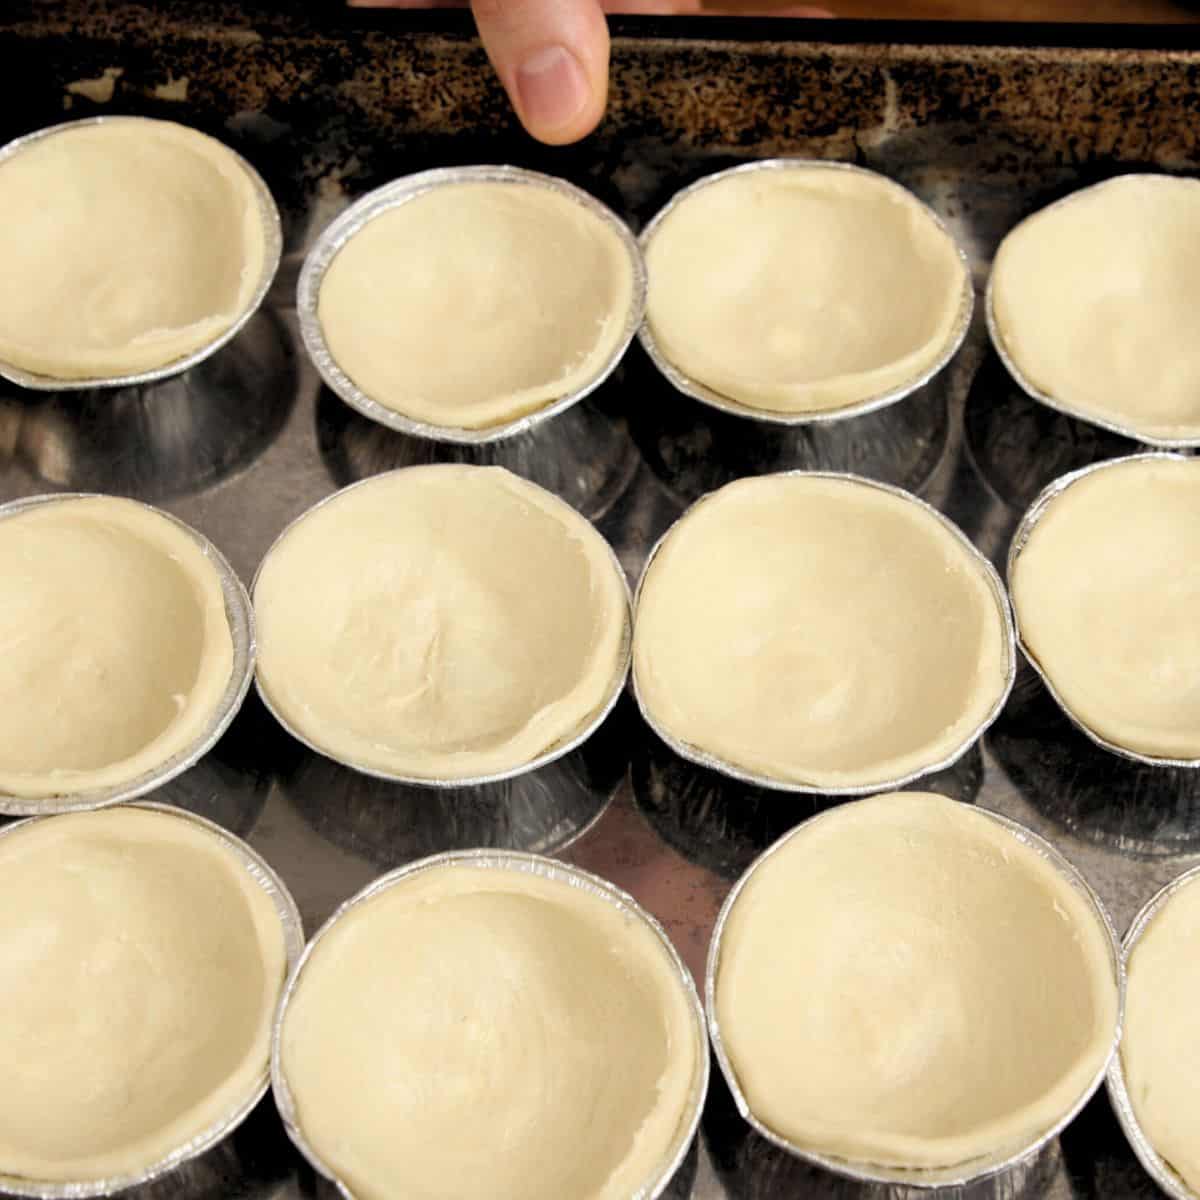
- Chill pastry - Place the tart shells into the fridge or freezer for a few minutes to cool down and firm up.
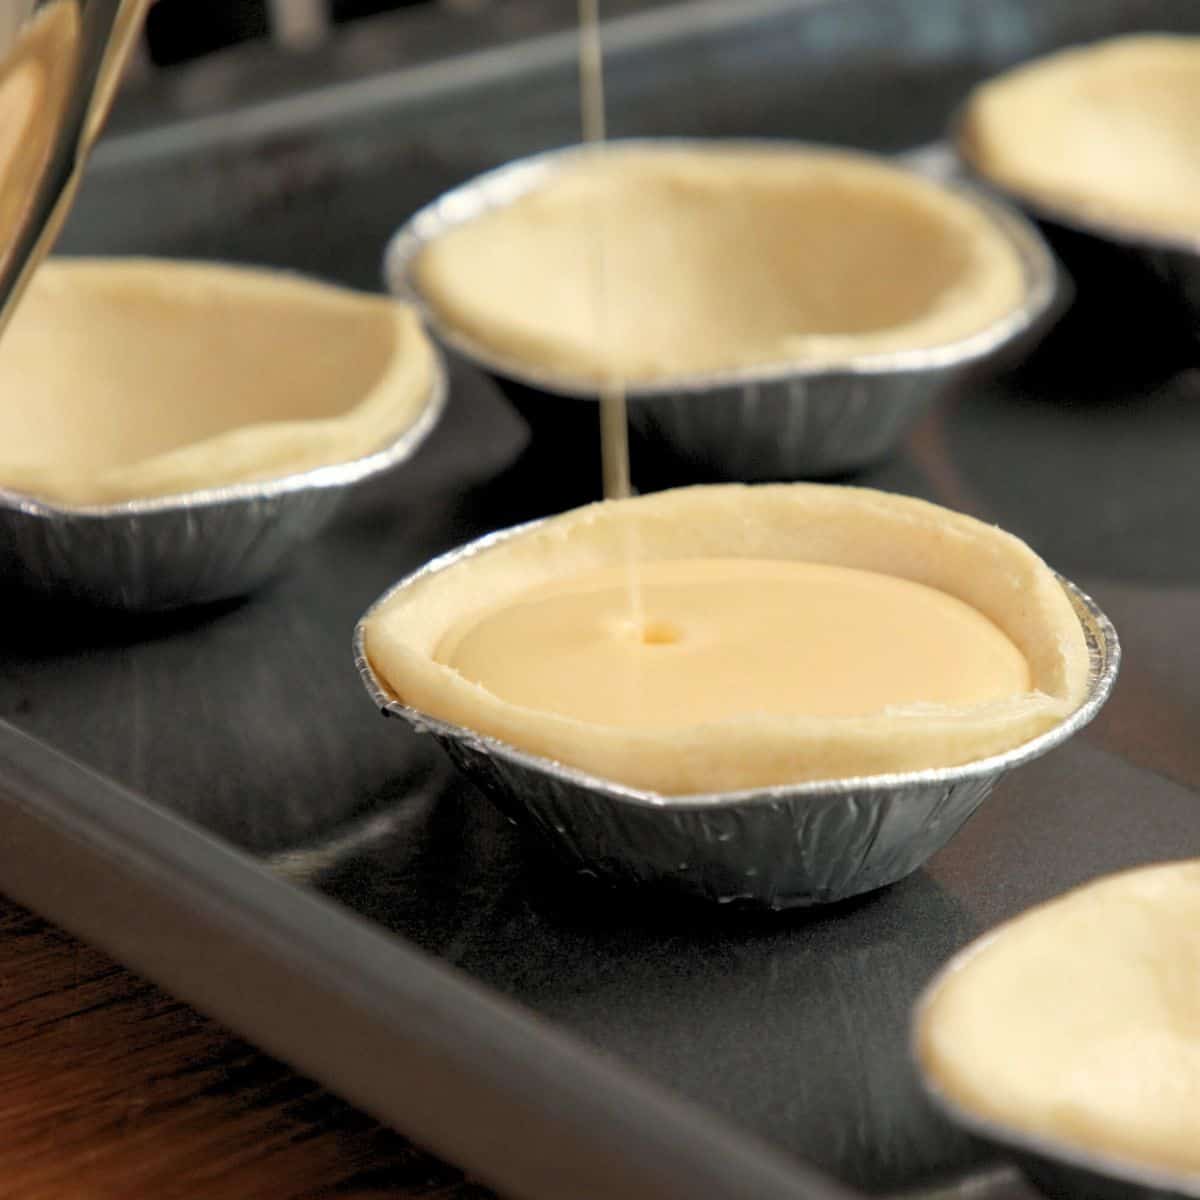
- Fill tarts and bake - Fill each tart shell with custard, about 85% full. Bake for 15 - 20 minutes or until the pastry is golden brown and the custard is blistered and shiny. Let it cool down for a few minutes before eating.
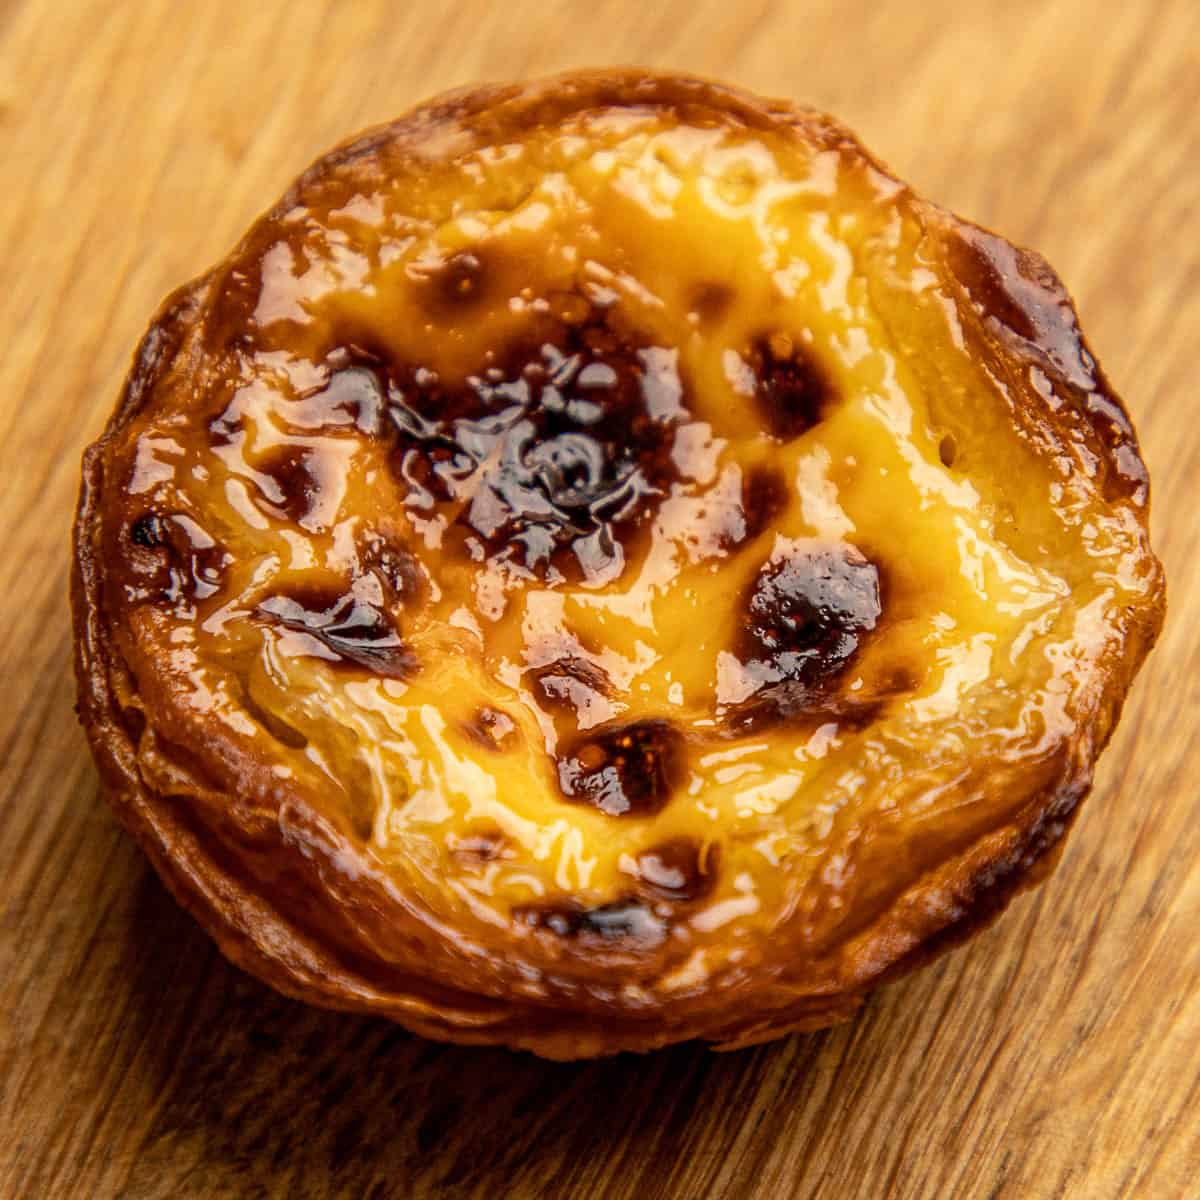
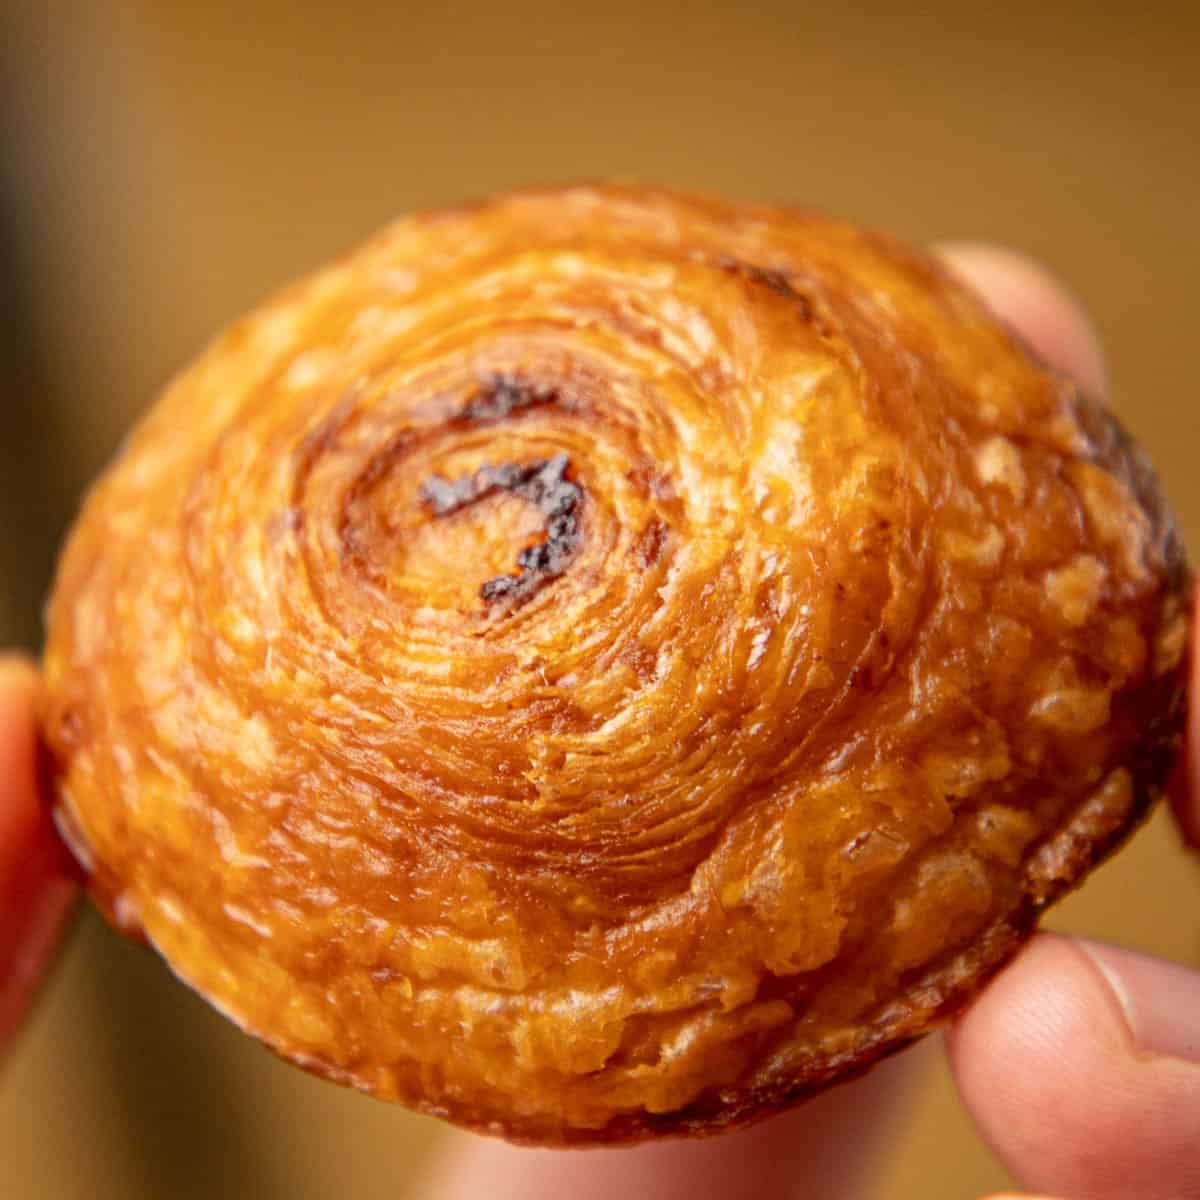
How they should look when baked
Once your tarts are baked, they should have that classic look and smell irresistible.
The perfect pastéis de nata should be golden brown and perfectly crisp all over, while the custard will have a shiny, blistered top.
They are traditionally sprinkled with a bit of cinnamon or icing sugar, but you can choose to have it or not. I prefer a tiny bit of cinnamon without the sugar as they are already sweet enough.

Tips for success
- Syrup Temperature - It's important to reach the correct temperature of 106°C (223°F). A kitchen thermometer is your best tool here.
- Cooking the Starch - When cooking the starch mixture, whisk constantly to prevent lumps.
- Pastry Temperature - Make sure the pastry is cold when working with it, especially during the laminating process. This helps the butter remain solid, which is key for achieving that flaky texture. The butter should be soft but not melted when spreading onto the dough.
- Tight Rolling of Logs - When rolling the dough into a log, make sure to roll tightly from the start. This ensures even layering, leading to a consistent flaky texture when baked.
- Straining the Custard - Always strain the custard before filling the pastry shells. This removes any bits of egg or spice, ensuring your custard is smooth and creamy.
- Using Cold Water When Forming the Shells - When shaping the tart shells, wet your thumbs with cold water. This will prevent the dough from sticking to your fingers and help you form a clean, smooth shell without tearing.
- Don't Overfill - Overfilling can cause the custard to spill over during baking.
- High-Temperature Baking - For the best result, bake at the highest temperature possible (around 250°C / 482°F). This allows the pastry to crisp up quickly and ensures the custard develops a beautiful, caramelized blistered top.
- Cooling Down Before Eating - Let the tarts cool for a few minutes before eating. They come out of the oven extremely hot and can burn your mouth. After about 10 minutes, they will be perfect.
Common problems and how to fix them
- Lumpy Custard - Gradually add the hot milk mixture to egg yolks while whisking continuously to avoid lumps.
- Overbaked or Burnt Pastry - Use the correct oven setting and monitor closely. Avoid using the grill or broiler setting.
- Underbaked or Soggy Pastry - Bake at a high temperature, and turn the oven tray halfway through cooking. If they need more time, bake them for longer.
- Filling Overflow - Fill tart shells no more than 85% to prevent spillage during baking.
- Difficulty Shaping Pastry - Rest the dough in the fridge for 15-20 minutes before shaping to help it hold its form. Always wet your thumbs with cold water to prevent sticking.
- Uneven Baking (Burnt Tops or Bottoms) - Use the middle rack and ensure the oven has even heat. Avoid top-only or bottom-only heat settings. Remember to turn the tray as most ovens have hot and cold spots.
- Oven Temperature - If your oven only reaches 220°C (428°F) like mine, bake for a little longer to achieve the desired crispiness and blistered custard look. Use an oven thermometer to check the true temperature of your oven.
Substitutions and variations
- Lactose-free - Use lactose-free dairy products in place of regular dairy.
- Without cream - Nata means cream, which is in the original recipe, but you can make it a touch lighter by replacing it with milk.
- Chocolate - You can either add cocoa powder to the custard or small chocolate buttons just before baking. Make sure they do not stick out, as they will burn.
- Puff pastry - Use ready-made puff pastry instead of this pastéis pastry. Roll the dough thinner then butter and roll into a log.
Equipment
Pastéis de nata have their own special tart molds. You can also use disposable aluminum tart molds like I did in this recipe.
If you only have a muffin tin you can bake them in that.
Storage and reheating
Storage - Store your custard tarts at room temperature for up to 2 days in an airtight container to keep the pastry crisp. If you need to store them longer, refrigerate them for up to 5 days. The custard will remain smooth and creamy, but the pastry may soften a bit.
Freezing - You can freeze these, but the pastry may lose some of its crispness. To freeze, wrap the cooled tarts tightly in plastic wrap or place them in a freezer-safe container. They can be stored in the freezer for up to 1 month. When ready to eat, thaw at room temperature or gently reheat in the oven directly from the freezer.
Reheating - To restore the crispiness of the pastry, reheat in a preheated oven at 350°F (175°C) for about 5 minutes. This will help crisp up the pastry while keeping the custard smooth and creamy. Do not microwave them.
FAQ
While they are similar, pastéis de Belém refers to the specific version made at the Pastéis de Belém bakery in Lisbon, which has been serving this pastry since 1837. Pastéis de nata is the general term for the pastry, which can be made and sold in bakeries worldwide. The Lisbon version is considered the original, with its closely guarded recipe.
Yes, but the pastry will likely lose some of its crispy texture once thawed. To freeze, wrap them tightly in plastic wrap or place them in a freezer-safe container. When ready to eat, thaw at room temperature or reheat in the oven at 350°F (175°C) for about 5 minutes to restore some crispiness.
Pastéis de Nata is the plural form, and Pastel de Nata is the singular. Both refer to the same Portuguese custard tart.
Traditionally, they are enjoyed as a mid-morning snack with coffee in Portugal. They are also commonly served as dessert after lunch or dinner, and some enjoy them paired with a glass of Port wine for an indulgent treat.
More dessert recipes
Recipe

Pastéis De Nata - Authentic Portuguese Custard Tarts (Video)
Ingredients
For the Custard
- 225 grams (1 ¼ cups) sugar
- 110 grams (½ cups) water
- ½ (½) lemon - peel only
- 2 (2) cinnamon sticks
- 2 grams (½ teaspoon) vanilla extract
- 165 grams (⅔ cups) double cream
- 400 grams (1 ⅔ cups) whole milk
- 25 grams (3 tablespoon) cornstarch - known as cornflour in the UK
- 120 grams (6 each) egg yolks - from 6 eggs
Instructions
Making The Custard
- Make the syrup - In a saucepan, combine sugar, water, vanilla, cinnamon sticks, and lemon peel. Bring to a boil over medium heat, stirring occasionally. Once the syrup reaches 106 °C or 223 °F, remove it from the heat and set aside to cool.225 grams sugar, 110 grams water, ½ lemon, 2 cinnamon sticks, 2 grams vanilla extract
- Cook the starch - In a separate saucepan, combine milk, double cream, and cornstarch. Whisk the mixture continuously over medium heat until it starts to bubble and thicken, ensuring there are no lumps. Once it begins to thicken, remove it from the heat.165 grams double cream, 400 grams whole milk, 25 grams cornstarch
- Mix with egg - Separate the egg yolks into a bowl and whisk them lightly. Gradually pour the hot starch mixture into the egg yolks while continuously whisking to temper the eggs and avoid curdling. Add the syrup and whisk to combine.120 grams egg yolks
- Chill and infuse - Cover the custard with plastic wrap, ensuring the wrap touches the surface of the custard to prevent a skin from forming. Allow the custard to chill in the fridge overnight to let the flavors infuse and the texture set. If you are short on time strain through a sieve straight away.
Making The Pastry
- Soften butter - Place the butter in a warm place to soften it. It should be pliable but not melted, which will make it easier to laminate the dough later.280 grams butter
- Prep dough - n a mixing bowl, combine the flour, salt, and water to form a dough. Mix until smooth, then cover the dough with a damp cloth and let it rest for about 30 minutes. This step helps hydrate the dough, making it easier to work with.310 grams flour, 3 grams salt, 200 grams water
- Roll out - After the dough has rested, roll it out on a lightly floured surface into a 40 cm x 50 cm (16-inch x 17-inch) rectangle. Focus on making it thin but not too fragile, about 3 credit card thickness.
- Spread with butter -Spread ⅕th of the softened butter evenly over two-thirds of the dough. Leave the top third unbuttered.
- Letter fold - Fold the unbuttered third of the dough over the buttered portion, then fold the other third on top to form a letter fold. This step creates the layers of butter and dough that will turn into the signature flaky texture.
- Repeat - Roll the dough out again and repeat the buttering and folding process. Roll it out, spread the butter, and letter fold it. If your kitchen is hot move the pastry to the fridge for 10 minutes between steps so that the butter does not melt out.
- Long roll - Once the dough has been folded twice, roll it out into a 20cm x 45cm (8 by 18 inches) rectangle. Spread another layer of butter over two-thirds of the dough.
- Fold and chill - Fold the dough into thirds just like the previous times, making sure each layer is well-buttered. Then, cover it with plastic wrap and chill in the fridge for at least 30 minutes to firm up.
- Roll out and butter - After chilling, roll the dough out again into a 40cm x 50cm (16-inch x 17-inch) rectangle and spread the remaining butter evenly over the surface. This step gives the dough its final butter layer.
- Trim edges - Trim the edges of the dough to create a clean, even rectangle. Save the trim in the freezer for other uses.
- Roll into a log - Once the dough is rolled and trimmed, tightly roll it up into a log shape. Pay special close attention to the first part of the roll that will form the bottom of the tarts. This log will be sliced into rounds that will form the tart shells.
- Chill down - Wrap the log in plastic wrap and chill it in the fridge for at least 3 hours, or better, overnight. This resting period ensures the dough firms up and makes it easier to slice into rounds.
Baking The Tarts
- Preheat oven and strain custard - Preheat your oven to 250°C / 482°F. While the oven heats up, strain the custard through a fine mesh sieve to remove any bits of egg or cinnamon, ensuring a smooth filling.
- Cut pastry - Slice the chilled pastry log into 1.5 cm (0.6 inch) rounds, ready for the tart molds.
- Press down - Wet your thumbs with cold water and gently press the dough down into the center of the molds. Be careful not to make the bottom too thin.
- Press out - Dip your thumbs into cold water again and work the pastry up the sides to form the tart shell in a smearing motion, taking care not to fuse the edges together.
- Chill pastry - Place the tart shells into the fridge or freezer for a few minutes to cool down and firm up.
- Fill tarts and bake - Fill each tart shell with custard, about 85% full. Bake for 15 - 20 minutes or until the pastry is golden brown and the custard is blistered and shiny. Let it cool down for a few minutes before eating.
Video
Notes
- Syrup Temperature - It's important to reach the correct temperature of 106°C (223°F). A kitchen thermometer is your best tool here.
- Cooking the Starch - When cooking the starch mixture, whisk constantly to prevent lumps.
- Pastry Temperature - Make sure the pastry is cold when working with it, especially during the laminating process. This helps the butter remain solid, which is key for achieving that flaky texture. The butter should be soft but not melted when spreading onto the dough.
- Tight Rolling of Logs - When rolling the dough into a log, make sure to roll tightly from the start. This ensures even layering, leading to a consistent flaky texture when baked.
- Straining the Custard - Always strain the custard before filling the pastry shells. This removes any bits of egg or spice, ensuring your custard is smooth and creamy.
- Using Cold Water When Forming the Shells - When shaping the tart shells, wet your thumbs with cold water. This will prevent the dough from sticking to your fingers and help you form a clean, smooth shell without tearing.
- Don't Overfill - Overfilling can cause the custard to spill over during baking.
- High-Temperature Baking - For the best result, bake at the highest temperature possible (around 250°C / 482°F). This allows the pastry to crisp up quickly and ensures the custard develops a beautiful, caramelized blistered top.
- Cooling Down Before Eating - Let the tarts cool for a few minutes before eating. They come out of the oven extremely hot and can burn your mouth. After about 10 minutes, they will be perfect.
- Storage - Store your custard tarts at room temperature for up to 2 days in an airtight container to keep the pastry crisp. If you need to store them longer, refrigerate them for up to 5 days. The custard will remain smooth and creamy, but the pastry may soften a bit.
- Freezing - You can freeze these, but the pastry may lose some of its crispness. To freeze, wrap the cooled tarts tightly in plastic wrap or place them in a freezer-safe container. They can be stored in the freezer for up to 1 month. When ready to eat, thaw at room temperature or gently reheat in the oven directly from the freezer.
- Reheating - To restore the crispiness of the pastry, reheat in a preheated oven at 350°F (175°C) for about 5 minutes. This will help crisp up the pastry while keeping the custard smooth and creamy. Do not microwave them.

Carlos says
What size tin do you use?
Charlé Visser says
Standard Pastéis de Nata tins measure 2.75 to 2.95 inches (7.0 to 7.5 cm) across the top, 1.25 to 1.6 inches (3.2 to 4.1 cm) at the base, and 1.0 to 1.2 inches (2.5 to 3.0 cm) in height.
Suri says
This Pastéis De Nata recipe is the one to follow if you want to eat the one's you get in Lisbon. Right amount of sweetness and easy to make. I made around 34, it depends how long you roll your pastry. Took them to a friend's house party, all were gone and everyone loved it.
Karin says
Do you roll into log from short side or long side
Charlé Visser says
From the short side.
ANITA says
Hi Charlie,
As I plan to bake half portion of the egg tart each time, can I just reduce the custard recipe by half?
Charlé Visser says
Sure thing
Anita says
Do we need to turn the dough before we do the next fold?
Charlé Visser says
yes
JDS says
I am Portuguese and can say these are probably the most authentic recipe I ever tried. They are almost identical to the ones in Lisbon. They are even a little less sweet which I didn’t know was possible.