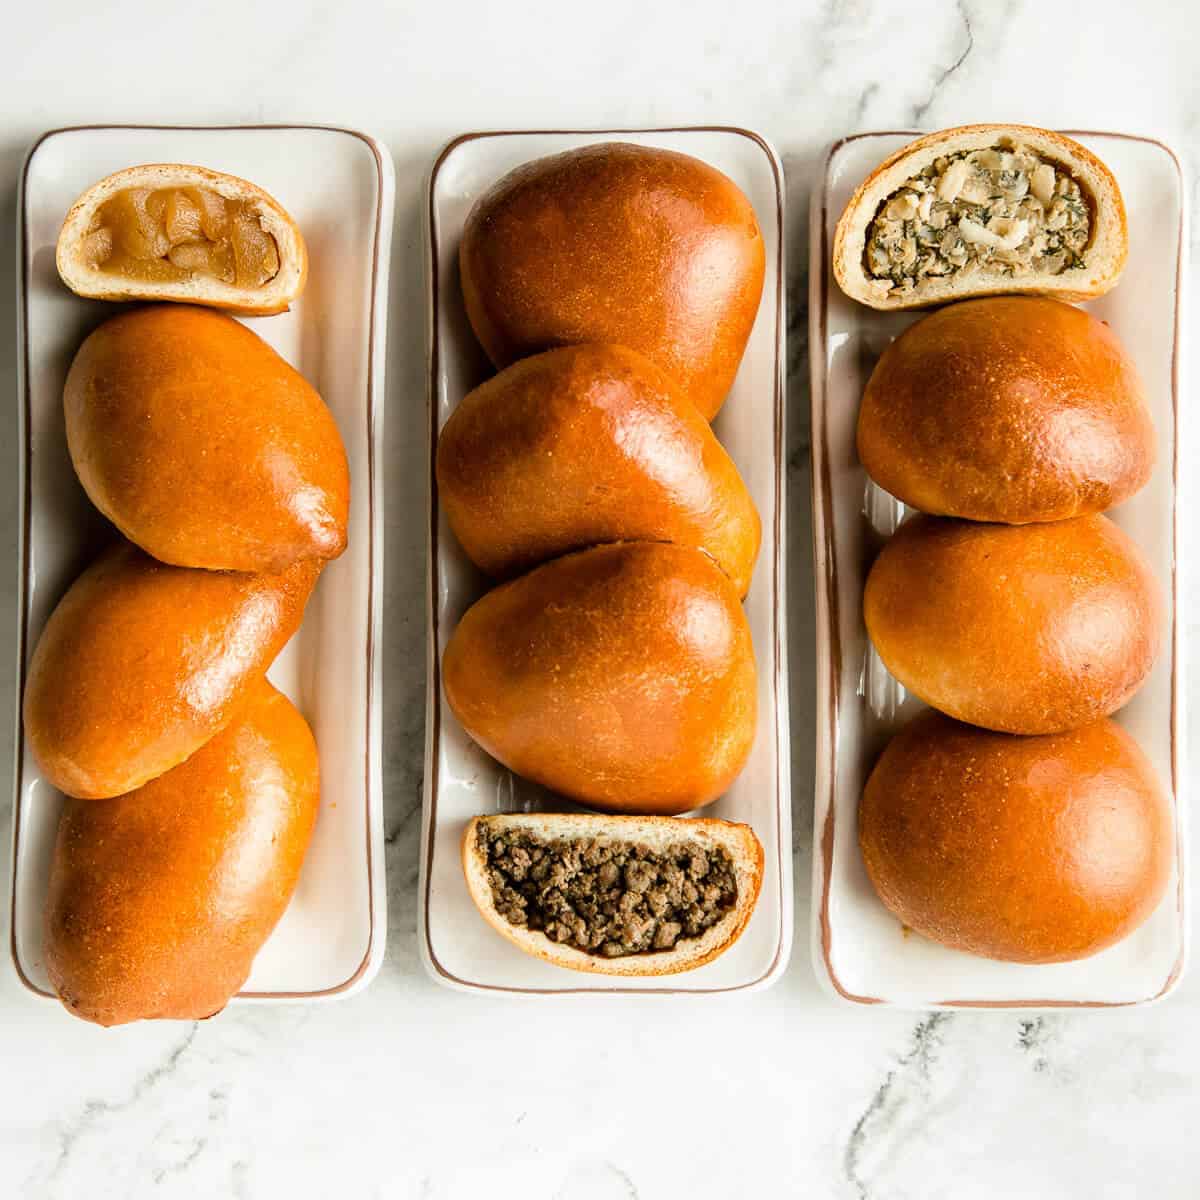
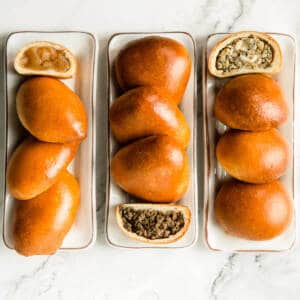
Pirozhki or пирожки are traditional small hand pies. Along with Borodinsky bread and medovik(honey cake), they are some of the most popular Russian foods.
Pirozhki consists of a filling encased in a soft and fluffy yeasted dough. Fillings can either be sweet or savoury, and the pies are either baked or fried.
The best pirozhki have plenty of filling encased in a very thin layer of fluffy buttery bread. It should also be no bigger than two or three bites. Perfect for a snack or appetizer.
Jump to:
- Baked or fried
- What type of dough is best?
- Pirozhki dough ingredients
- Meat pirozhki ingredients
- Cabbage pirozhki ingredients
- Apple pirozhki ingredients
- Making the dough
- Meat pirozhki
- Cabbage pirozhki
- Apple pirozhki
- Video
- Tips for success
- Alternative pirozhki fillings
- Storage instructions
- Frequently asked questions
- Useful equipment
- Related recipes
- Recipe
- Comments
Baked or fried
There is no right or wrong way to cook pirozhki.
Baked is my favourite, and it's also the way famous restaurants like Dr. Zhivago and Café Pushkin serves it.
Baked is slightly healthier and lighter than fried, although one could argue that fried is more home style. Most likely how a babushka(grandmother) might cook them.
This pirozhki recipe can be baked or fried. Both make amazing little pies.
Fillings come in many flavours, but the dough stays the same.
What type of dough is best?
Pirozhki dough, like the fillings, can vary.
Sometimes puff pastry or other flaky, high butter content variants are used.
Most often used and also the most traditional dough is a demi brioche.
Meaning, it's a mix between classic brioche(enriched with eggs and butter) and regular white bread(contains no eggs or butter).
Although pirozhki can be made with sourdough starter, it's best to use active dry yeast or fresh yeast, especially for the average home cook.
Pirozhki dough ingredients
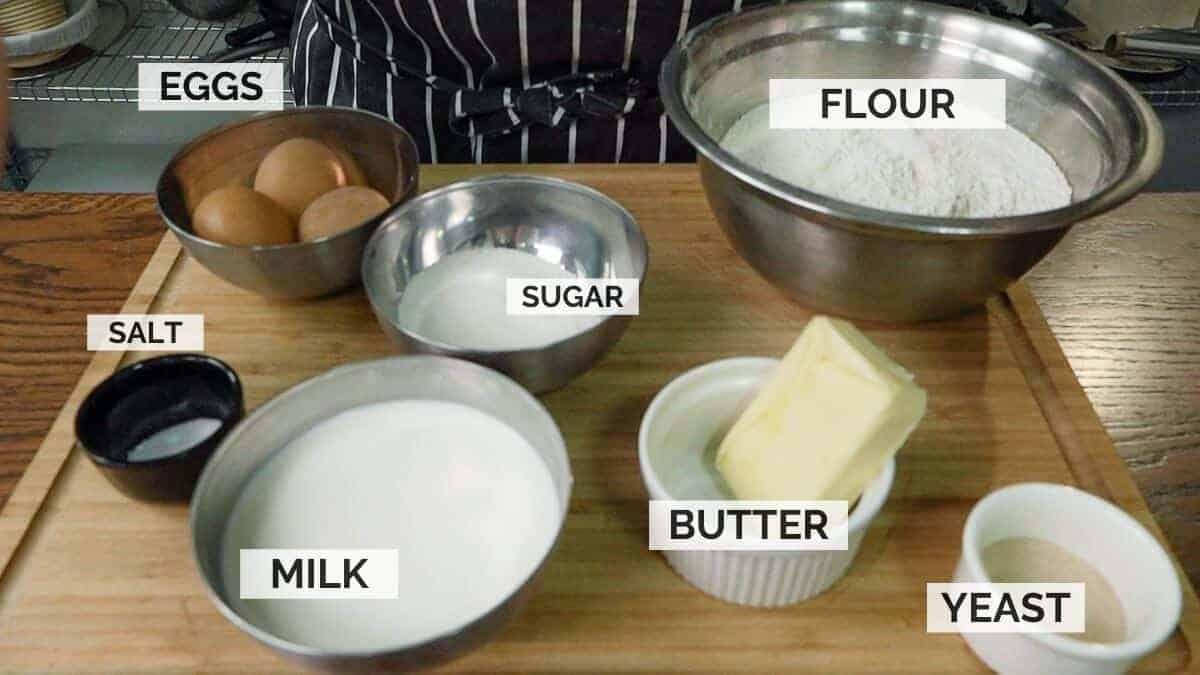
- Flour - White bread flour or all-purpose flour.
- Yeast - Dried yeast or fresh yeast. If using fresh, double the amount.
- Sugar - Regular white sugar. The dough is quite sweet, and it should be like that.
- Salt - Fine sea salt works best. Don't use coarse or flaky salt, as it won't dissolve well.
Meat pirozhki ingredients

- Liver - I used turkey liver, but feel free to use chicken or simply replace it with more meat if you don't like the flavour.
- Beef - I mince my own chuck. Use whatever cut or type of meat you want.
- Hearts - Optional like the liver, but it adds a ton of flavour.
- Aromatics - Keeping it simple with onion and garlic. You can spice it up if you want.
Cabbage pirozhki ingredients

- Cabbage - White cabbage of any kind. Green cabbage and red cabbage does not work well.
- Aromatics - Onion and garlic. Keep the flavours simple.
- Extras - Boiled eggs and dill. Use hard-boiled eggs.
Apple pirozhki ingredients
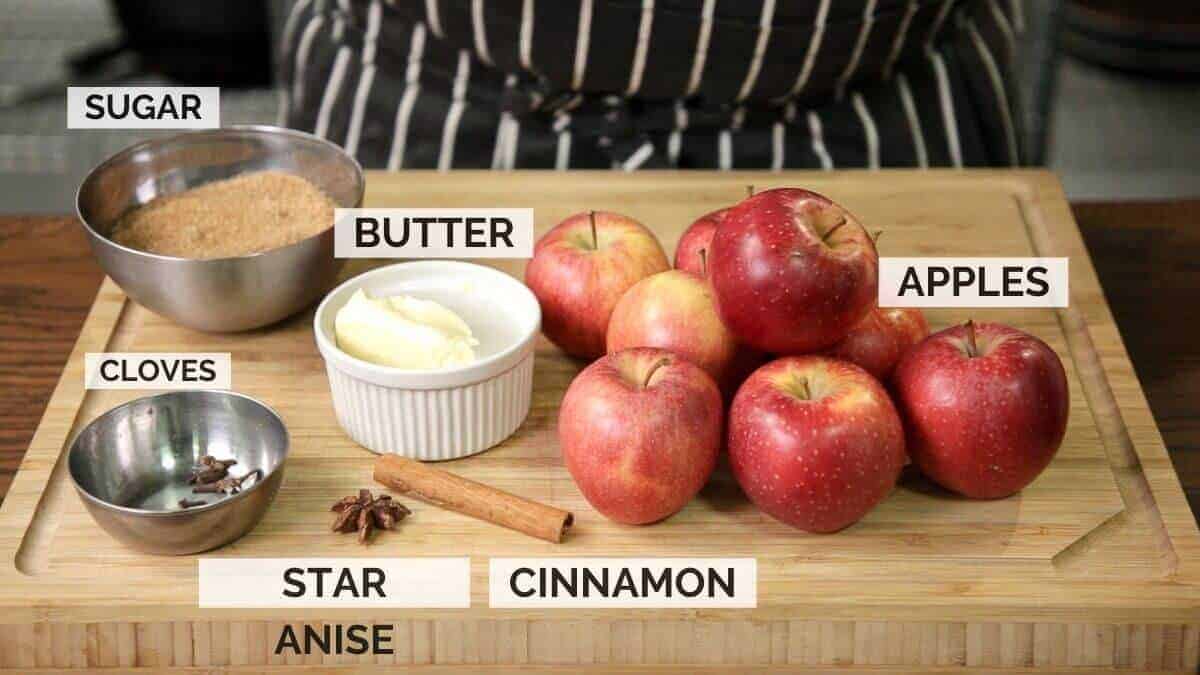
- Apples - I used pink lady apples, but you can use granny smith or golden delicious too.
- Spices - These are optional but highly recommended. Classic apple spices like clove, cinnamon and star anise.
Making the dough
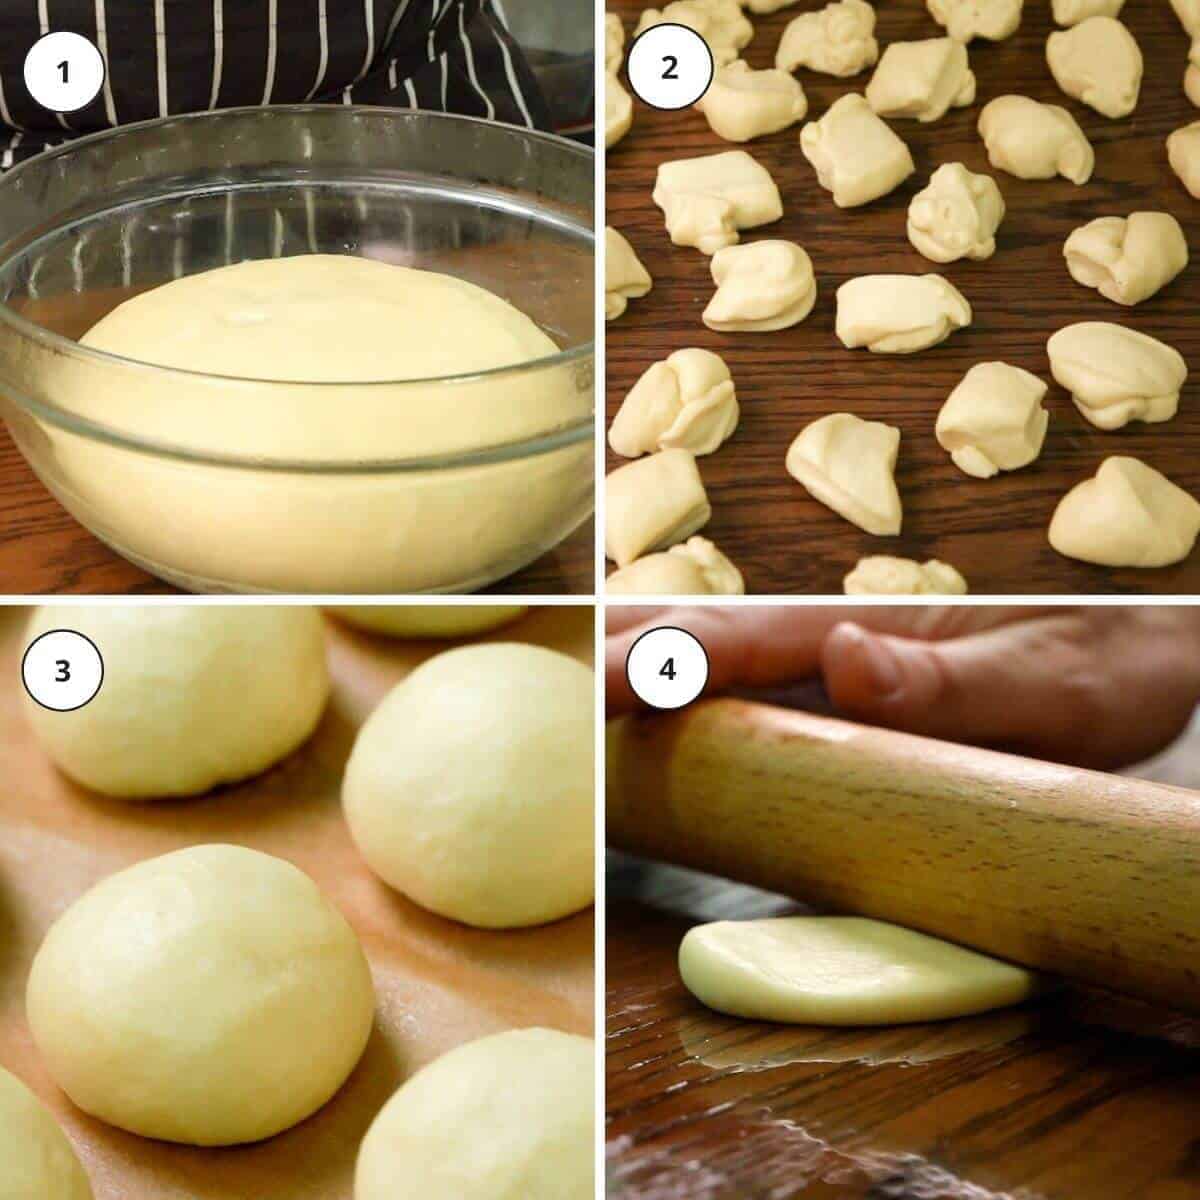
- Mix the dry and wet ingredients for 10 minutes on medium speed in your kitchen aid stand mixer or whatever mixer you have.
- Add the butter bit by bit and blend another 5 minutes until the dough is elastic and smooth. Place in a bowl covered with a damp cloth to either rise overnight in the fridge or for 2 hours at room temperature.
- When ready, deflate the dough and divide into 30 gram portions. Let the dough rest for 5 minutes to relax the gluten and roll into round balls. Cover and rest for another 10 minutes.
- When you are ready to use it, roll the balls out thinly. Ready to wrap around the filling of your choice.
- Make a simple egg wash by blending 1 egg with 50 millilitres of milk. We use this to spray or brush onto the pirozhki just before baking.
Meat pirozhki
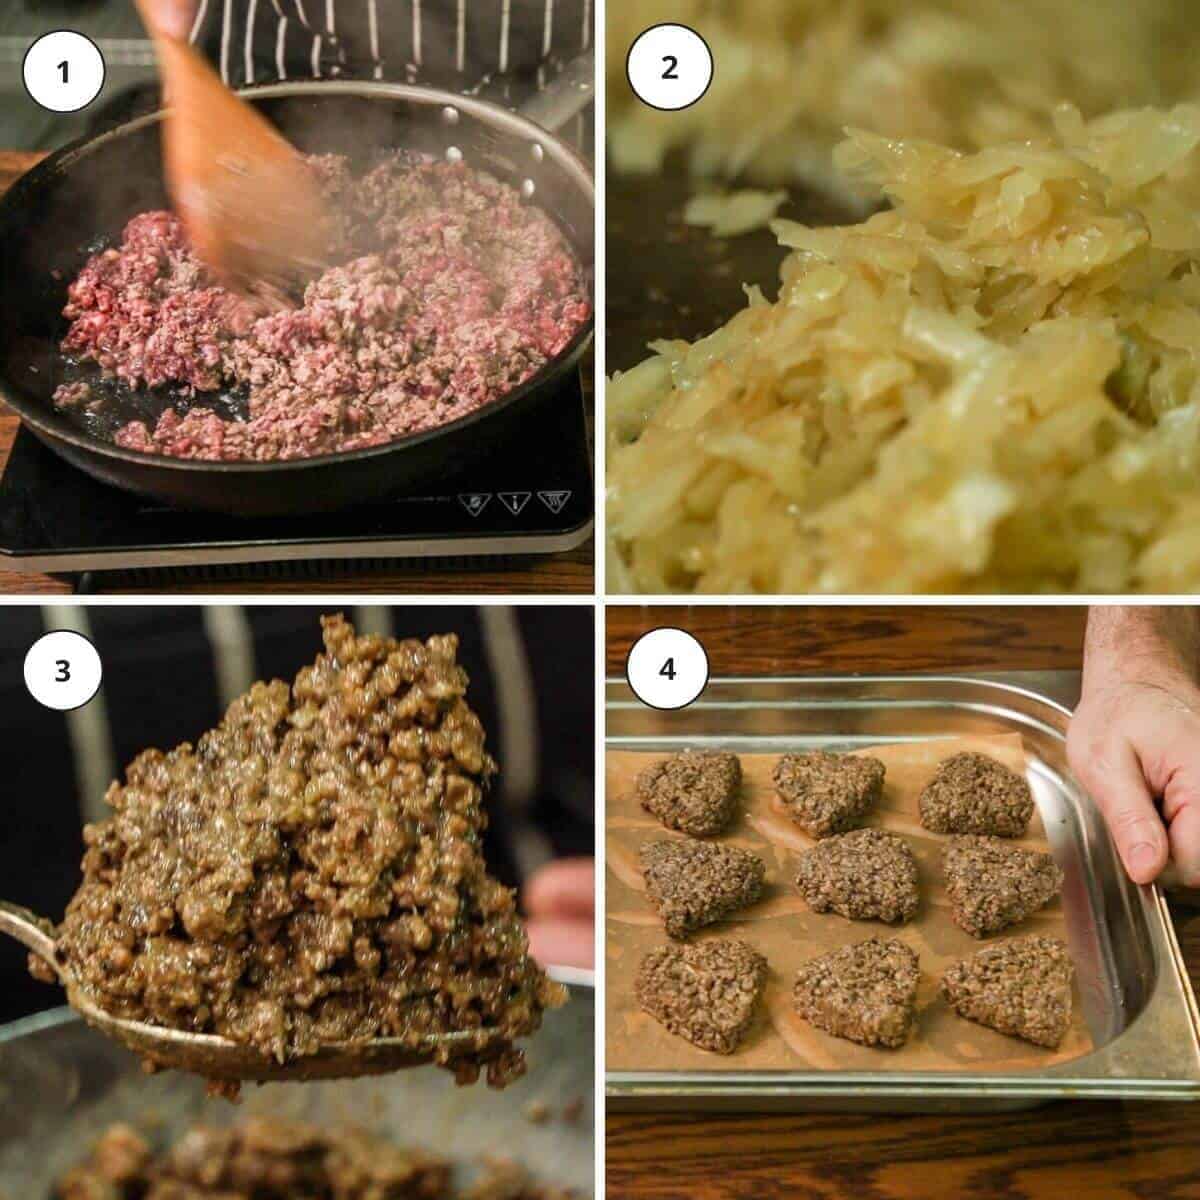
- Fry the mince meat in a hot pan until well browned. Drain any fat and keep aside.
- Fry the onions and garlic in the reserved fat in the same pan. Scraping the fond of the bottom of the pan. Keep the onions blond without serious caramelization.
- Add the fried minced meat back into the pan with the onions. Add a touch of beef stock, water or vegetables stock and slowly simmer the mix for 5 to ten minutes to soften the mince.
- Once done, cool the mix down before forming into 50 gram portions. Traditionally, meat pirozhki is made in a triangle shape. Make sure to pack the mix tightly, before moving into the freezer to fully set for 20 minutes.
It's best to keep the mix cold at all times. If the fat melts, the shapes will fall apart and crumble. Do not try and make the mix too wet as it will result in soggy, and not fluffy pies.
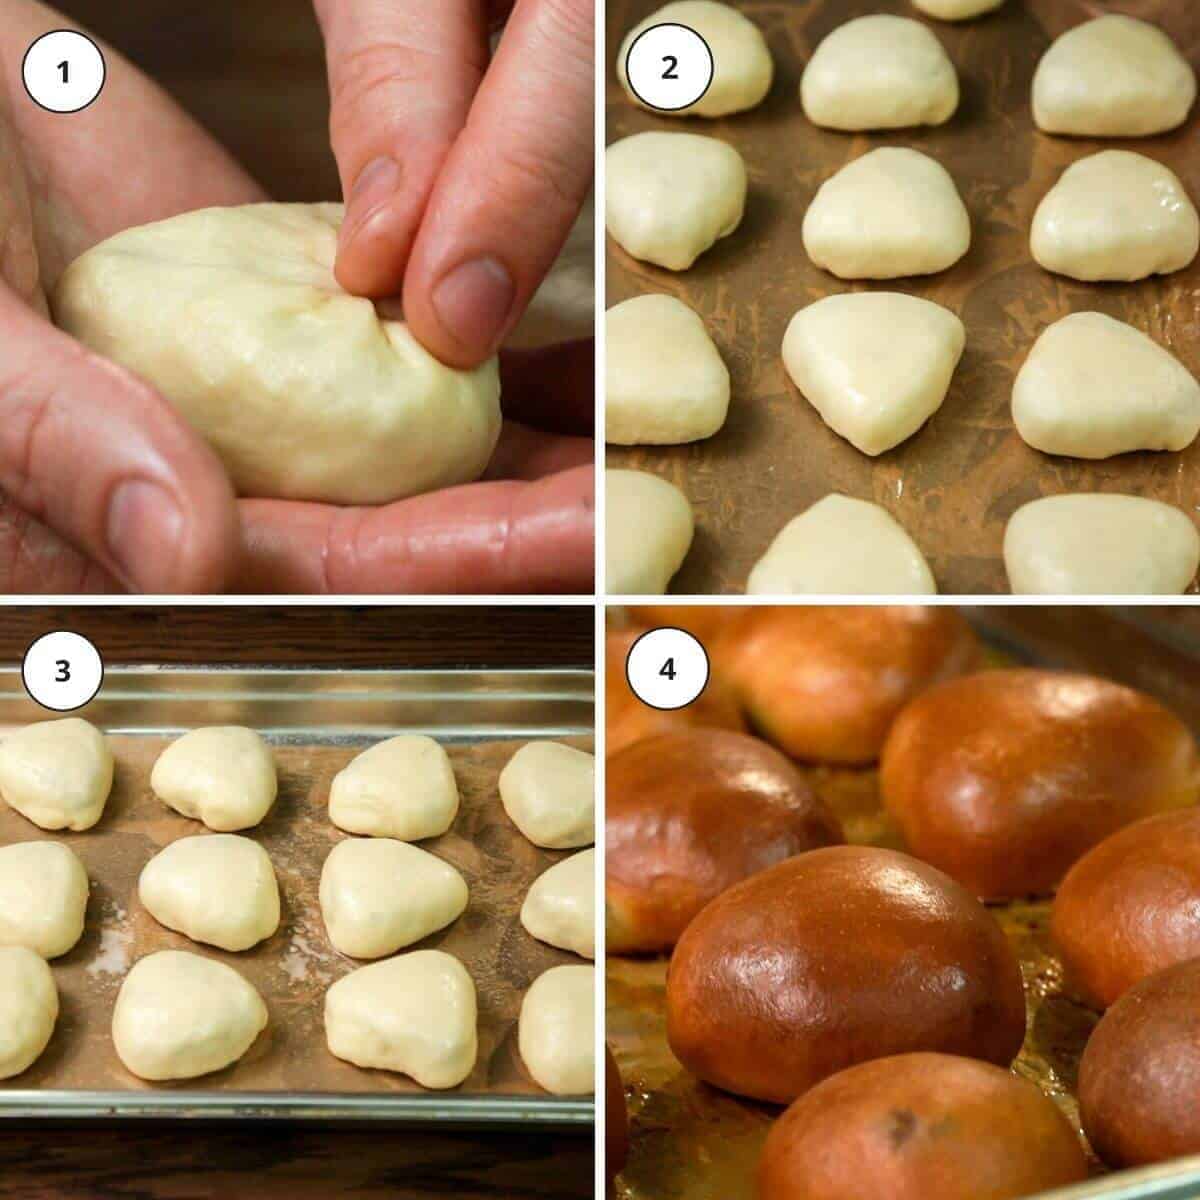
- Once the dough his rolled out thinly, place the filling into the centre and close the pirozhki by pinching and pulling from the edges of the dough. Avoid bunching up the dough when you seal it. It should be evenly spread all over.
- Once the pies are shaped, move them onto a parchment lined baking tray and close with another tray turned upside down. Proof for one and a half hours in a warm place(around 30° C or 86° F) until jiggle and fully proven. Turn your oven to 170° C or 338° F.
- Spray or very gently brush them with egg wash, taking care not to deflate them, as they are very fragile at this stage.
- Bake for 18 to 20 minutes, or until deep golden brown. Cool down slightly on a wire rack before serving or storing for later.
Cabbage pirozhki
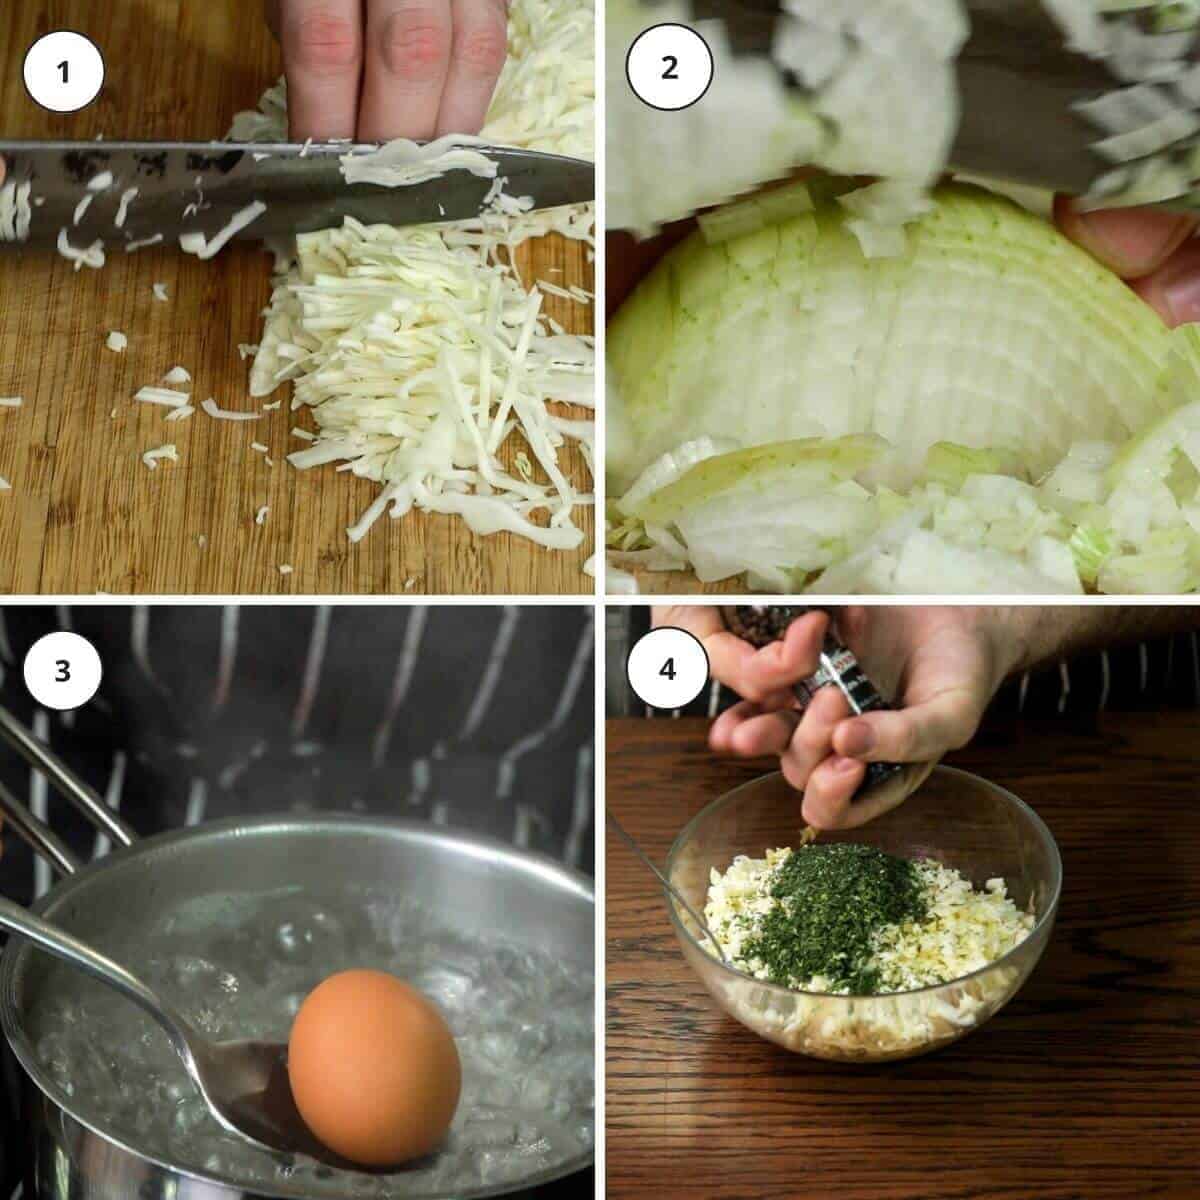
- Slice the cabbage as thinly as possible and into short strands to avoid long stringy bits of cabbage. Chop the onion and garlic finely before pan frying it all together until slightly caramelized and soft. If it browns too quickly or goes dry, add a touch of water and lower the temperature.
- Boil the eggs for 10 minutes. Cool down in cold water, then peel and grated on a box grater.
- Chop the dill and add all the ingredients together in a bowl before seasoning with salt and pepper.
- Chill down the mix completely in the fridge.

- Shape the filling into 50 gram balls and firm it up by placing into the freezer for 10 minutes. Roll out the dough thinly.
- Once rolled, place the filling into the centre of the dough and close the pirozhki by pinching and pulling from the edges of the dough. Avoid bunching up the dough when you seal it, but make sure it's completely sealed. The dough should be evenly spread all over.
- Once the pies are shaped, move them onto a parchment lined baking tray and close with another tray turned upside down. Proof for one and a half hours in a warm place(around 30° C or 86° F) until jiggle and fully proven. Turn your oven to 170° C or 338° F.
- Spray or very gently brush them with egg wash, taking care not to deflate them, as they are very fragile at this stage.
- Bake for 18 to 20 minutes, or until deep golden brown. Cool down slightly on a wire rack before serving or storing for later.
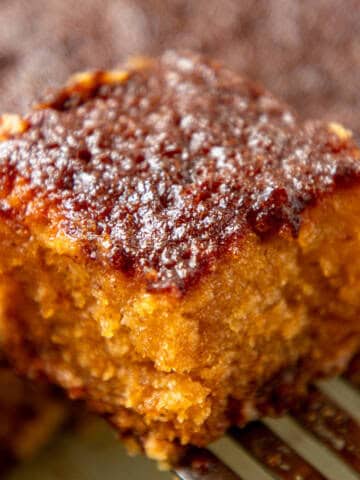
Apple pirozhki
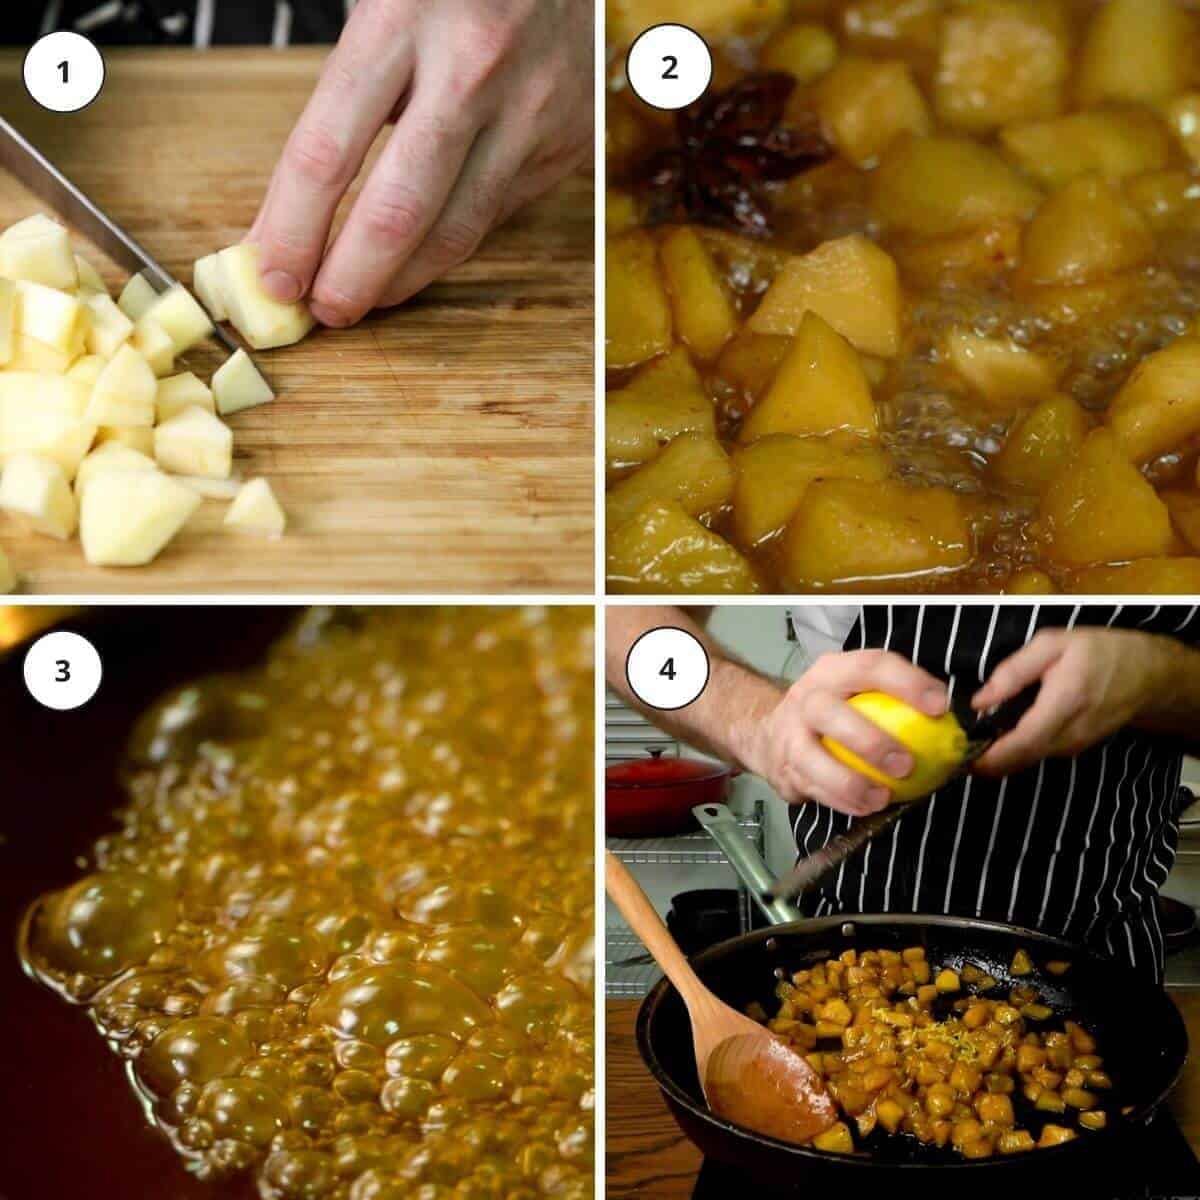
- Peel and core the apple. Cut it into roughly 1.5 centimetre or ½ inch pieces.
- Add to the pan with the sugar, butter and spices. Cook on medium high heat until the apples are soft to the touch but not falling apart. Remove and discard the spices.
- Drain the liquid and place back into the pan to reduce into a thick caramel.
- Place the apples back into the caramel and season with lemon zest and lemon juice before placing into a bowl and chilling down in the fridge.
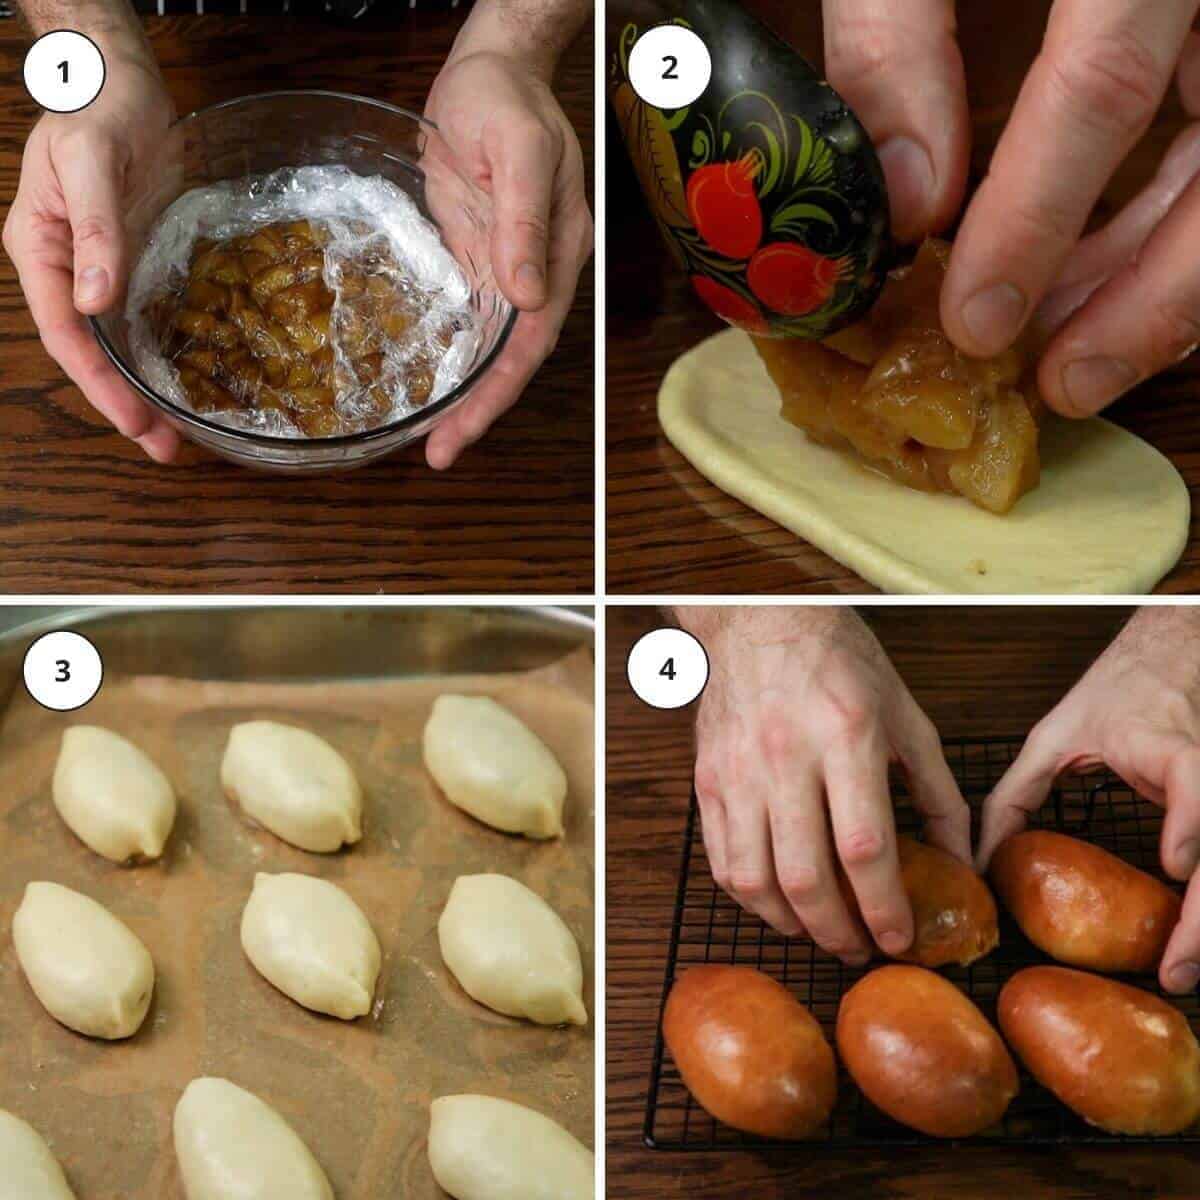
- Once the rolled out thinly, place the filling into the centre of the dough and close the pirozhki by pinching and pulling from the edges. Avoid bunching up the dough when you seal it. It should be evenly spread all over. The apple filling and oblong shape is the trickiest, to form. You can also seal the pirozhki at the top and bake it with the seal at the top to simplify the process.
- Once the pirozhki are shaped, move them onto a parchment lined baking tray and close with another tray turned upside down. Proof for one and a half hours in a warm place(around 30° C or 86° F) until jiggle and fully proven. Turn your oven to 170° C or 338° F.
- Spray or very gently brush them with egg wash, taking care not to deflate them, as they are very fragile at this stage.
- Bake for 18 to 20 minutes, or until deep golden brown. Cool down slightly on a wire rack before serving or storing for later.
Video
Tips for success
- Dough - Make sure to mix it for the full recommended time. Pirozhki dough handles easier when chilled. Wrap in plastic and chill in the freezer for 20 minutes or in the fridge for a few hours.
- Filling - Fillings should not be too wet. Pirozhki dough does not stand up well to high moisture fillings, and if the fillings are too wet it might cause the pies to break open and leak.
- Shaping - Make sure to roll the dough out very thinly and then evenly encase the fillings, so you don't end up with uneven pies.
- Baking - Make sure the oven is preheated, and your pirozhki are fully proofed before you bake them. Depending on the temperature you prove them, the time can vary wildly. Best keep an eye on them and monitor how they are proving before baking.
Alternative pirozhki fillings
Savoury fillings
- Salmon and potato
- Meat and rice
- Wild mushroom
- Buckwheat and offal
- Chicken and leek
- Pumpkin and sage
Sweet fillings
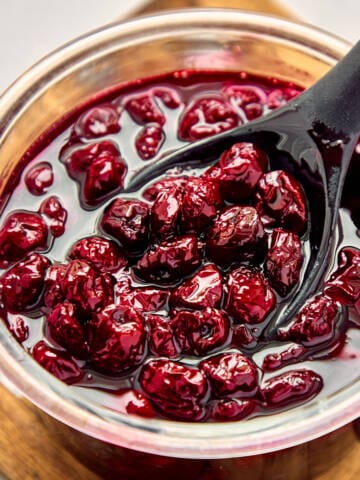
- Cranberry
- Pear
- Cottage cheese and raisin
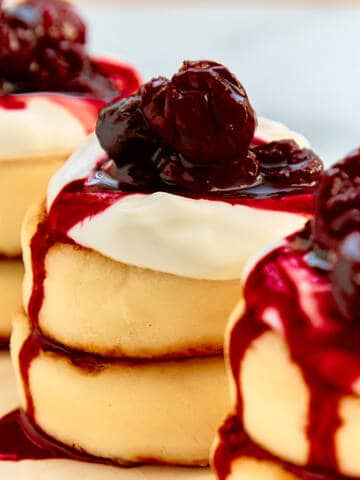
- Cherry
- Apricot
Storage instructions
Once cooled down, you can store them airtight in the fridge for up to 5 days.
Do not let them spend more than 6 hours out of the fridge. Although many street vendors sell these from ambient displays, it's not the safest way to store them.
Frequently asked questions
They are best and always served warm as an appetizer or a snack. Sometimes they are served with traditional beetroot soup like borscht as a side instead of bread.
They freeze well and will keep for up the 6 months in the freezer sealed airtight.
The best way is to reheat in the microwave. Make sure to cover them with a lid to avoid drying out. Microwave on 30 second bursts to make sure they are perfectly reheated. If warming just a few pies, 30 seconds on high should be enough in most microwaves.
Do not reheat straight from frozen. First defrost at room temperature or in the microwave on the defrost setting. You can also defrost it slowly in the fridge overnight.
Useful equipment
Meat grinder

Cooling Racks
Electronic Kitchen Scales
Kitchenaid Stand Mixer
Related recipes
This site contains affiliate links. I may earn a tiny commission on qualifying purchases at no extra cost to you. By bookmarking these links you help support the upkeep of this site.
If you found this post helpful or have learned something, please comment, subscribe, and follow me on social media for more delicious recipes.
Recipe
Traditional Russian Pirozhki (Hand pies) - Complete Guide + Video
Ingredients
Dough ingredients
Meat filling
- 900 grams (2 lb) beef chuck - note 2
- 300 grams (⅔ lb) turkey hearts - note 3
- 300 grams (⅔ lb) turkey liver - note 3
- 250 grams (1 4/7 cups) onion
- 10 grams (1 ¼ tablespoon) garlic
- 300 grams (1 ¼ cups) beef or chicken stock
- 20 grams (1 ½ tablespoon) neutral oil
- salt and pepper to taste
Cabbage filling
- 400 grams (6 cups) cabbage - note 4
- 200 grams (1 ¼ cups) onion
- 10 grams (1 ¼ tablespoon) garlic
- 5 each (5 each) eggs - note 5
- 20 grams (1 ½ tablespoon) neutral oil
- salt and pepper to taste
- 15 grams (⅓ cups) dill
Apple filling
- 700 grams (1 ½ lb) apples - note 6
- 150 grams (¾ cups) sugar
- 70 grams (⅓ cups) butter
- 2 grams (1 teaspoon) cinnnamon
- 1 gram (⅕ teaspoon) cloves
- ½ gram (⅛ teaspoon) star anise
Instructions
Dough
- Mix the dry and wet ingredients for 10 minutes on medium speed in your kitchen aid stand mixer or whatever mixer you have. After 10 minutes, add the butter bit by bit and blend another 5 minutes until the dough is elastic and smooth.
- Place in a bowl covered with a damp cloth to either rise overnight in the fridge or for 2 hours at room temperature.
- When ready, deflate the dough and divide into 30 gram portions. Let the dough rest for 5 minutes to relax the gluten and roll into round balls. Cover and rest for another 10 minutes.
- When you are ready to use it, roll the balls out thinly. Ready to wrap around the filling of your choice. Make a simple egg wash by blending 1 egg with 50 millilitres of milk. We use this to spray or brush onto the pirozhki just before baking.
Meat pirozhki
- Fry the mince meat in a hot pan until well browned. Drain any fat and keep aside.Fry the onions and garlic in the reserved fat in the same pan. Scraping the fond of the bottom of the pan. Keep the onions blond without serious caramelization.
- Add the fried minced meat back into the pan with the onions. Add a touch of beef stock, water or vegetables stock and slowly simmer the mix for 5 to ten minutes to soften the mince. Once done, cool the mix down before forming into 50 gram portions.
- Traditionally, meat pirozhki is made in a triangle shape. Make sure to pack the mix tightly, before moving into the freezer to fully set for 20 minutes. It's best to keep the mix cold at all times. If the fat melts, the shapes will fall apart and crumble. Do not try and make the mix too wet as it will result in soggy, and not fluffy pies.
- Once the dough his rolled out thinly, place the filling into the centre and close the pirozhki by pinching and pulling from the edges of the dough. Avoid bunching up the dough when you seal it. It should be evenly spread all over.
- Once the pies are shaped, move them onto a parchment lined baking tray and close with another tray turned upside down. Proof for one and a half hours in a warm place(around 30° C or 86° F) until jiggle and fully proven. Turn your oven to 170° C or 338° F.
- Spray or very gently brush them with egg wash, taking care not to deflate them, as they are very fragile at this stage.Bake for 18 to 20 minutes, or until deep golden brown. Cool down slightly on a wire rack before serving or storing for later.
Cabbage Pirozhki
- Slice the cabbage as thinly as possible and into short strands to avoid long stringy bits of cabbage. Chop the onion and garlic finely before pan frying it all together until slightly caramelized and soft. If it browns too quickly or goes dry, add a touch of water and lower the temperature.
- Boil the eggs for 10 minutes. Cool down in cold water, then peel and grated on a box grater.
- Chop the dill and add all the ingredients together in a bowl before seasoning with salt and pepper. Chill down the mix completely in the fridge.
- Shape the filling into 50 gram balls and firm it up by placing into the freezer for 10 minutes. Roll out the dough thinly.
- Once rolled, place the filling into the centre of the dough and close the pirozhki by pinching and pulling from the edges of the dough. Avoid bunching up the dough when you seal it, but make sure it's completely sealed. The dough should be evenly spread all over.
- Place the shaped pies onto a parchment lined baking tray and close with another tray turned upside down. Proof for one and a half hours in a warm place(around 30° C or 86° F) until jiggle and fully proven. Turn your oven to 170° C or 338° F. Spray or very gently brush them with egg wash, taking care not to deflate them, as they are very fragile at this stage.
- Bake for 18 to 20 minutes, or until deep golden brown. Cool down slightly on a wire rack before serving or storing for later.
Apple pirozhki
- Peel and core the apple. Cut it into roughly 1.5 centimetre or ½ inch pieces. Add to the pan with the sugar, butter and spices.
- Add to the pan with the sugar, butter and spices. Cook on medium high heat until the apples are soft to the touch but not falling apart. Remove and discard the spices.
- Drain the liquid and place back into the pan to reduce into a thick caramel. Place the apples back into the caramel and season with lemon zest and lemon juice before placing into a bowl and chilling down in the fridge.
- Once the rolled out thinly, place the filling into the centre of the dough and close the pirozhki by pinching and pulling from the edges. Avoid bunching up the dough when you seal it. It should be evenly shaped all over.
- Move the shaped pirozhki onto a parchment lined baking tray and close with another tray turned upside down. Proof for one and a half hours in a warm place(around 30° C or 86° F) until jiggle and fully proven. Turn your oven to 170° C or 338° F.
- Spray or very gently brush them with egg wash, taking care not to deflate them, as they are very fragile at this stage.Bake for 18 to 20 minutes, or until deep golden brown. Cool down slightly on a wire rack before serving or storing for later.
Video
Notes
- Doube the weight if using fresh yeast. If using sourdough starter use 15% of the weight of the flour.
- You can buy 20/80, 30/80 or lean mince. You could also use whatever other cut of beef you want.
- Hearts and liver give great flavour but it's not for everyone so simply omit and increase the meat if you don't like it.
- White cabbage works best. Avoid savoy or red cabbage.
- Hard boil the eggs so you can grate it.
- Pink lady and Granny Smith works best.
Maria G. says
Can I use this dough recipe to make one large pirog? Do you think it will support the bottom in this case?
Charlé Visser says
Yes you can do, but don't go to high. Better to make it flatter so the weight is not too much on the dough.
Olga says
The best pirozhki recipe I've tried.
Alyssa McCord says
I have been making fresh piroshki for almost 20 years. This is the best recipe I’ve ever used. I do make just a few slight adjustments that probably don’t even matter. 1. I mix 25 grams of the sugar with the yeast and warm milk and allow it to bloom first. 2. I mix the wet and dry and while still shaggy I slowly add the butter. I did the recipe to the letter the first time and the butter had a really hard time incorporating into the dough. So that’s why I started doing it while the dough is still shaggy. I only kneaded 10 minutes this last time and only after the butter was incorporated. I did notice the dough was a little tougher. So maybe I’ll add more kneading time next time. But the finished product was fluffy and had an amazing flavor. The dough is a little sweeter than others I have done, but I like it!
Anastacia says
Is 85g sugar necessary for the yeast to activate?
I usually follow recipe with Swedish yeast but I cant get it here unfortunately. This recipe seems the best for baking with American yeast but is sugar necessary for it to work? All of it?
Charlé Visser says
You can reduce the sugar. Not needed for the yeast but the dough should be slightly sweet.
Marihah Shah says
Beautiful recipe! Can you freeze unbaked buns and bake them later?
Charlé Visser says
Yes, but you will have to let them proof once defrosted.
Julie says
Thanks for the amazing recipe! It'll be my second time making it. Are the filling quantities listed here for the entire dough amount, I found that I ran out of the cabbage filling (just did cabbage) in my first round. If using sourdough are the proofing times similar?
Charlé Visser says
There's more dough than you need, so double up on the filing if only making one type. For sourdough, the proofing time is much longer because of the wild yeast. Expect 3 - 5 hour proofing time depending on the temperature of the room. For sourdough, I always like doing a low slow proof in the fridge, if you have time for that.
Julie says
Awesome, thank you! If I'm doing the bulk fermentation in the fridge overnight, then the final proof when everything is filled and shaped is still 3-5 hours?
Charlé Visser says
Mostly depends on the temperature you prove it at. Might be ready in 2 hours if it’s warm. I like proving them in tge fridge shaped and filled. Rub with a bit of oil then next day spray them or brush with eggwash and proof for another hour at room temp before baking. Making pirozhki with sourdough can vary wildly because of the nature of sourdough.
Ivan Shidlovsky says
Thank you for sharing your receipe.
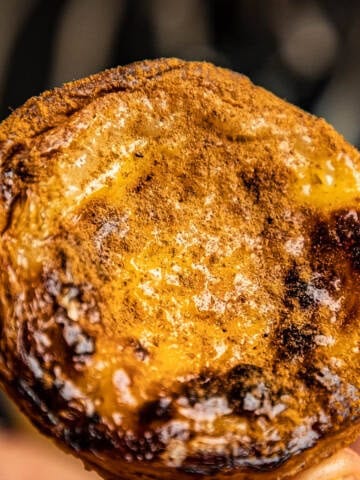
Спасибо. They were definitely the party favorite. I was only able to get the top half brown, and that was using the broil function. Any suggestions for getting the whole muffin brown?
Charlé Visser says
Welcome. If it doesn’t brown on the bottom it is an oven and tray issue. Try flipping them halfway through baking.
Raluca says
Excellent pirozhki! A labour of love, and definitely worth it. I was glad to have the proportion of dough to filling in grams and make every pie just right every time. Hilarious chef and impeccably explained recipes. Thank you, Charlé!
ML says
Hello Chef! I've tried other meh piroshki recipes before, but these were da BOMB! Thank you for this amazing dummy proof recipe! Wasn't in the right state of mind - I used 60g less of flour in my 1st batch of dough, mixed everything and put it in the fridge to rise overnight, then rested 1 hr at room temp before working in the remaining flour because it was too tacky, and it still turned out fluffy and yummy. After the 1st batch had gone into the fridge, I realized my error and made a 2nd batch immediately, just to compare how far off I'd be, then followed the remaining steps to a T. These are one of the best breads I've ever made. I made them with your cabbage filling, and another batch with mushrooms. Though my piroshkis looked nowhere as beautiful as yours, they were soo soo fluffy and good. And the ratio of 50g filling to 30g dough - perfect! I'm gonna keep working on it. This is definitely going into my rotation! Thank you once again!
Charlé Visser says
Glad you like them! Enjoy!!
natalia nikolaidi says
Hello, The nutritional value refers to which of all? plain? thank you
Charlé Visser says
Will send you individual vallues by email. These values are an average including the dough so will vary slightly individually. Keep an eye on your mail!
Lisa says
So no need to proof the yeast first?
Charlé Visser says
No just make sure starter is fed and active.
Jessica says
Very surprised there aren't more reviews. These pies were absolutely delicious. Worth every second that went into the cooking process. Chef is hilarious, and I appreciate the free online lessons from an obviously skilled professional.
I made the meat pies and they were all eaten within two days, I look forward to making the cabbage pies next.
Thank you for the recipe!
IB says
Another great filling is: hard boil eggs, rice and green onions. One of my favorite.