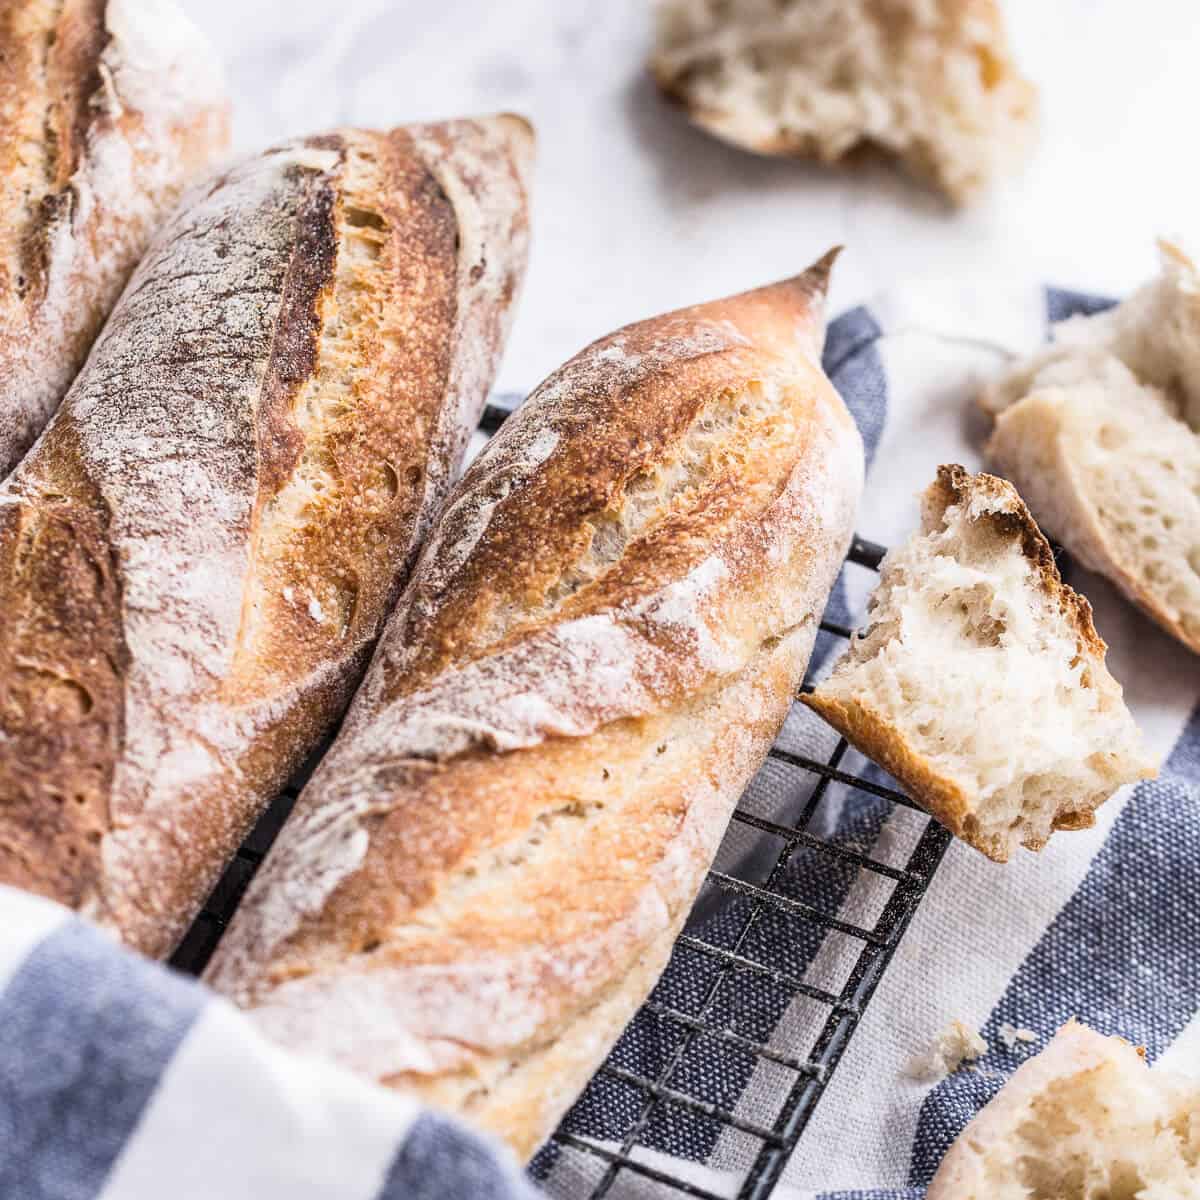
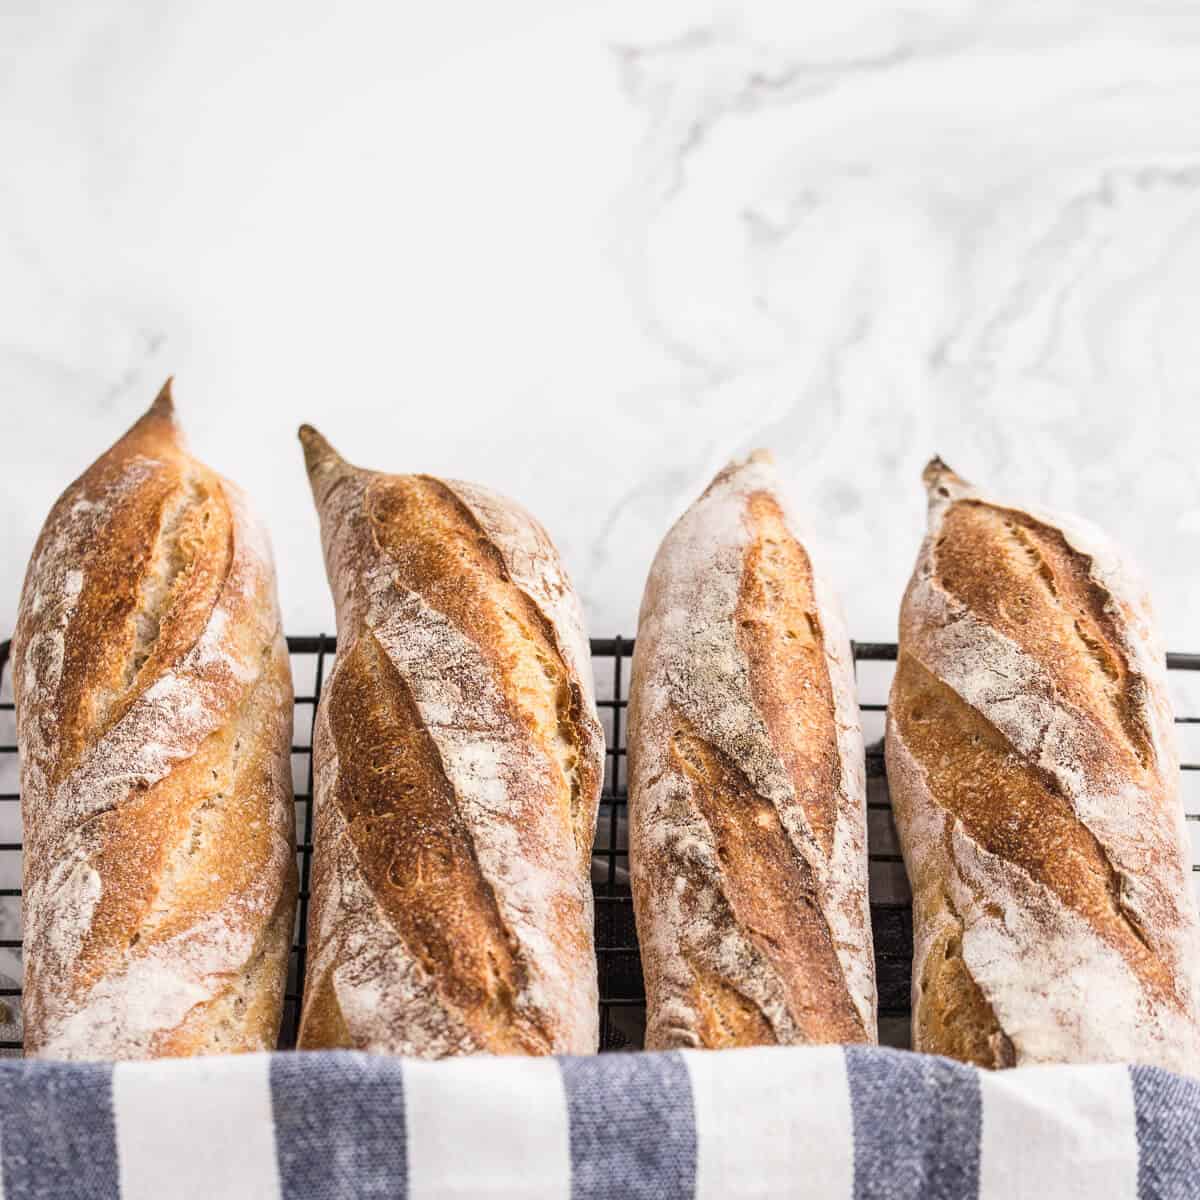
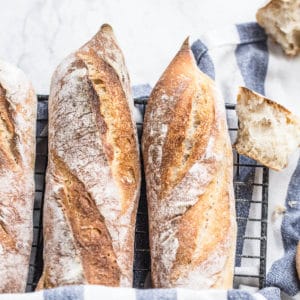
Sourdough baguettes are a superior version of the classic French baguette that uses store-bought yeast instead of a sourdough starter.
These baguettes have a delicious crunchy crust with an open crumb, light airy and slightly chewy. All the sought-after qualities you want in the perfect sourdough baguette.
Below is a simple-to-follow, step-by-step guide bakers of all levels can easily use at home, with all your questions answered, and a special section explaining how to fix issues you might run into.
The recipe is tailored for home bakers so that they fit into a regular-size oven. It makes four demi baguettes which are half the length of classic baguettes.
Jump to:
- Why make sourdough baguettes
- Equipment for making baguettes
- Ingredients
- Baking Schedule
- Sourdough baguette dough
- Dough temperature matters
- Shaping baguettes
- Proving
- Scoring and baking baguettes
- Video
- How to get the perfect crust
- Tips for successfully baking baguettes
- Troubleshooting
- Variations
- How to soften hard baguette
- Serving suggestions
- Frequently asked questions
- Other recipes you might like
- Recipe
- Comments
Why make sourdough baguettes
Traditionally baguettes aren't made with sourdough but rather with fresh yeast. The process takes a lot quicker but the result is much inferior to a sourdough baguette.
Sourdough baguettes are also healthier and easier to digest than regular yeasted baguettes. Making them lighter and the preferred option in top restaurants and bakeries.
Equipment for making baguettes
Sourdough baguettes are best baked on a baking stone if you have one. It ensures a perfect rise and crispy crust. Otherwise, use a heavy steal tray instead. Whichever you choose, make sure to preheat the oven for at least an hour before baking.
To proof baguettes you also need a sturdy material like a special linen baguette couche or simply use thick kitchen towels.
A spray bottle of water is useful for spraying the inside of the oven as well as the loaves before they go into the oven.
You need to slash the loaves with a special tool called a bread lame. It's essentially just a little handle with razor blades.

Bread Baking Set

Electronic Kitchen Scales
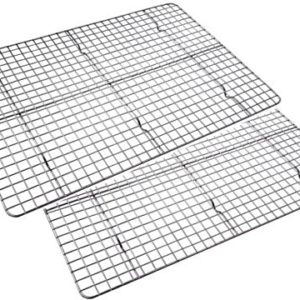
Cooling Racks
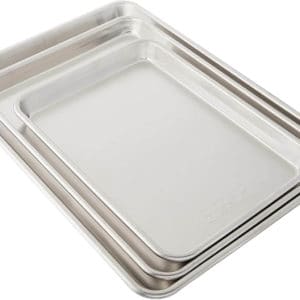
Baking Sheets
Ingredients
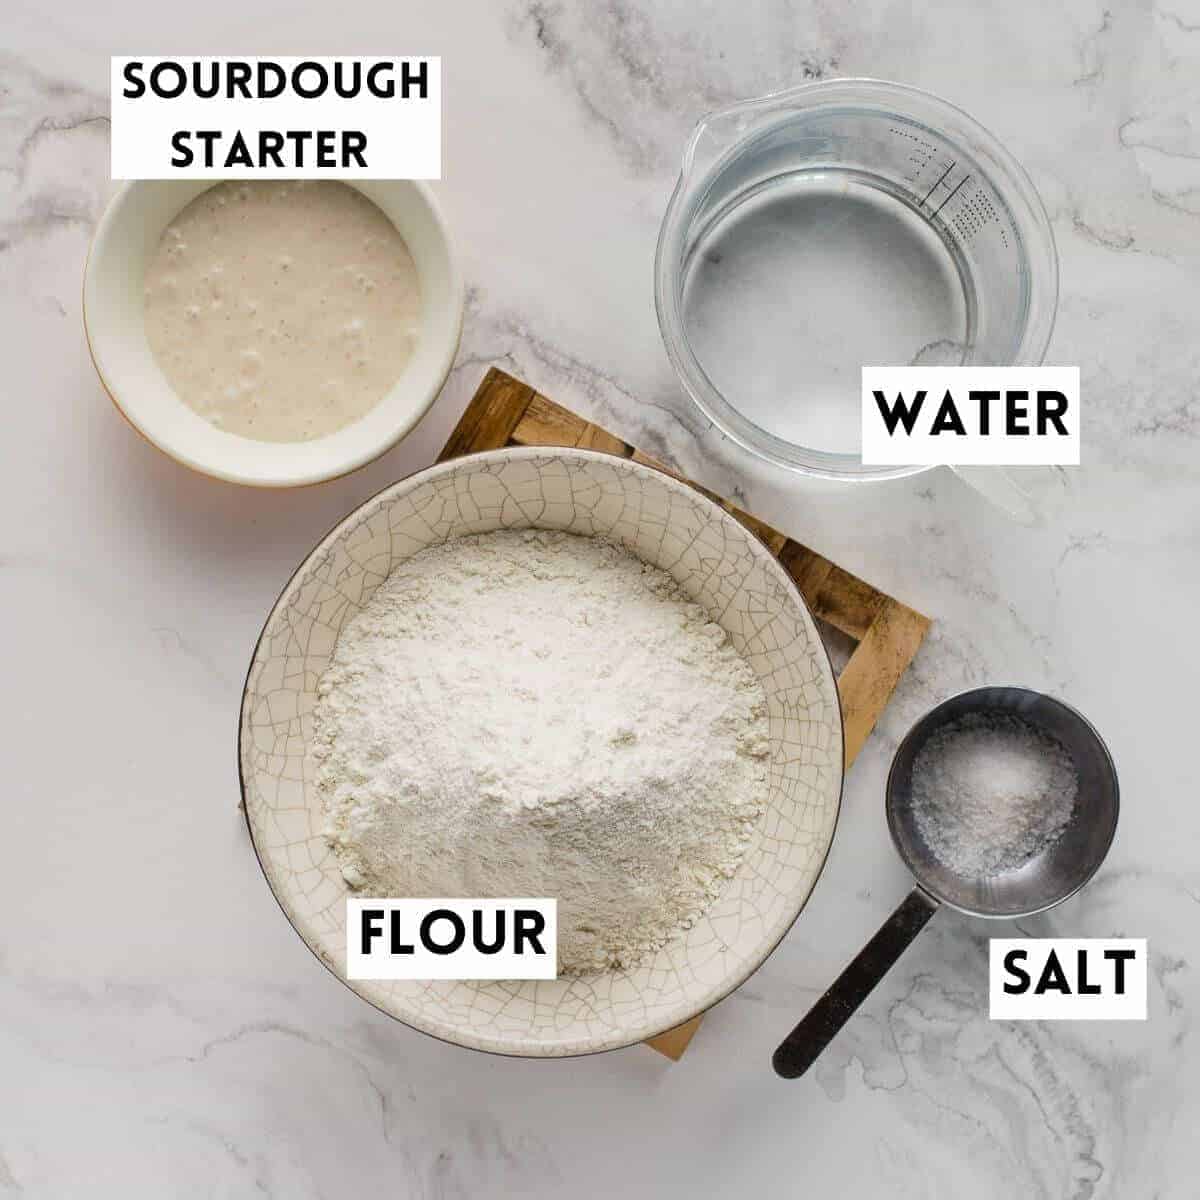
- Starter - Use my rye starter recipe or, if you already have a sourdough starter then use what you have. Your starter must be active and healthy. If your starter has been frozen or sitting in the fridge for a while, then first feed it a few times to get it nice and bubbly before using it.
- Flour - Use all-purpose flour that has a protein content of between 10 - 12 per cent. You can use stronger flour but, don't go any lower. I've also included some other substitutes you can use a bit further down in the post. Gluten-free flour won't work as expected.
- Water - Clean drinkable room temperature water. Do not use lukewarm water as you would to bloom yeast for burger buns and other quick-to-make breads.
- Salt - Fine non-iodised natural sea salt is my recommendation but if you only have fine iodised salt then use that. It slows down fermentation somewhat and might have a slightly bitter taste sometimes, which is why I opt for the natural salt.
See recipe card for quantities.
Baking Schedule
Below is an easy-to-follow example baking schedule I find manageable, but you can adjust it to fit into your schedule as you wish.
| Day 1 | Mixing dough/ Bulk fermentation/ Shaping/ Cold fermentation |
| 10:00 pm (the night before) | Feed your starter. |
| 8:00 am | Make the dough and autolyse for an hour. |
| 9:00 am | Add the salt, give it stretch and fold # 1. |
| 9:00 am | Bulk ferment for 1 hour. |
| 10:00 am | Stretch and fold # 2. |
| 11:00 am | Bulk ferment for 2 hours. |
| 1:00 pm | Shape the dough. |
| 1:30 pm | Cold ferment in the fridge for 18 to 24 hours. |
| Day 2 | Scoring and baking |
| 7:30 am | Preheat oven and prepare baguettes for baking. |
| 8:30 am | Score and bake baguettes. |
Sourdough baguette dough
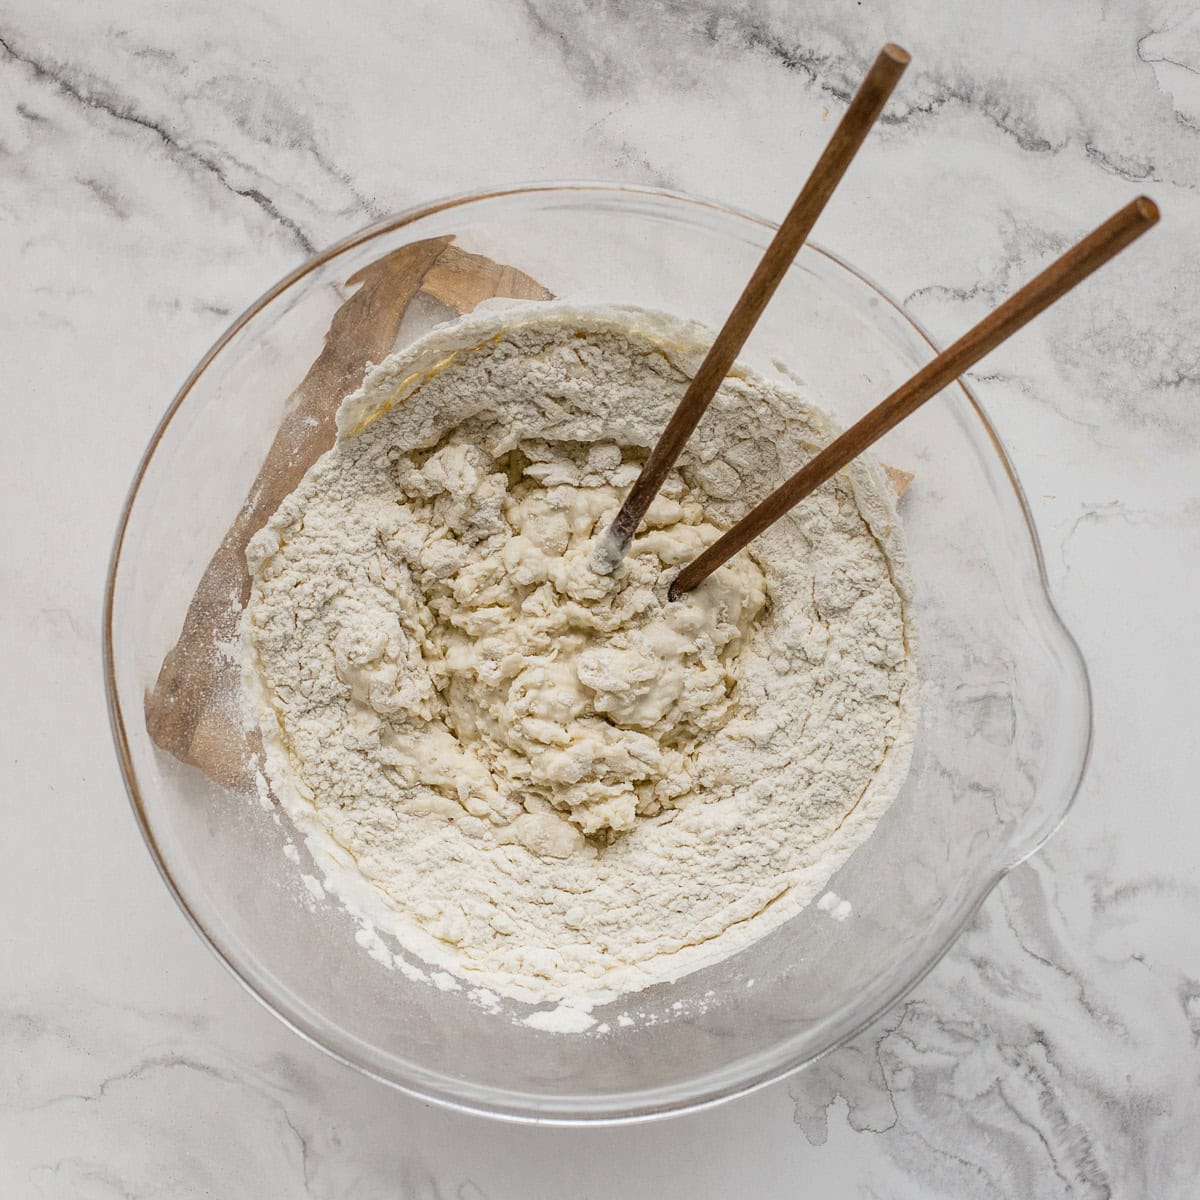
Step 1: Mix 250 grams of water with 100 grams of bubbly, active sourdough starter. Add in the flour and mix until fully incorporated.
Step 2: Cover and rest for 1 hour. During this time dissolve the salt in the remaining 30 grams of water.
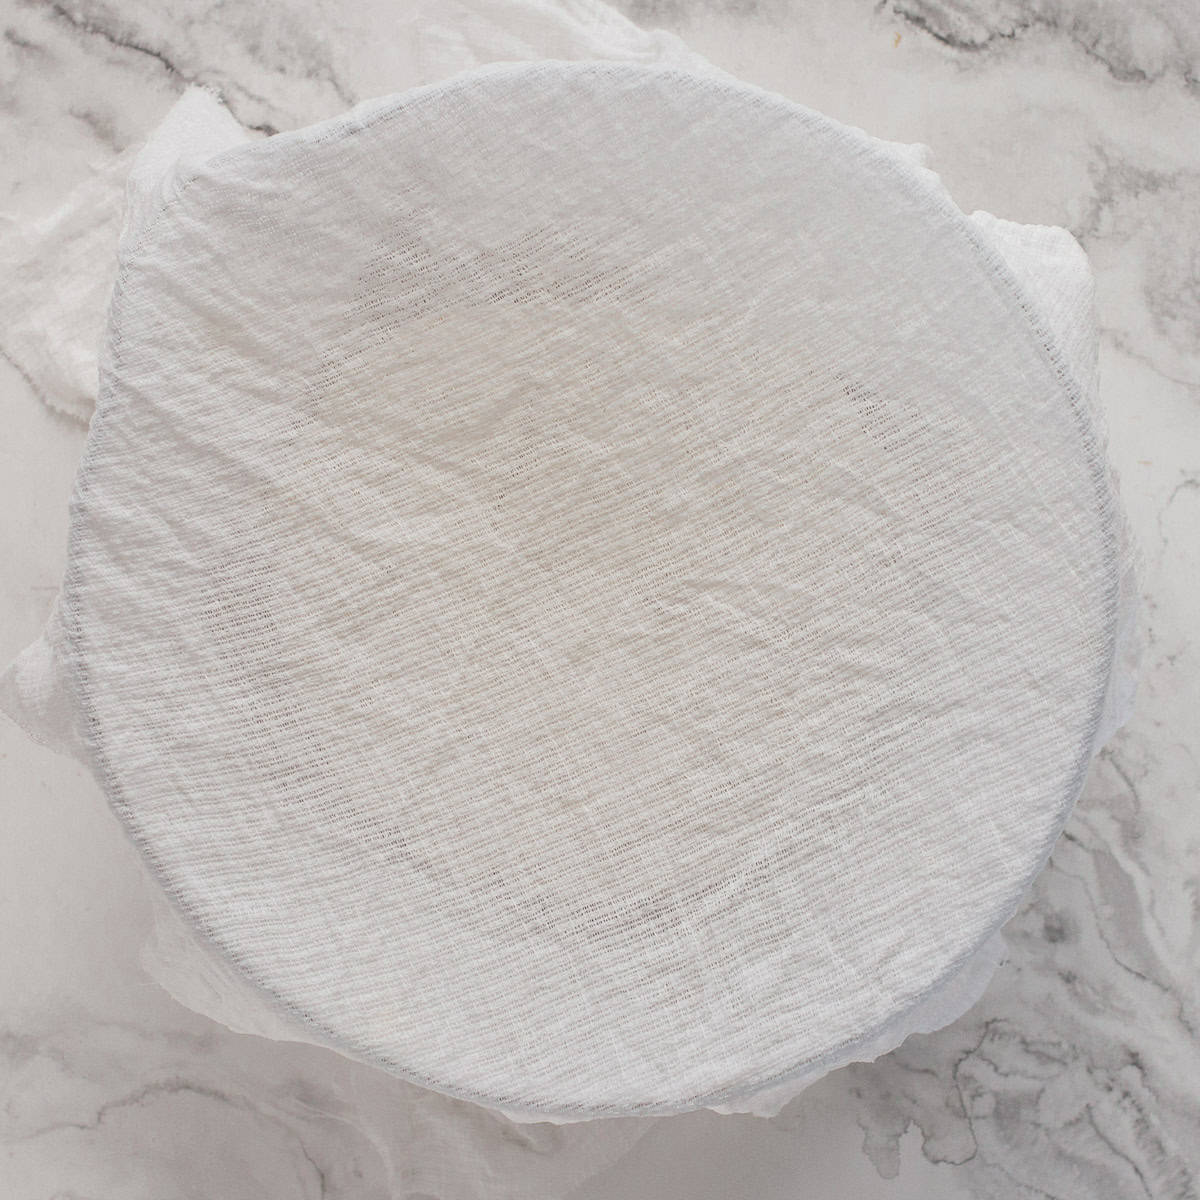
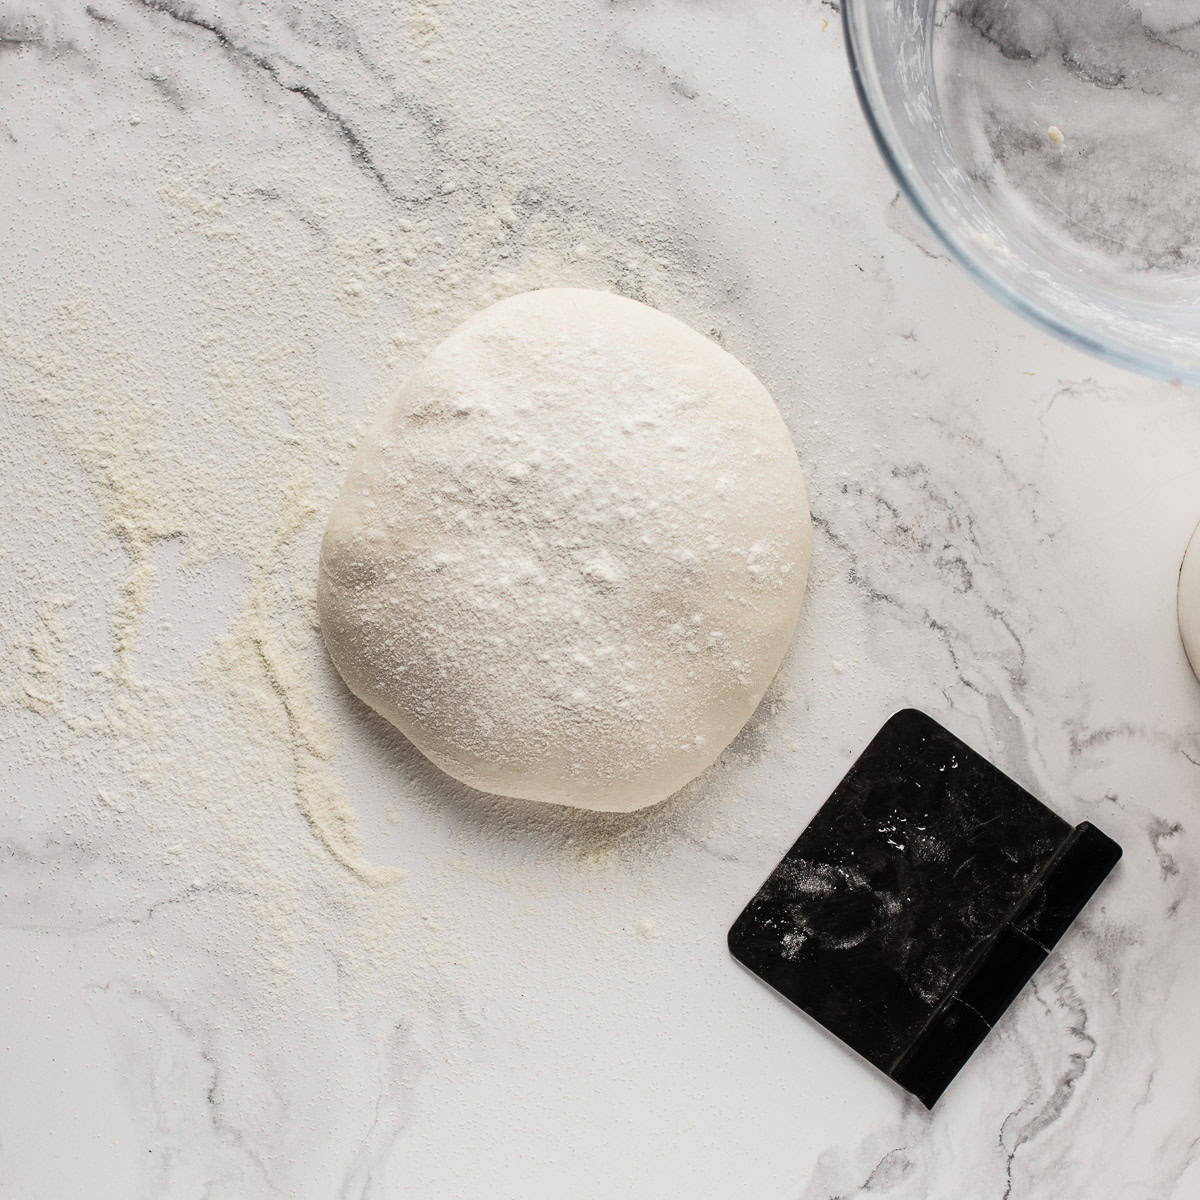
Step 3: Add the salty water to the dough and mix well until the dough is smooth. Give it a stretch and fold by pulling up one side of the dough and folding it over itself, repeating around the perimeter of the dough. When done, form into a ball and place into a clean, lightly oiled bowl covered with a damp cloth. Let it rest for 1 hour.
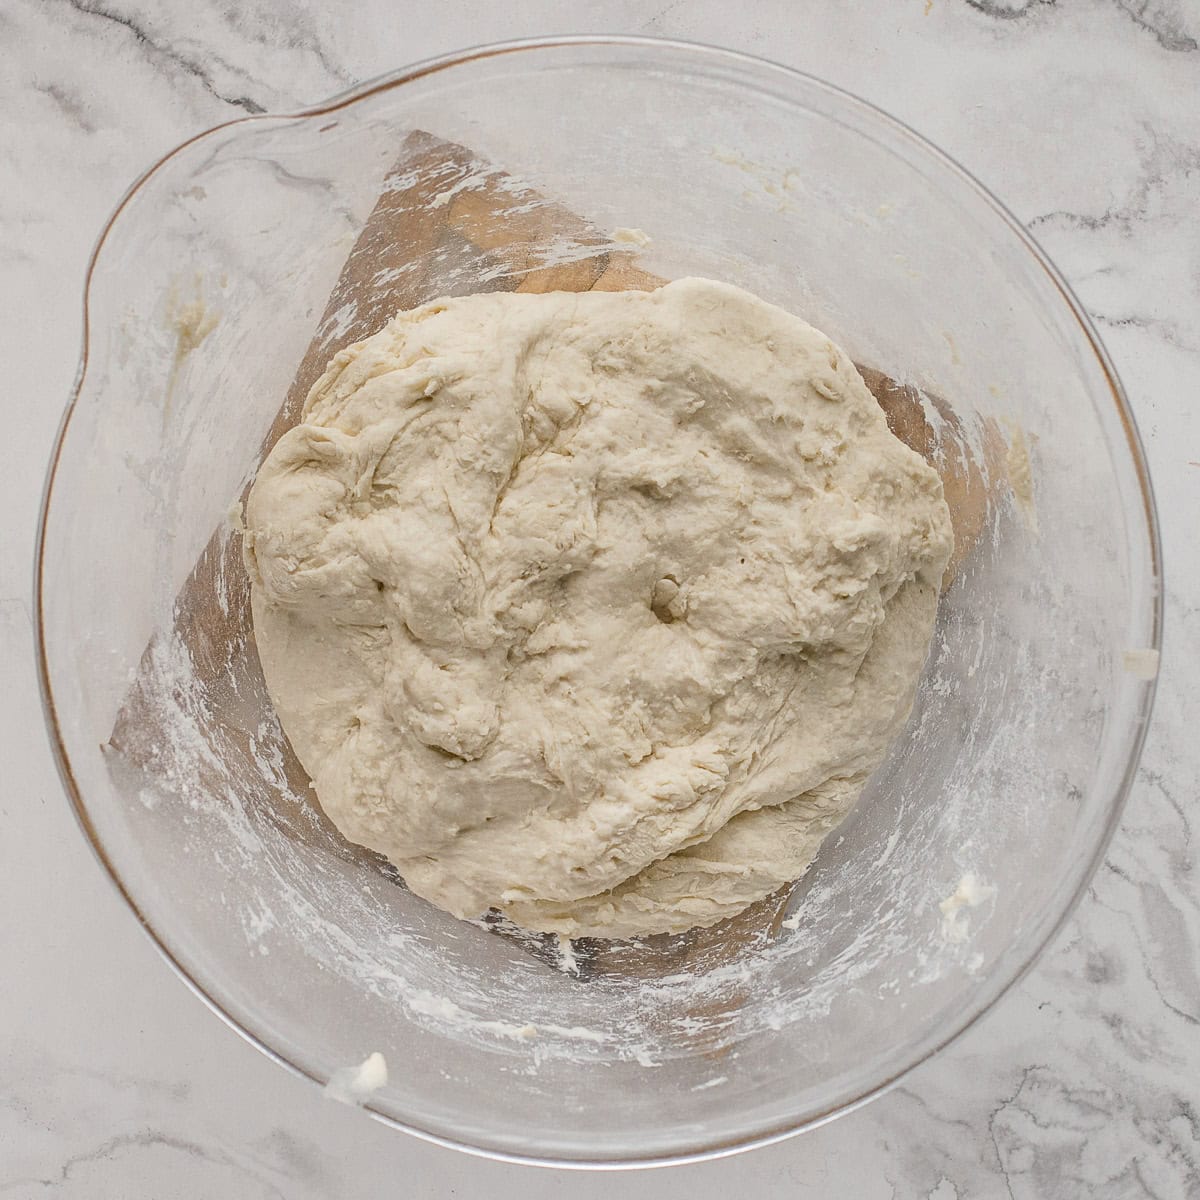
Step 4: Repeat the stretch and fold process twice more resting the dough for an hour after the second set of folds. After the 3rd set of folds let it bulk ferment for 2 hours. Make sure to cover the dough with a damp cloth when not handling it.
Dough temperature matters
Ideally, the dough mixing and fermentation up to cold fermentation, happens at room temperature. For most people, this will be around 20-22 °C (68-72 °F).
However, If you live in a colder area then try and let your dough bulk ferment in the oven with only the light turned on.
Likewise, if you are in a very hot climate without temperature control then cut the fermentation times in half.
Fermentation time is all the time the dough is left alone and covered.
Shaping baguettes
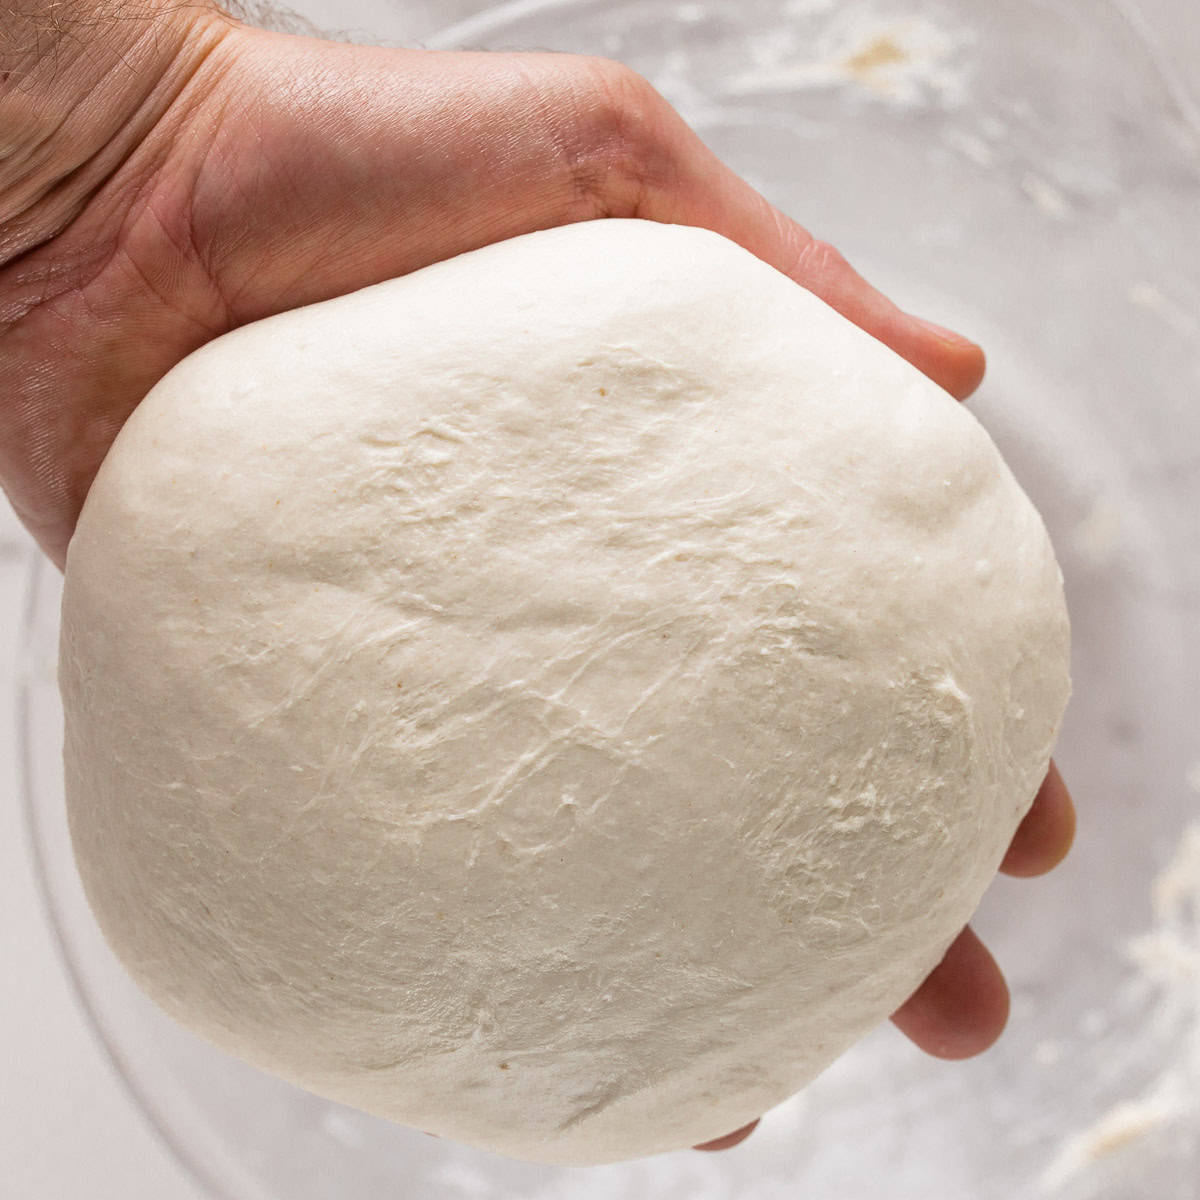
Step 1: Place the dough onto a lightly floured work surface.
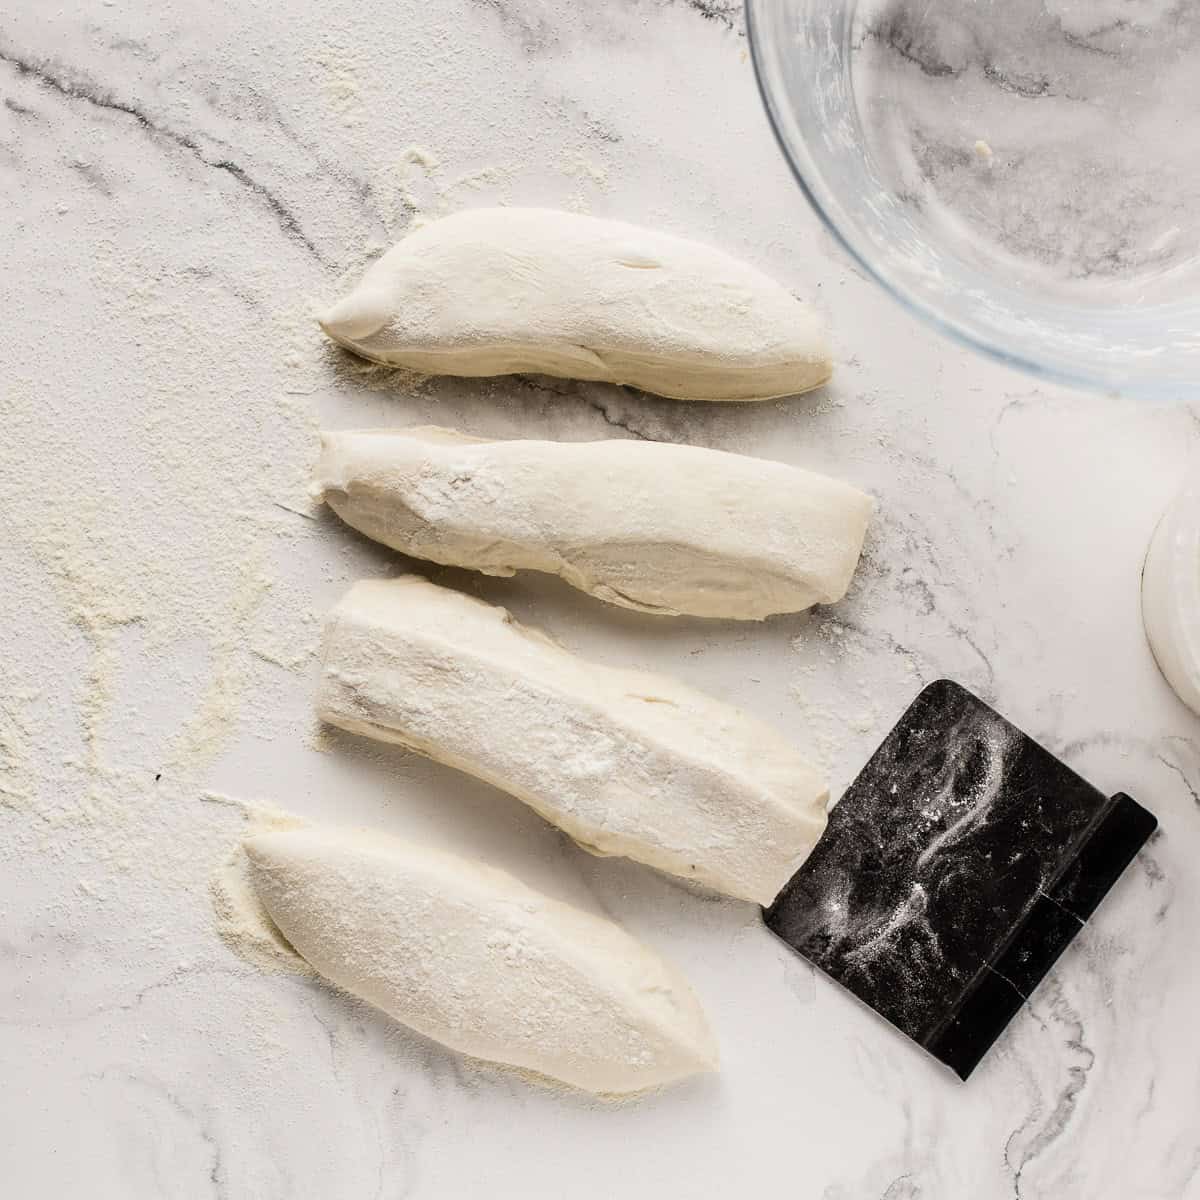
Step 2: Divide it into 4 equal pieces for demi baguettes or two for longer baguettes if your oven and equipment allow for it.
Step 3: Gently pat out some air and flatten it into a rectangle.
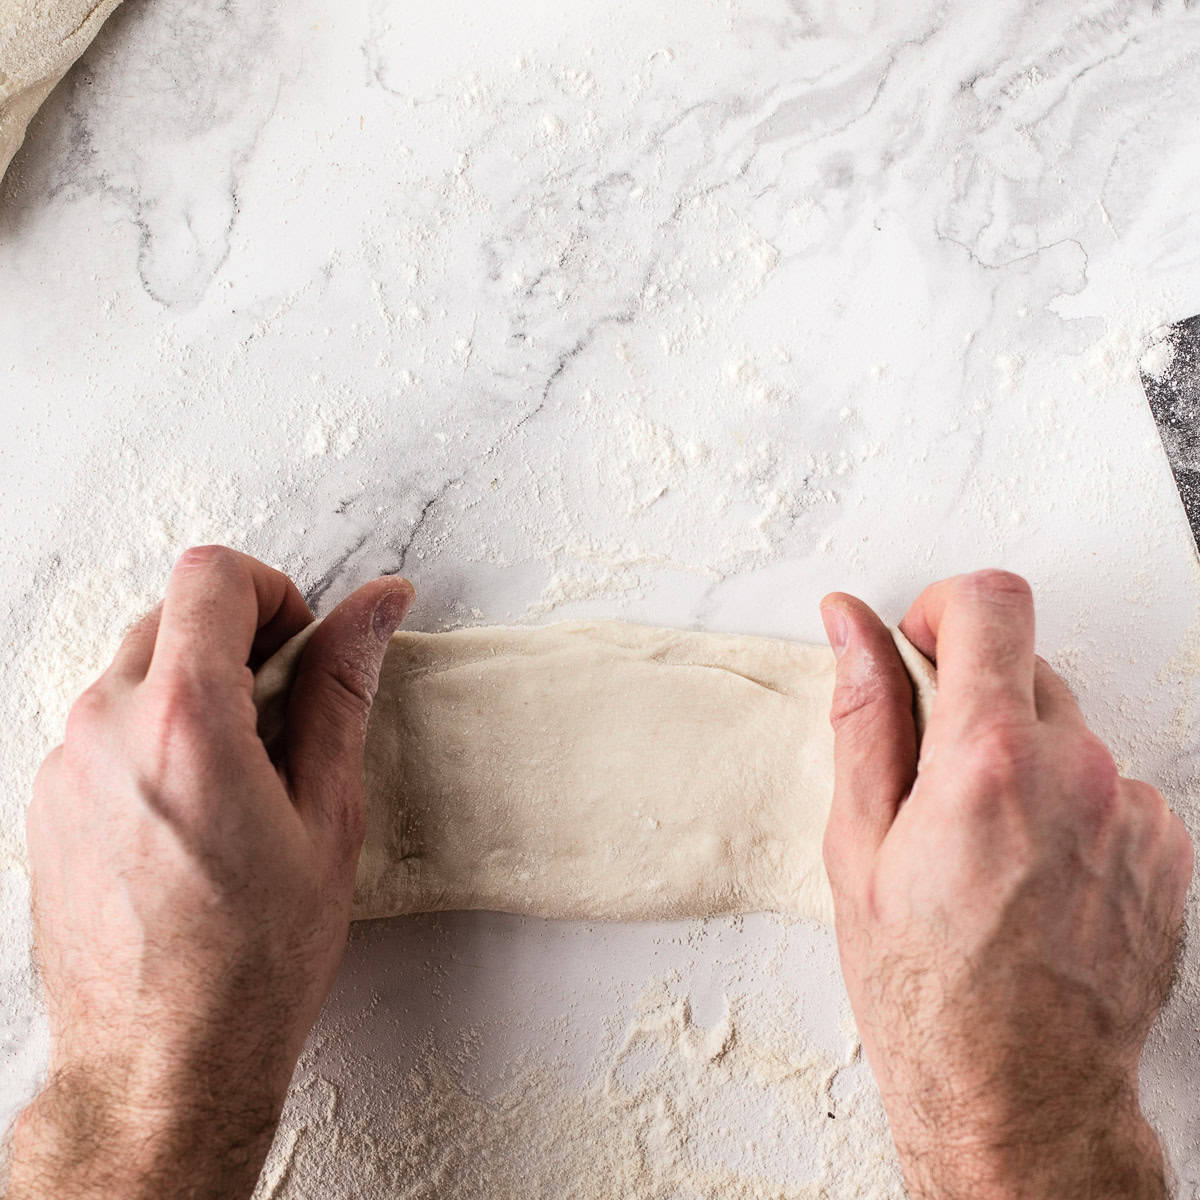
Step 4: Fold the far side over keeping tension pushing down and away into the dough with your thumbs.
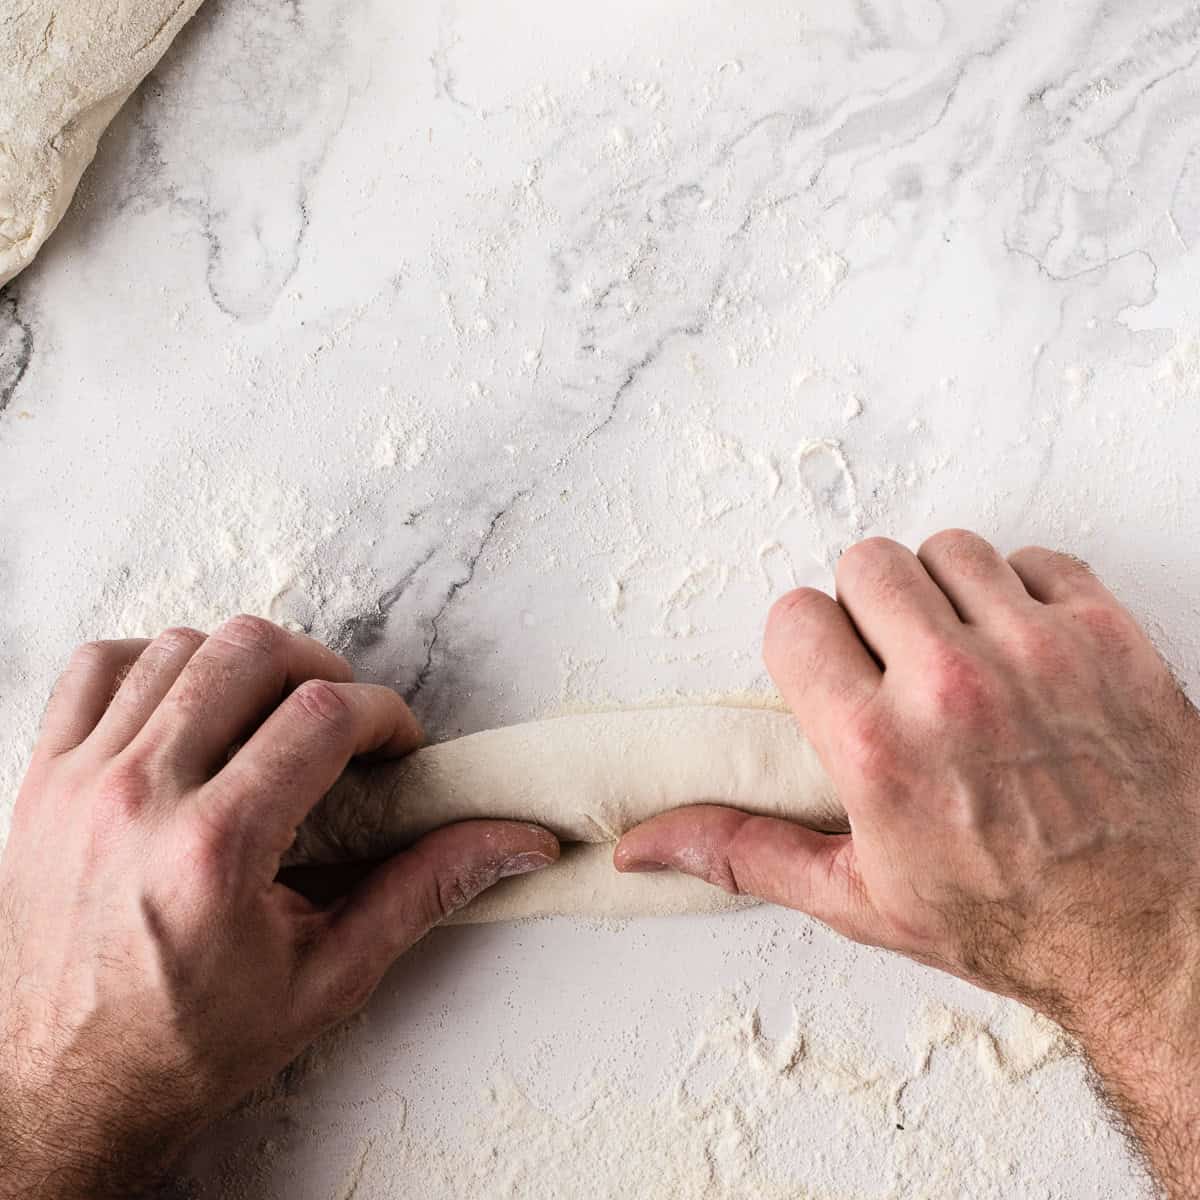
Step 5: Keep rolling and keeping the tension until you have a tight sausage shape.
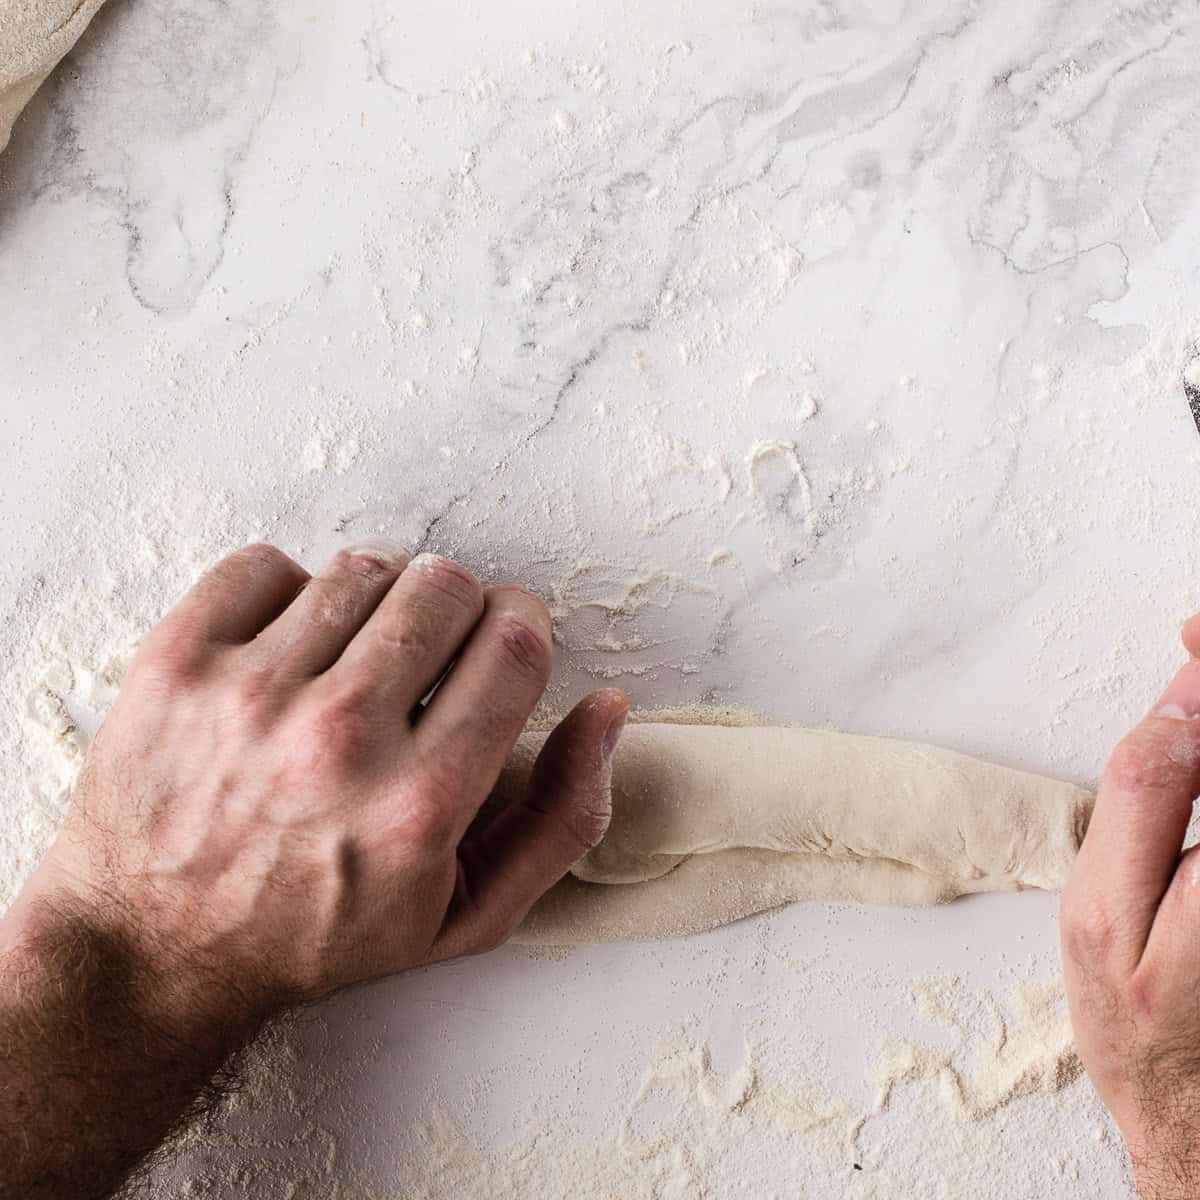
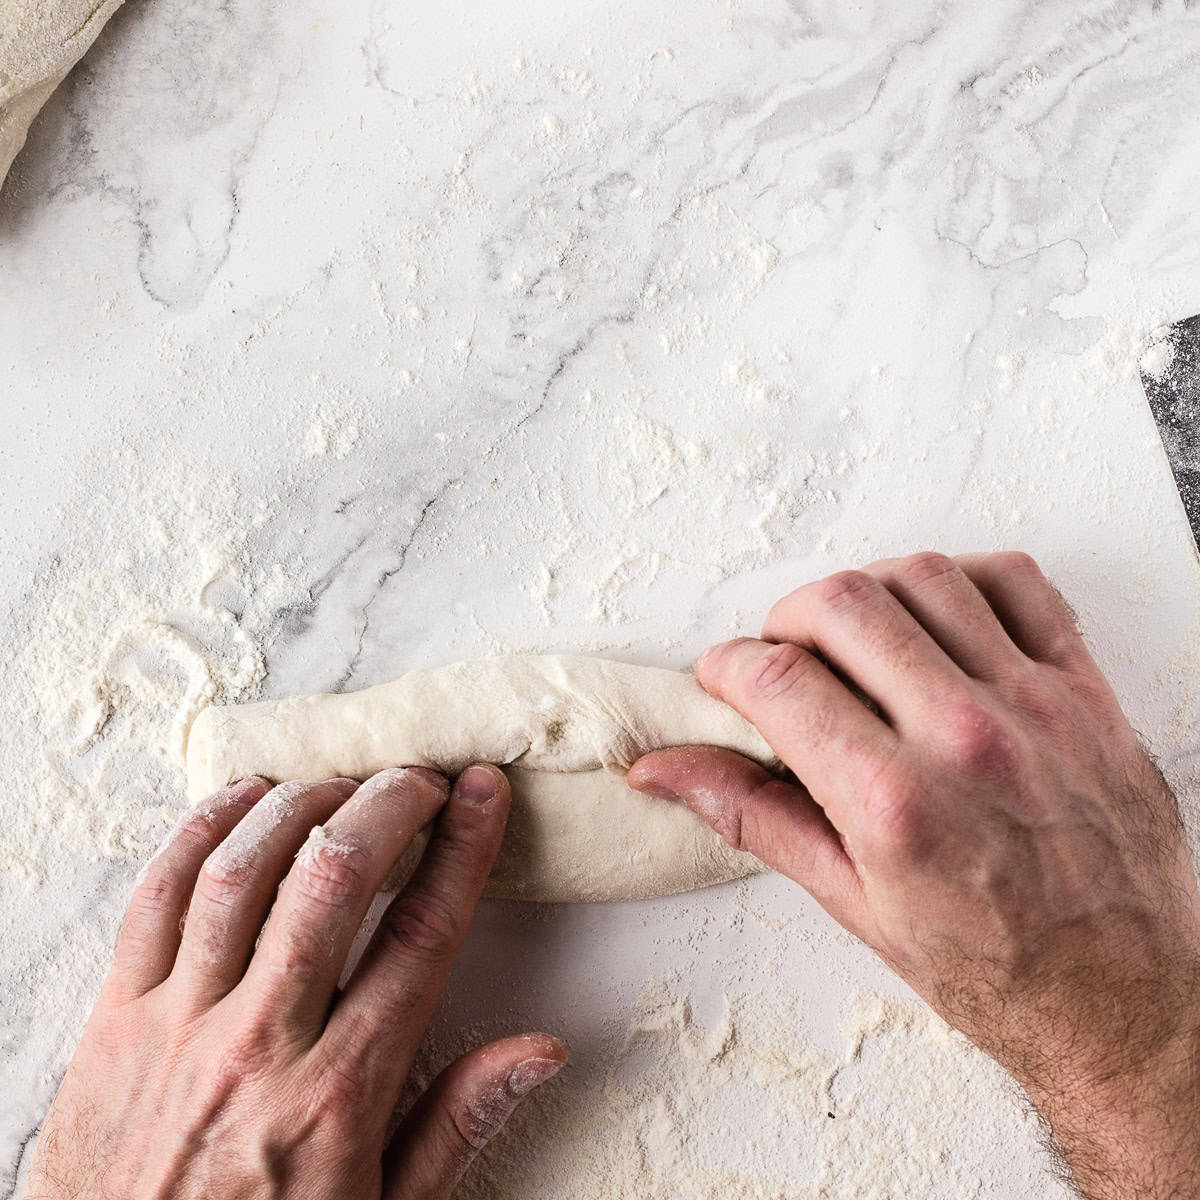
Step 6: Press the seam down with the palm of your hand.
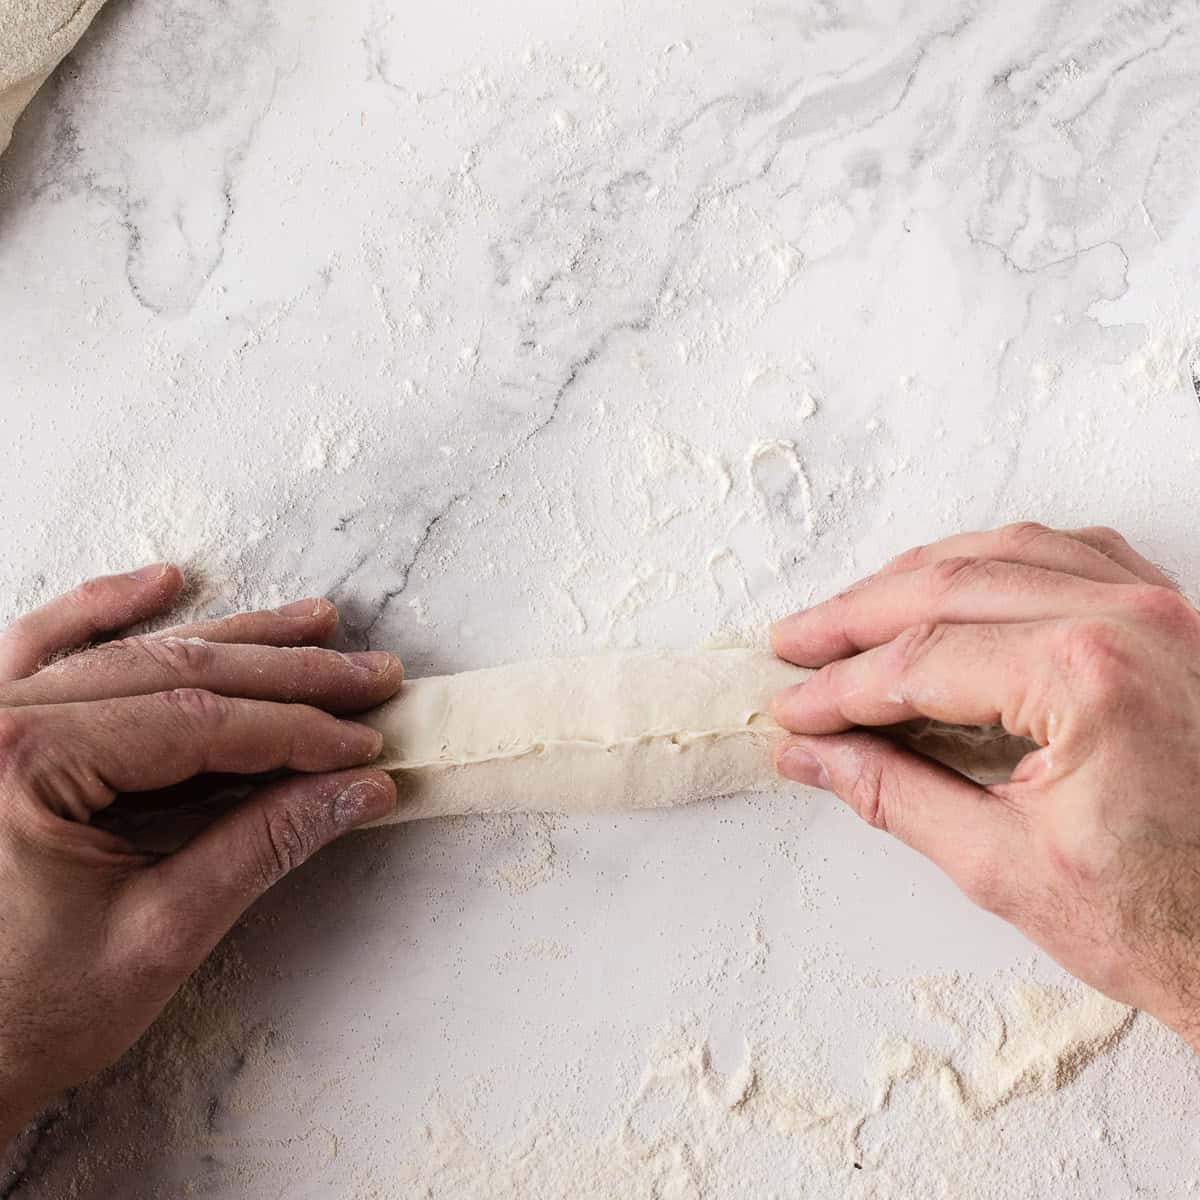
Step 7: Pinch it close with your thumbs and forefingers to make sure it's completely sealed.
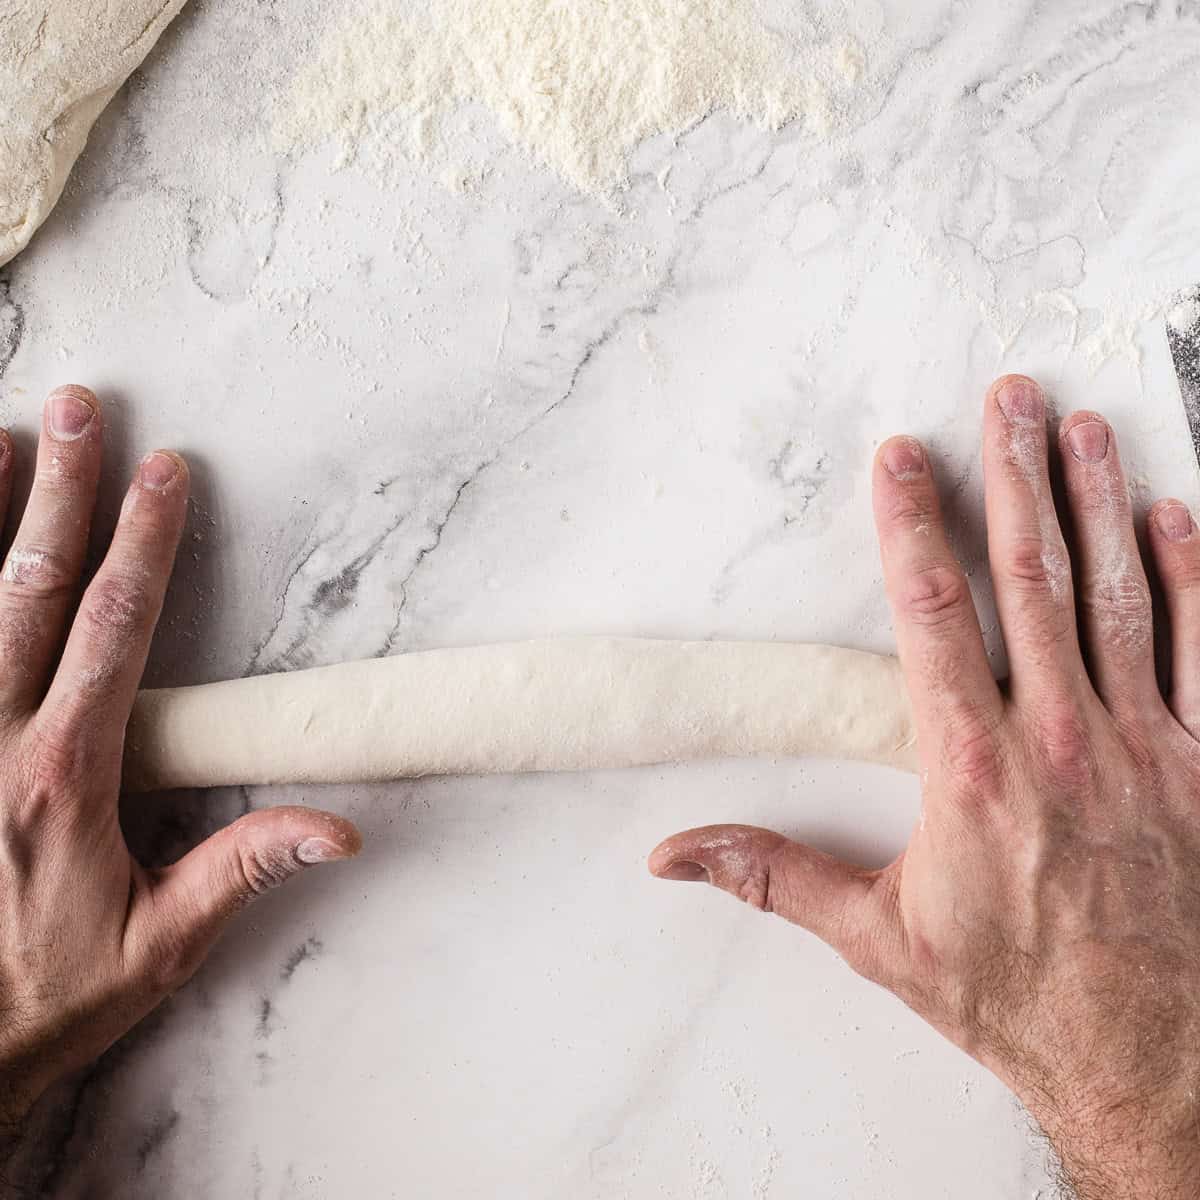
Step 8: Roll out from the centre to the outsides, keeping more pressure on the outside of your hands, to create the pointy ears on either end.
Proving

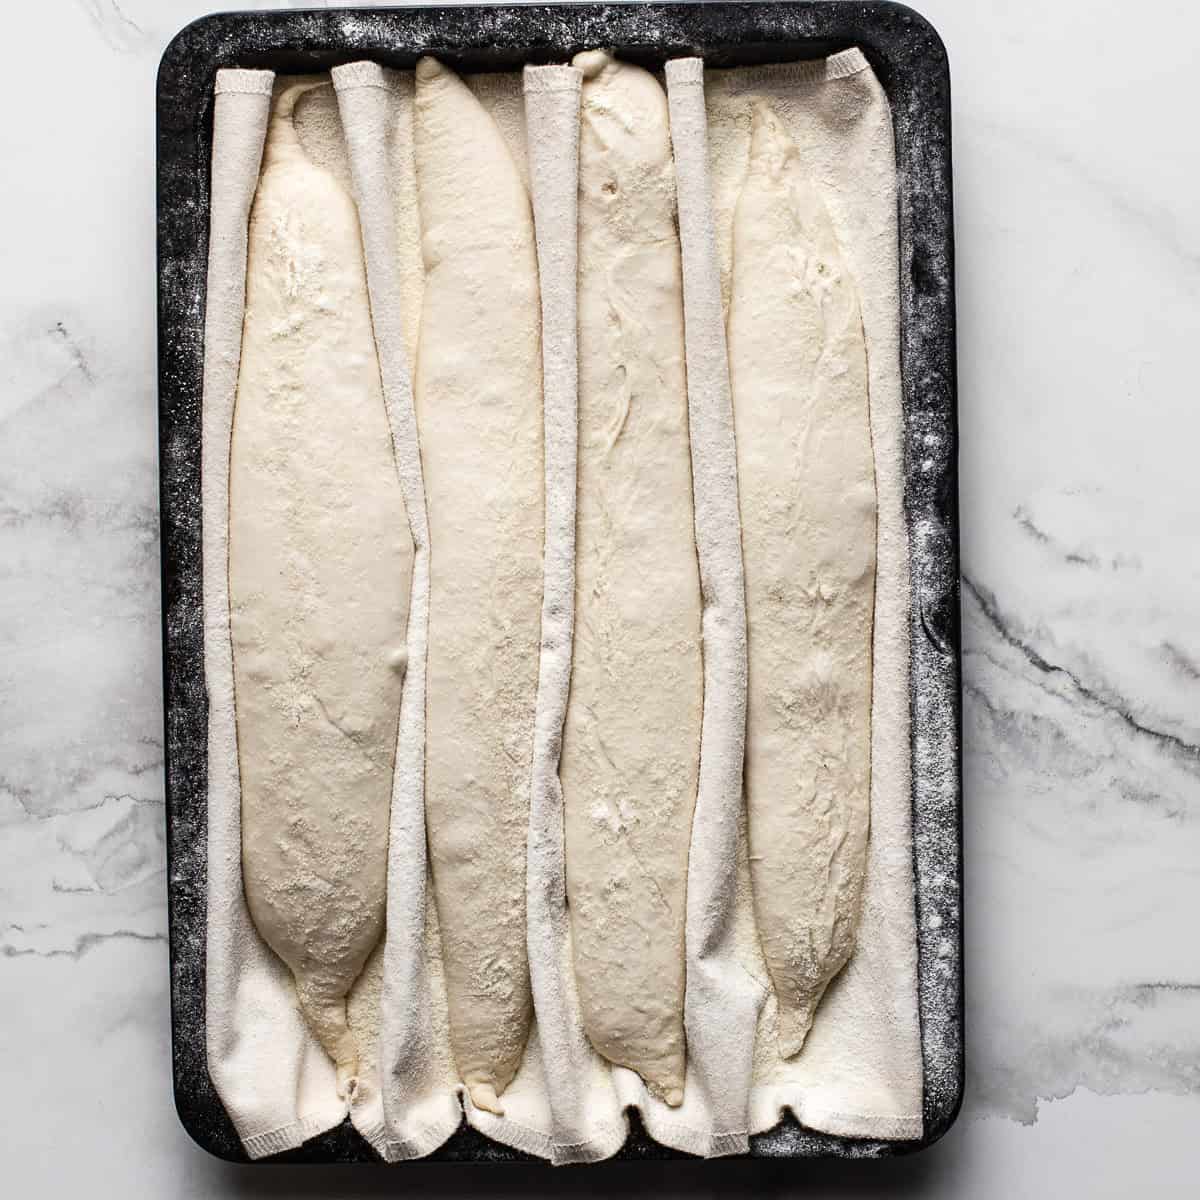
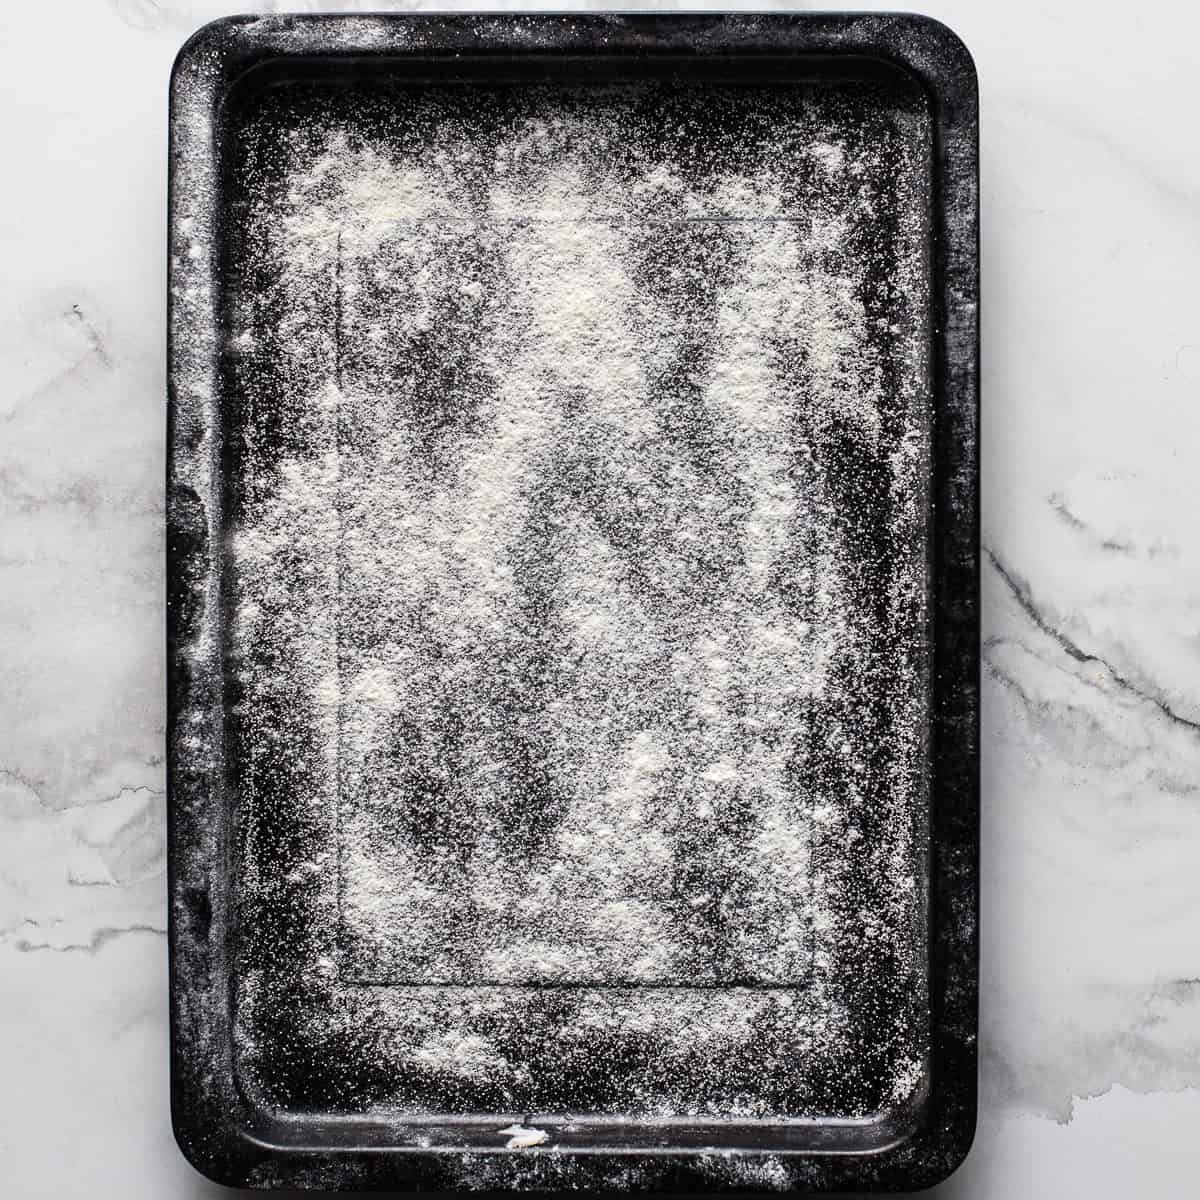
Step 1: Line a baking sheet or tray with a couche or well-floured thick linen cloth. Fold it so that it will hold your baguettes in place. The flour can be a 50/50 mix of semolina and regular flour or simply rice flour.
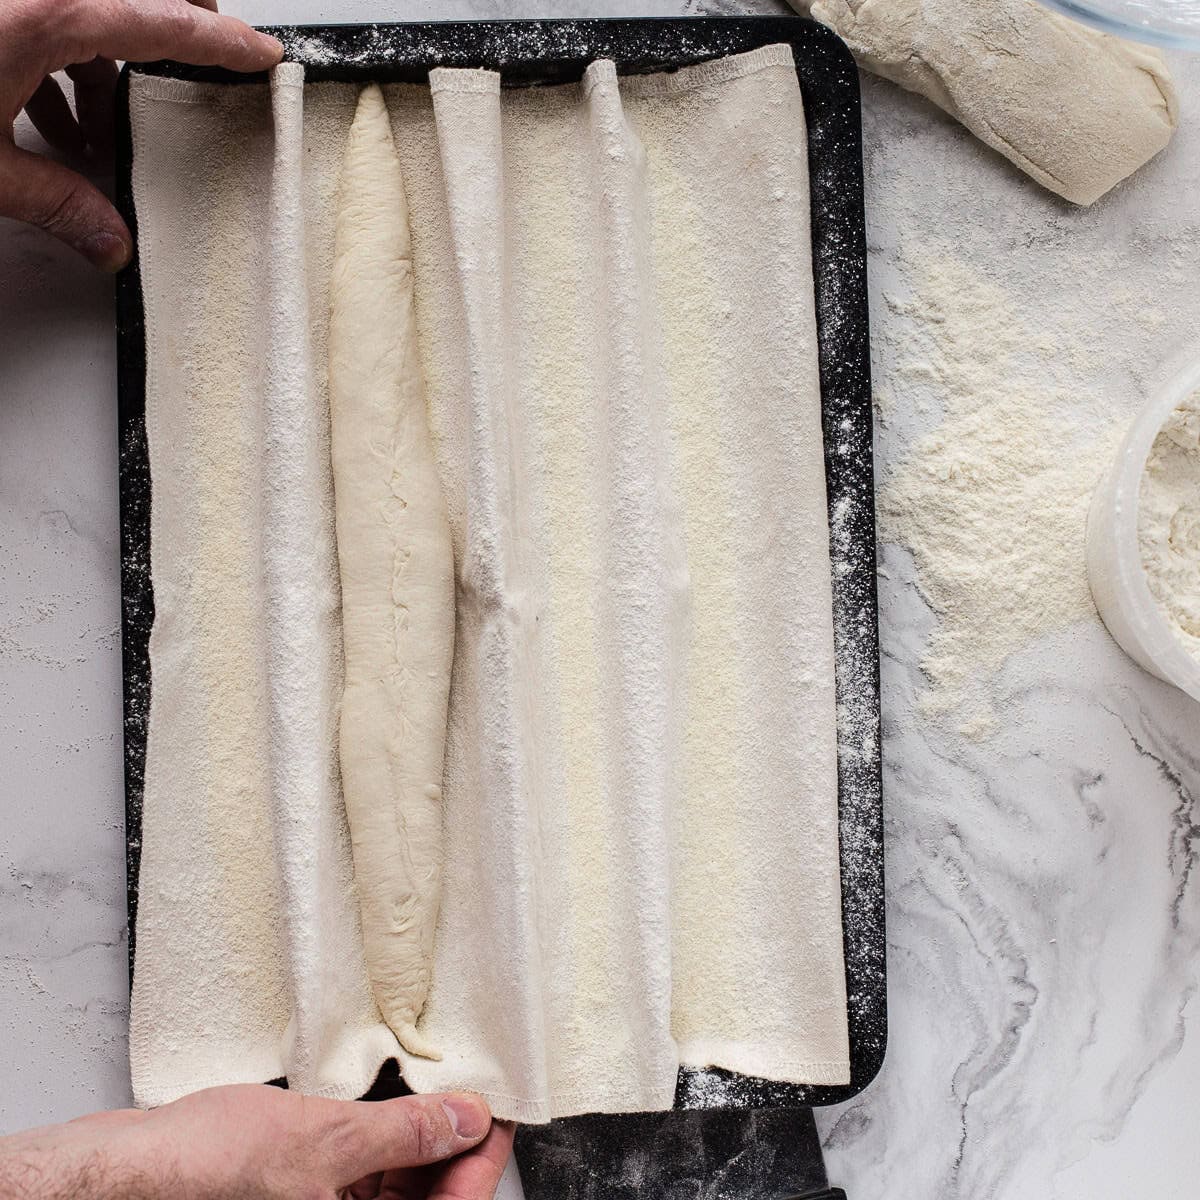
Step 2: Place your baguettes seam-side up into the folds you made with the cloth.
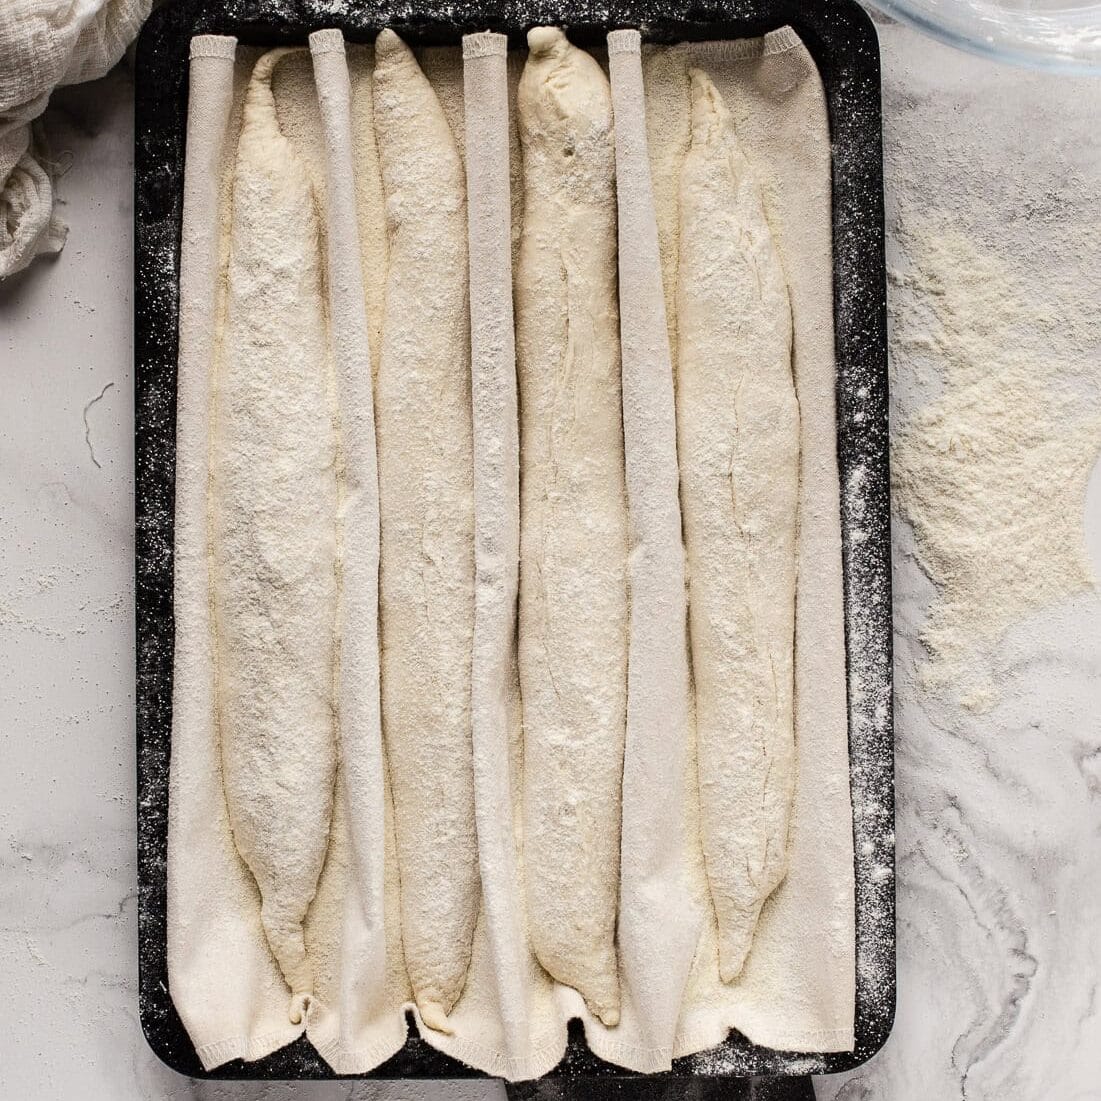
Step 3: Sprinkle with more flour mix and cover with plastic wrap or another baking sheet turned upside down.
Step 4: Proof in the fridge for 18 hours or up to 36 hours.
Scoring and baking baguettes
Step 1: Remove the baguettes from the fridge and prove at room temp if they are still a bit flat. Preheat your oven to 250 degrees Celsius or 480 degrees Fahrenheit. Place a container filled with boiling water in the bottom of the oven. Place your baking tray or pizza stone into the oven so it's hot when you need to bake. Dust the hot tray with semolina flour. Place the baguettes seam-side down onto the baking sheet. Use a special bread scorer or sharp knife to slash the loaves. The cuts should be made at a 30-45-degree angle and 1,5 centimetres deep along the length of the dough.

Step 2: Place the baguettes into the oven and bake for 30 minutes. After 15 minutes, rotate the baking sheet and turn the oven down to 220 degrees Celsius or 428 degrees Fahrenheit. Remove the baguettes from the oven. Let them cool down slightly and admire their crunchy crust and pillowy crumb before slicing a piece to sample. Enjoy with some good butter or olive oil and balsamic glaze.
Video
How to get the perfect crust
Enough moisture and a high temperature.
That's what gives baguettes or any sourdough bread such a lovely crispy and crunchy crust.
When we make bread we hydrate starches. The starch at room temperature only takes up about 40% of its potential hydration level.
As the bread bakes, those hydrated starches take up more moisture the closer it gets to 82 degrees Celsius or 180 degrees Fahrenheit. At this temperature, starches gelatinise irreversibly.
The high moisture level ensures that the temperature of the dough rises very slowly.
The yeast can perform a final supercharged fermentation and the bubbles already trapped in the dough have time to expand before the protein structure around them sets.
To make a crispy crust we want to bombard the hydrated starches with moisture so that they become so saturated with moisture, they burst and form a liquid gel.
This gel, in turn, bakes into a glass-like structure or thin crust and then finally browns due to the Maillard reaction.
For this reason, the first 10 minutes of baking is crucial as the moisture level during this period needs to be kept at a maximum. We don't want the exterior to dry out and set while the inside is still expanding.
Make sure your oven is extra steamy by placing a container with boiling water inside.
Spray the inside of the oven and also the loaf with a fine water mist every 2 minutes during the first 10 minutes of baking.
After that, you stop spraying it with water and you let the crispy crust form.
More on all that technical stuff here at Bakerpedia if you are interested in the science.
Tips for successfully baking baguettes
- Use scales for accurate measurements.
- Use an active sourdough starter.
- Dust your couche very well, otherwise, it will stick. Rice flour works better than regular flour if you have it.
- Make sure to cover the dough when not handling it to avoid it from drying out.
- Use common sense when proving and baking it. If it seems ready before the mentioned time frame then bake it, if it needs longer then let it prove longer.
- Use boiling water instead of ice cubes when baking. Ice cubes only cool down the oven whereas boiling water is only a moment away from becoming steam.
- Make sure to cool down your baguettes for at least 30 minutes before eating.
- Practice makes perfect. Very few people make great baguettes the first time. It takes practice and everyone's starter, flour, kitchen, fridge and oven is different. Practice and you'll make perfect sourdough baguettes all the time.
Troubleshooting
My baguettes didn't rise
Either your starter is spoiled or you didn't give it enough time to prove before baking it. Make sure your starter is active and bubbly and do a poke test before baking as shown in the video.
The dough got stuck to the couch.
Use more flour. If you over dust you can always brush off the excess before baking.
The color is dull.
Your oven temperature is too low or you didn't have enough moisture at the start of baking. Ensure you properly preheat your oven well in advance and bake in a nice steamy oven.
The crumb is dense and the bread is heavy.
This happens when you underproof the dough and bake it so the crust sets. Prove it properly and bake in a steamy oven.
My baguettes aren't crispy.
The temperature was too low and the moisture too high.
Variations
You don't have to stick to the classical white baguette. You can easily modify this recipe by following these steps.
- Flour - Replace 10 per cent of the white flour with rye, wholewheat, spelt, buckwheat, oat or flax meal.
- Seeds and dried fruit - Add chopped dried apricots, cranberries, cherries, walnuts, or pumpkin seeds.
- Other add-ins - For a burst of colour add a tablespoon of one of the following. Turmeric powder, cocoa powder, blue pea flower powder.
How to soften hard baguette
When you go through the trouble of making your sourdough baguette from scratch, you want to eat it all instead of giving it to the pigeons.
Refreshing it is easy and you don't waste a crumb.
Hard baguette means it has dried out and the little moisture that was in there has evaporated. This is easily fixed.
Remember we talked about hydrated starches irreversibly gelatinise when the bread is baked? This means that the structure of the bread is fully intact and the only thing we need to do is replace the lost moisture.
To do this you need to spray or dip your bread into water. Make sure the crust is completely wet but not soaked.
Turn your oven to 160 degrees Celsius or 320 degrees Fahrenheit.
Place the soaked baguettes on a lined oven tray or baking sheet and bake for 10 minutes.
Your stale baguette will be as good as new with a crunchy crust and soft interior.
Note that you can only use this lifeline once. After that, it's pigeon food.
Serving suggestions
Like with any good sourdough bread, you can simply have it with good butter or go the extra step and cook something else delicious to serve it with.
- Sandwiches - Make a simple cheese and ham sandwich for a truly French snack. refrain from overloading it with soft ingredients. Because the crust is crispy and the interior chewy, it's best to use dry ingredients like cheese, ham, liver spread or something down those lines.
- With soup - Toast it or dip it into your favourite soup like Ukrainian borscht or creamy potato and leek soup.
- Croutons - Make croutons for salads by drizzling with olive oil, salt and pepper and baking until crispy in the oven.
- With dips - Dip into baked Morrocan eggplant or pea and mint dip. My favourite is to dip into good olive oil, homemade balsamic glaze and Egyptian dukkah.
Frequently asked questions
Classic French baguettes are made with a poolish or an old dough made with fresh or instant yeast. Sourdough baguettes are made purely with a sourdough starter which contains wild yeast.
Yes, you can. When you autolyse the dough you get a technically better loaf and increase the chances of success. However, if skip the autolyse and just add all the ingredients together you will still get delicious good looking baguettes.
No. This recipe only works with a sourdough starter and long slow proof. If you don't have a sourdough starter then you would need to use a recipe specifically created with fresh or instant yeast.
Once completely cooled you should store it airtight and keep it in a cool dry place. It will keep for up to 5 days. Do not store in the fridge as bread goes stale quicker in the fridge.
You can easily bake and freeze sourdough baguettes for longer storage and for the convenience of having freshly baked bread to hand at all times.
I suggest you slice the bread and store it in airtight ziplock bags. It will keep for up to 3 months.
Because a baguette is a long round shape you will have trouble just popping it into a regular toaster. It is also browned all over so if you cut it in half lengthways you might burn the already browned side. The best way is to either fry it in a pan or toast it under the grill drizzled with a bit of olive oil.
Other recipes you might like
If you love baking bread are desserts then you will find the following recipes useful.


This site contains affiliate links. I may earn a tiny commission on qualifying purchases at no extra cost to you. By bookmarking these links you help support the upkeep of this site.
If you found this post helpful or have learned something, please comment, subscribe, and follow me on social media for more delicious recipes.
Recipe
Sourdough Baguette Recipe
Ingredients
For the baguette dough
- 450 g (3.6 cups) flour - white bread
- 280 g (1.1 cups) water
- 100 g (0.4 cups) active sourdough starter
- 15 g (3.0 teaspoon) salt
Instructions
Making the dough (This all happens at room temperature)
- Mix 250 grams of water with 100 grams of bubbly, active sourdough starter. Add in the flour and mix until fully incorporated. Cover and rest for 1 hour. During this time, dissolve the salt in the remaining 30 grams of water.
- Add the salty water to the dough and mix well until the dough is smooth. Give it a stretch and fold by pulling up one side of the dough and folding it over itself, repeating around the perimeter of the dough. When done, form into a ball and place into a clean, lightly oiled bowl covered with a damp cloth. Let it rest for 1 hour.
- Repeat the stretch and fold process twice more, resting the dough for an hour after the second set of folds. After the 3rd set of folds, let it bulk ferment for 2 hours. Make sure to cover the dough with a damp cloth when not handling it.
Shaping
- Place the dough onto a lightly floured work surface and divide it into 4 equal pieces for demi baguettes or two for longer baguettes if your oven and equipment allow for it.
- Gently pat out some air and flatten it into a rectangle.Fold the far side over keeping tension pushing down and away into the dough with your thumbs.Keep rolling and keeping the tension until you have a tight sausage shape.Press the seam down with the palm of your hand.Pinch it close with your thumbs and forefingers to make sure it's completely sealed.Roll out from the center to the outsides, keeping more pressure on the outside of your hands, to create the pointy ears on either end.
Proving
- Line a baking sheet or tray with a couche or well-floured thick linen cloth. Fold it so that it will hold your baguettes in place. The flour can be a 50/50 mix of semolina and regular flour or simply rice flour.
- Place your baguettes seam-side up into the folds you made with the cloth. Sprinkle with more flour mix and cover with plastic wrap or another baking sheet turned upside down. Proof in the fridge for 18 hours or up to 36 hours.
Scoring and baking
- Remove the baguettes from the fridge and prove at room temp if they are still a bit flat. Preheat your oven to 250 degrees Celsius or 480 degrees Fahrenheit. Place a container filled with boiling water in the bottom of the oven. Place your baking tray or pizza stone into the oven so it's hot when you need to bake. Dust the hot tray with semolina flour. Place the baguettes seam-side down onto the baking sheet. Use a lame or sharp knife to slash the loaves. The cuts should be made at a 30-45-degree angle and 1.5 centimeters deep along the length of the dough.
- Place the baguettes into the oven and bake for 30 minutes. After 15 minutes, rotate the baking sheet and turn the oven down to 220 degrees Celsius or 428 degrees Fahrenheit. Remove the baguettes from the oven. Let them cool down slightly and admire their crunchy crust and pillowy crumb before slicing a piece to sample. Enjoy with some good butter or olive oil and balsamic glaze.
Video
Notes
- Sourdough baguettes will last for about 5 days sealed airtight. They will lose their crunch but you can refresh them by toasting or frying in a pan with a bit of olive oil.
- It can be frozen for up to 3 months. Cut it into slices and store airtight in the freezer for convenience. Whenever you want a little snack or a piece of baguette, simply take a slice from the freezer and warm it up.


Amanda says
Just took mine out of the oven and they are fantastic! I followed the recipe but tried not to overthink the process, just sort of went with the signals my dough was giving. Delicious! Will make them again....probably will start tonight!
Mike McCaw says
It is physically impossible to dissolve 11 grams of salt in 22 grams of water!
The solubility limit of sodium chloride is 26%.
Does this mean I should add some extra water so it is all dissolved, or will the fact that half of the salt is still solid not a big issue? It would not be as evenly dispersed in the dough as it would be if actually dissolved.
Alternatively, should the original dough be made stiffer by reserving 44 grams of water to dissolve the salt?
Charlé Visser says
it's ok if not all the salt is dissolved. The final product will not know the difference. One thing I would add. I've lately added my salt in straight away with the water, and I find it makes absolutely no difference for me. Bakers do swear by adding salt later, but in reality I find this to be overblown precision.
Anonymous says
Thank you very much! That is helpful information. I'm looking forward to tasting these.
Mike
Shelley says
I'm really happy I found your recipe, it works well for me.
I make two larger loaves, and am very pleased (as are my friends).
My question: I know the website has adjustments for the number of loaves. For example, to double it simply doubles all the ingredients. Does this really work?
I know in a lot of pastry baking (e.g. cakes, cookies, etc.) a strict doubling does not always work.
In the past I basically resort to making two batches of dough, but if doubling it truly works, that will take some of the labor down a notch.
Your thoughts?
Thanks!
Charlé Visser says
For most recipes it's totally fine if you scale it up, because the ratios/percentages always stay the same. The problem comes in scaling up when equipment are not made for scaling. For instance, a home oven can't be filled up with bread. It will cause uneven and uneventful loaves. Mixing bowls and fridges might also end up overloaded or the recipe ingredients unequally divided, resulting in the ratios being off. So technically you can scale it to tons but you also need to factor in your setup to accommodate for it.
Cari Roeber says
What amazing baguettes! Love this recipe. However, for me personally, I have struggled with flat loaves lately. Mostly in the colder weather this winter. Another issue that I've seemed to encounter on recent attempts, was real difficulty incorporating the salty water when it was time. The dough seemed to have become a bit "tough" or something, making it hard to incorporate the salty water to make a homogenous dough. I think I will give it another shot soon and attempt to tweak a bit? Maybe not waiting as long before adding the salty water. I'm glad it's getting warmer here in the Midwest, hoping that helps. And if you have any tips, I'd be so happy to hear it.
Charlé Visser says
You can increase your bulk ferment by a few hours before shaping them and doing a slow fridge ferment.
Jessica says
This was a trust the process recipe for me. But it turned out amazing. Best baguettes I’ve ever made.
Anna says
The section, “ Place the baguettes into the oven and bake for 30 minutes. After 15 minutes, rotate the baking sheet and turn the oven down to 220 degrees Celsius or 428 degrees Fahrenheit.”
Is making me very confused. To clarify, do you bake them at 480 for 30 minutes and then drop the temp for an additional 15 minute cook?
Charlé Visser says
You bake them total 30 minutes. The 30 minutes is split into 15 minutes at 480, and 15 minutes at 428. A total of 30 minutes.
Cheryl Wakneen says
This recipe was easy to follow but didn’t come out as puffy and big. My oven was very hot with steam as well but I noticed they didn’t rise much when I placed them in the fridge for 36 hours and 3 hours at room temp. Will leave them out to prove longer next time as I think my room was a bit cold. Still very delicious with butter.
Amy says
It’s taken some practice for me to make these look like baguettes, but I’ve made this recipe about five times and it’s always delicious! I even won a sourdough bake-off at work with these, and a chef said it reminded him of the childhood baguettes he had from his home country. I now divide into 3 instead of 4, and I think this is the perfect size for my stone, but no adjustments otherwise. Thank you for such a clear set of instructions and this beautiful recipe!
David M says
This has become my favorite, go-to baguette recipe. Truly amazing! I grew up in France, so I am picky about my bread, too! My one question would be about shortening the proofing. Can you do part at room temperature instead of the refrigerator if in a hurry?
Charlé Visser says
Sure thing. You can skip the fridge ferment.
Brigitta Shields says
My Baugettes are burning.
I tried 250 degrees Celsius to start and it burned, dropped it down to 230 to start and still burned.
Any advice ?
Charlé Visser says
Check your oven settings. If it burns, I suspect it's heating from top and bottom elements like grill spirals. Use the convection (fan) setting if you have it. If your oven only has the top and bottom elements directly blasting heat onto the bread, then place a baking sheet in between your heating element and the baking sheet with the bread in order to avoid the direct heat. Hope that fixes the issue.
Denise Haney says
I have been making this recipe for quite some time now and they are always delicious. I notice that you recently updated the timing in the recipe with a bulk fermentation after the stretch and folds. What was the reason for this?
Charlé Visser says
I realised that a lot of people are having difficulty getting the proper proof. Maybe they have super cold fridges or slow starters. Many reasons. So, to help get around that I added a bit more time out of the cold. If the previous method worked for you then stick to that!
Roberto says
I thought you posted a baguette recipe using the poolish method and refrigerating overnight but I can't find it now.
Vickie Price says
I made this recipe today for my third time. However I didn’t leave them in the oven anywhere near that long. They were getting quite brown on top and I temped them at 210 F. So I took them out. I did the recipe in two baguettes instead of 4 so not nearly as tight rolled either. Is that why they were done so fast?
Charlé Visser says
Depends on many things. Did they come out successful, though?
Vickie Price says
Are these mini baguettes? You don’t say how big they are. I’m going to try the recipe but I have one of the perforated bread trays for two loaves
Charlé Visser says
They are demi baguettes, meaning half the size of a regular baguette.
Christy says
Followed this recipe the other day, and made four extremely dense, thin breadsticks. Trying again tonight, and paying more attention to the dough than the time. I've gone 2 hours past stretch & folds, and dough still looks underproofed. Dough temp is currently 73º F. I'm gonna wait a while longer and see what happens, but would love to know if (for next time) I can put in the fridge early, let sit in there overnight, and continue BF in the morning?
Charlé Visser says
The dough is feeling cold so let it BF longer before you divide and shape. Judging by the slow rise I would let it proof a bit before moving into the fridge for a nice long slow proof. Try pushing it to 20 hours. When you you want to bake it, do a little poke test first. If it’s still under let it proof a bit more in a warmer place before baking. Hope they come out like airy large crispy breadsticks this time
Brittany says
These look delicious. Is it possible to split the dough into 2 loaves rather than 4?
Charlé Visser says
Only if you have a very big oven. Best to do 4 in a home oven.
Lisa says
Love your video. My dough is resting now but is very wet! Hope to save it, any suggestions? The recipe calls for 30g of water with the salt but the video says 20. Of course I did 30. I will try to save with the added flour on bench shape, etc…
Can’t wait to try.
Charlé Visser says
Welcome! 10g water here and there won’t make much difference. Hope it came out good!
Charity says
Oh how I wish I would have seen the video before making these! When I'm making a classic table loaf, my dough usually takes around 10-12 hours. I followed your recipe exactly, but my baguettes came out more like skinny breadsticks, and I'm wondering if it's because your recipe doesn't call for very long fermentation? Cheers!
Charlé Visser says
All depends how much it rises in the fridge. Could take much longer depending on few factors like temp and starter. When you want to bake and it still looks flat, simply leave it at room temp to proof, into the fridge again for 10 minutes or so(will make slashing the dough easier) then slash and bake.
Sinei says
Hi! First timer here. It was so cold today that my starter took longer to be ready. I’m now waiting to do my first fold and wondering if instead of needing to shape tonight I can put it in the fridge after my last fold and pick it up in the morning after bringing it back to room temp? Thank you!
Charlé Visser says
Hello Sinei,
It’s better to shape it and stick it into the fridge for a nice long slow proof.
But if the timing don’t work for you then feel free to bulk in fridge, shape the next morning while the dough is still cold.
Bring it up to temp so that it can proof. Then once proven you stick it into the fridge open for 15 to 20 minutes.
This makes it easier to slash and handle.
Then bake as instructed. Good luck!
Christina Williamson says
When I start the process and add 50 grams of white bread flour and 50 grams of water, how many grams of starter am I supposed to use?
Thanks!
Charlé Visser says
200g starter should be good. It’s just to get whatever starter you have nice and active. If you already have it ready and active. Go straight to the 2nd step
Grace M. says
AMAZING! Thank you so much for this recipe! I have used it throughout my university days, as they are stressful and baking dilutes the stress for me! This is the easiest recipe I’ve ever followed, and it is by far the most delicious bread I’ve ever made. I know my family thanks you too, as they reap the benefits.
Mar says
Can you please tell me what type of salt you use?
What should the temperature of the water be when feeding the starter?
What should the temperature of the water be when mixing the water with the starter and bread flour to make the baguettes? And the water temp for the water and salt mixture? Sorry to be so basic!
I fed a 100 grams of rye starter with 100 g of rye flour and 100g room temp water. Correct? Yes? No? Too much? Your recipe called out for 50 g of flour and 50g water. Or should I have started with 50g of starter?
Thank you in advance!!!
A Super Novice!
Charlé Visser says
Salt is simple fine sea salt.
Just room temp water all round is good.
You feed your starter with 50g flour and 50g water the night before to get it nice and active.
To make the bread you use 100g of that active ripe starter.
Jill says
Hello, great recipe! Thank you! The only confusing part was the bake time. I read it as “bake 30 minutes” and THEN turn the tray and turn down the oven for an additional 15 minutes.. until I read the total bake time. A better way of saying it could be, “ Place the slashed loaves into the oven and bake for 15 minutes at 250 degrees Celsius or 480 degrees Fahrenheit. After 15 minutes, rotate the tray and turn the oven down to 220 degrees Celsius or 428 degrees Fahrenheit, rotate the tray, and bake for an additional 15 minutes.
Stefan says
I might overlook, but seems like you did not specify how much flour to use, there is nice picture of it in bowl but no specs. Please can you reveal the mystery number.
Stefan
Charlé Visser says
In the recipe card but it’s 400g. Let me know how it goes!
Nicki says
Just starting on the sourdough journey and found your baguette recipe - easy to follow and great results, gave me a lot of confidence that I can do this! It's a keeper! Thank you so much
Mark says
The recipe calls for 280 g (1.1 cups) water but later calls for salted water. I think something is missing
Charlé Visser says
The total water is 280g/ ml
You use 250g to hydrate the dough.
You then mix the remaining 30g water with the salt and add that after the initial hydration.
This step is more for pros and picky bakers, but you could easily skip it and get a great baguette.
Nothing missing. All there. Hope that helps.
Gavin Jenkins says
Absolutely fantastic recipe. Instructions are clear and easy to follow for a novice. The dough shapes like a dream compared to some other popular recipes. Will be trying some of your other recipes too. One question… Can regular sourdough be shaped into a baguette? Of coarse it can but does it come out good?
Charlé Visser says
Great to hear. Yes it will work, might be a bit more difficult to shape but then then again you can always just drop the hydration a bit.
Abby says
I have had trouble with these rising sufficiently after being in the fridge, even though I already had bubbles in the dough before shaping. would leaving them out overnight cause over proofing? If so, I'm thinking I'll just try to start the process in the morning and let them rise for a few hours before baking. They taste great, though!
Also made the borodinsky bread last weekend and it's amazing!
Charlé Visser says
Sure just change your schedule a bit so they rise for longer.
Anonymous says
I've made these three times now, and the second time I doubled the recipe. My family loves these baguettes! The only thing I change is that I put all the ingredients together in a bowl (starter, water, salt and flour) and then let it sit for an hour then do 3 stretch and folds every 45 minutes. Once I also used an unfed starter and it still worked perfectly. After the 3 stretch and folds, I let it bulk ferment for a few hours on the counter then I shape. I found that letting them rise on the counter for an hour or two provides the same result as letting them cold proof overnight. I usually choose cold-proof because it's more convenient and I can bake it whenever I'm ready the next day.
Hailey says
Tried my best to follow this recipe as carefully as possible, but my loaves didn’t rise and turned out VERY hard on the outside, but still soft on the inside. What could I have done wrong and how can I correct for next time? I am at a higher elevation, about 2,500 ft.
Charlé Visser says
If the loaves had a hard time rising it needs a bit more warmth or time. Keep it in a warmer place if possible until nice and puffy before baking. Don’t worry about the altitude when it comes to a loaf of bread. Make sure your loaf is risen nicely. Have a nice hot steamy oven. Hope that helps!
Garnett says
Hi Charlé, Other recipes for sourdough baguettes also emphasize the steam as you do. Most of them remove the steaming pans after 15 ish minutes (dangerous!). Do you also recommend removing the steam source about half way through the bake? Thanks for this awesome recipe!
Charlé Visser says
If it's still very steamy in there, then pull it out, but I never do. The heat in the oven should be high enough to temper the steam, so it does not become a steam room.
Garnett says
That makes sense. I plan to use the lava rocks steaming for the first time and was
a bit fearful about removing them when so hot. Many Thanks! PS - you're amazing about responding so quickly - so helpful!
Charlé Visser says
Great! Send a picture of the result!
Laura says
Amazing taste and instructions! Thank you, thank you! Now on to trying the Parmesan Shortbread recipe. 🙂
Michael says
I tried making these this morning and had a couple issues. The first problem was that when adding in the water/salt mixture after the autolyse, it was very hard to get the newly added water and salt to incorporate into the dough. I had to use my hands and really dig in there, at which point the dough became very wet and smooth, almost stringy. Was this because I over-mixed the dough when I initially combined the starter, flour, and water? Are you only supposed to mix the flour, water, and starter until they come together into a dough, or should I form it into a ball.
The second issue I encountered (and I believe this was because of the trouble I had mixing the dough originally) was that the dough was very firm. This made it difficult to perform the stretches and folds, as well as shape it. The dough was very dense, and so it didn't rise overnight in the fridge. It also didn't rise much in the hour I left it out before baking, and as a result my baguettes were extremely thin and un-usable for sandwiches.
Any advice would be appreciated, the taste was delicious!
Charlé Visser says
Add all the salt and water in at once if the autolyse causes problems. Add a bit more water if your dough is too stiff. Might be a more absorbing flour. If it does not rise much let it proof longer. Leave it out of the fridge longer too and make sure it’s proven well before baking.
Brittany says
First time using my homemade sourdough starter, first time making baguettes. Sooo happy with the results! Great recipe and I enjoyed how easy the process was by following your time/day schedule. Looking forward to trying more of your recipes!
nancy says
I made a bit of a mistake and added the salt in the beginning rather than dissolving it in water and adding it to the next step.Should I pitch it or will it be ok? Looks like a beautiful dough so far. Thanks!
Charlé Visser says
Keep calm and carry on. All will be good)
Leanne says
Hi,
Do u have a recipe for baguettes thats at least half whole wheat or rye flour?
Or can I just add it?
Charlé Visser says
You can just do half half but remember the gluten will be low and the bran will interfere with the structure so it will be denser. No matter what recipe you use.
stephen mackin says
So, I tried this recipe. Followed all of the timings and everything seemed good until it came to shaping the baguettes. The dough seemed very wet and I struggled to shape the baguettes - dough sticking to my bench. But I persevered. After refrigerating overnight, the baguettes rose and looked good, at the half way point of baking. Then when I turned them in the oven they seemed to shrink.
Taste really good, just think I must be doing something wrong with the dough.
Will try again.
Charlé Visser says
If the dough is hard to handle, reduce the hydration by 3%. Sounds like might have turned them a touch early. Let them develop a good dark crust and then flip. If need be turn the oven temperature up to get a better bake.
Carmen says
Hello! This is my second time trying to make baguettes in the last couple weeks, and each time, the dough appears to be too wet and heavy in the stretch and fold phase and after. While the taste was great and even the structure wasn’t too bad, my baguette never really rose in the fridge or in the hour after, and so they were little and thin! Any ideas? My sourdough starter is very active and bubbly (doubles in size after feeding), and I followed the directions to a T! Thank you!
Charlé Visser says
The rise in the fridge is very much dependant om fridge temp. You just leave it out to rise until it’s ready to bake. As far as dough consistency goes, flours vary a lot so if it feels a bit loose then add 25 grams flour and see how it goes. Once you get a feel for how the dough reacts and the perfect rise time for your setup, these are very great little baguettes. Hope that helps and please do ask if you need more help.
JR says
I'm lazy, so I tend to shy away from overnight recipes, but my wife and teenaged son massively prefer these baguettes to any other recipe. They're so good. Blisters on the crust, and a chewy wonderfullness. Thanks so much.
Is there any reason not to slash them immediately when I take them out of the fridge? When they soften, instead of getting a nice deep slash I get like ... 3 millimeters. (And I bought a--the cheapest, granted--lame, too!)
Charlé Visser says
Glad to hear they are popular with the family)
If you get good proof on them in the fridge you can slash cold and bake straight away.
If you slash them under proved it won't turn out well. You could also try popping them back into the fridge for a few minutes once proven to make the slashing a bit easier.
JR says
Thanks! Will do.
Narelle says
Charle - thank you so much for your generous sharing of your recipes. i made these baguettes and they are magnificent. Great, clear instructions made the process so simple! New best favourite sourdough recipe!
Charlé Visser says
Hopefully good))
Anonymous says
Perfect baguettes! They are so crunchy! OMG
Natalia says
Hello. I’m planning to make this recipe today. But wanted to clarify the starter. You mention to use your rye starter recipe (which is a mix of white and rye flour, plus water) but in this recipe you say to feed your starter with just white flour and water. Does it matter which one you do? My current starter is a rye one like you mention, it’s doing great so I don’t want to mess with the routine on it. Any suggestions? Thank you
Charlé Visser says
Just feed it like you feed it. I only add rye flour to me starter again after a few discards. Rye is like a multivitamin to the yeast.
Jeff B says
Hi!
Instead of shaping the baguettes before the long refrigerator rise, can I just put the dough in the fridge overnight, then next day divide the dough, shape baguettes and let proof for an hour before baking? I don’t have room in my fridge for a pan of baguettes.
Thanks!
Charlé Visser says
Jeff, just shape them. And let them proof for a few hours then bake. Same day and no fridge space issues.
Joe, S says
First time baguette maker here! They are amazing. You really know how to explain recipes in such detail.
Suzana Wilder says
Followed the steps exactly and got perfect baguettes! Thanks for the detailed recipe.
Alison says
Made these over the weekend. They baked up wonderfully.
I've tried a few great sourdough baguette recipes over the years and this recipe is probably my favourite in terms of simplicity and the wonderful instructions.
Thanks so much for sharing and taking the time to explain it all in such detail.
Will also be trying your Borodinsky bread soon. It's caused quite a stir in the "bread baking circles".
My local baker told me your recipe is something truly unique and amazing so got to try it!
xxxxxx
Mark says
Just WOW! Amazing sourdough baguettes and I'm a novice home baker. They were crunchy on the outside, light and chewy on the inside. Never knew I would be able to make bread this good at home. Thanks for the detailed instructions especially with the dreaded shaping, which is a struggle and a half.