This beginner-friendly sourdough bread recipe eliminates unnecessarily complex steps. By skipping the traditional autolyse and pre-shape, you can easily bake a loaf with a crunchy crust, a pronounced "ear," and a soft, open crumb.
Understanding the visual cues of fermentation, rather than relying strictly on a clock, is the key to consistent results. It all starts with a simple-to-make sourdough starter.
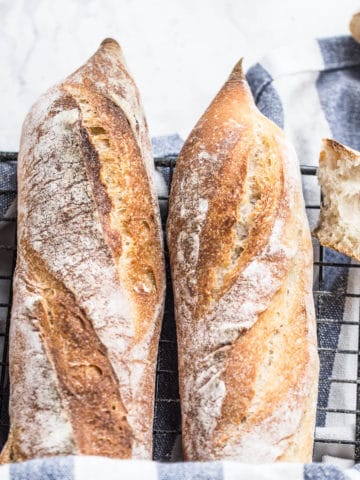
Once you master this foundational recipe, you will be able to easily adapt these skills to bake sourdough baguettes, flaxseed sourdough, or a rich, dark Borodinsky rye bread.
- Yield: 1 Large Loaf (~900g)
- Hydration: 75% (The Beginner "Sweet Spot")
- Hands-on Time: 35 Minutes
- Total Time: 18-24 Hours
- Difficulty: 2/10 (No-Knead Method)
- Essential Tool: Dutch Oven
Jump to:
- A simplified method for beginners
- The weekend sourdough baking schedule
- The exact ingredients (and why we use a specific flour blend)
- Essential sourdough equipment
- Step-by-step instructions
- Watch how to make it
- How to store and refresh sourdough bread
- What to do with stale sourdough bread
- Easy sourdough variations to try next
- Sourdough troubleshooting & FAQs
- Common sourdough terms explained
- More bread recipes
- Recipe
- Comments
A simplified method for beginners
Many sourdough recipes use techniques designed for commercial bakeries that manage hundreds of loaves. While techniques like a strict autolyse or a multi-stage shaping process are scientifically sound, they are not strictly necessary to bake an excellent loaf in a home kitchen.
This recipe streamlines the process. There is no delayed salt addition, no pre-shaping, and no heavy kneading required. Instead, this method relies on a simple one-bowl mix, gentle folding, and precise visual cues to guarantee success.
The weekend sourdough baking schedule
Sourdough fermentation takes time, but the actual hands-on work is minimal. Here is a practical weekend schedule that fits into a standard routine:
| Stage & Time | Action Required | Hands-on? |
|---|---|---|
| Fri 10:00 PM | Build Levain: Mix starter, flour, and water. Cover overnight. | ✅ 5 mins |
| Sat 8:00 AM | Mix Dough: Combine levain with flour, water, and salt. | ✅ 10 mins |
| Sat 8:30 AM | Stretch & Folds: Perform 4 sets of folds, 30 mins apart. | ✅ 5 mins x 4 |
| Sat 10:30 AM | Bulk Fermentation: Rest until dough rises by ~75%. | ❌ Passive |
| Sat 4:00 PM | Shape & Retard: Shape loaf and place in fridge (12-24 hrs). | ✅ 10 mins |
| Sun 8:00 AM | Preheat: Place Dutch Oven in oven at 250°C (480°F). | ✅ 2 mins |
| Sun 9:00 AM | Score & Bake: Bake covered (20 min) then uncovered (20 min). | ✅ 5 mins |
Customize it to suit your schedule in the table below!
Custom Sourdough Schedule
Select your Levain Start to generate your timeline.
The exact ingredients (and why we use a specific flour blend)
Standard all-purpose flour often lacks the necessary protein to develop a strong gluten network, which can result in a flat loaf. For the best results, use a strong bread flour combined with a small percentage of whole grains.
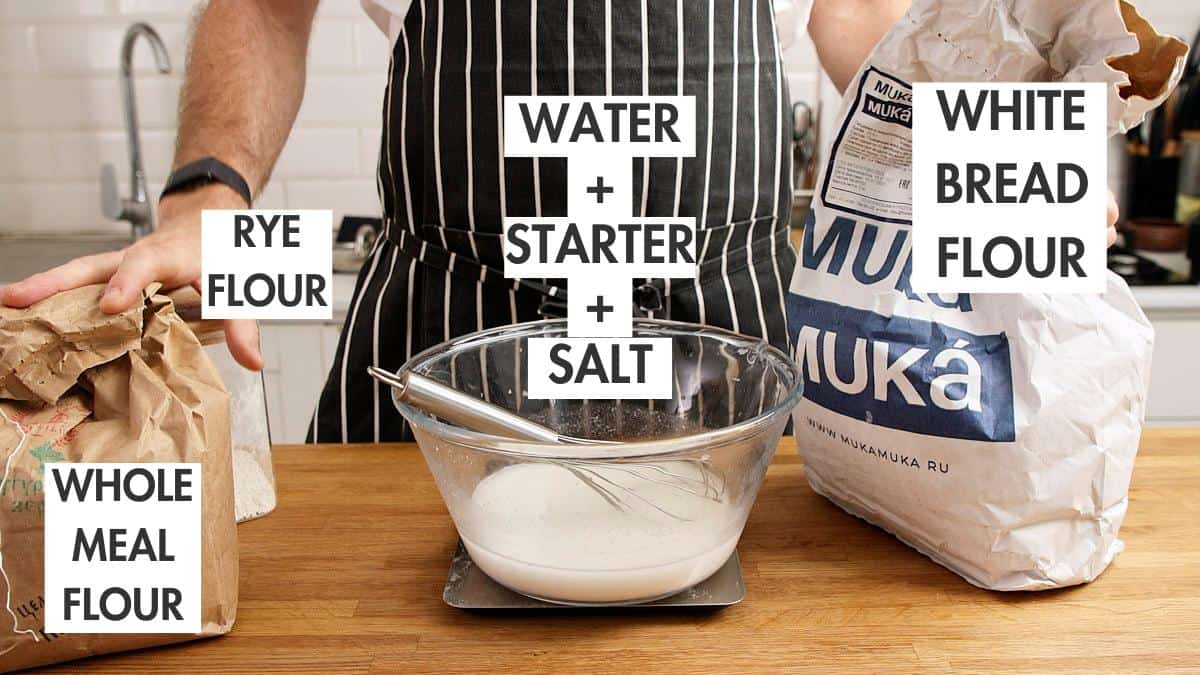
- Active levain - This is essentially an active bubbly starter. Unless you bake every day, you'll have to refresh the sourdough starter in your fridge into an active levain. Steps below.
- Strong white bread flour - Look for a protein content of at least 12%, which is typically indicated on the nutritional label.
- Rye flour and Wholemeal flour - Including a small amount of whole grain flour acts as a catalyst for the wild yeast. The extra nutrients in the bran supercharge the fermentation, making the dough rise more predictably while adding a deeper flavor.
- Water - Touch above room temperature (around 27°C / 80°F is ideal to jumpstart fermentation).
- Fine sea salt - If you can avoid it, do not use iodized salt. It slightly slows down fermentation, but if that's what you have, then use it.
Essential sourdough equipment
You only need a few specific tools to get bakery-quality results at home:
- Digital kitchen scale: Mandatory. Measuring by volume (cups) is inaccurate. Weighing ingredients in grams guarantees the correct dough hydration.
- Cast iron Dutch oven: Traps steam during baking to create a massive oven spring and a blistering, crispy crust.
- Proofing basket (Banneton): Supports the wet dough in the fridge overnight, keeping it in a tight, tall shape rather than spreading flat.
- Bread lame (or razor blade): Standard knives can drag and deflate the dough. You need a razor-thin blade for a clean score.
- Dough scraper: Highly recommended for cleanly handling sticky dough, scraping bowls, and building tension during shaping.
Step-by-step instructions
Step 1: Build an active starter (The "Levain")
To bake bread, you must use an active, vigorous sourdough starter. If your starter has been sitting dormant in the refrigerator, it will not properly leaven the dough.

- In a clean jar, combine 20 grams of mature starter, 40 grams of strong white bread flour, 10 grams of rye flour, and 50 grams of water.
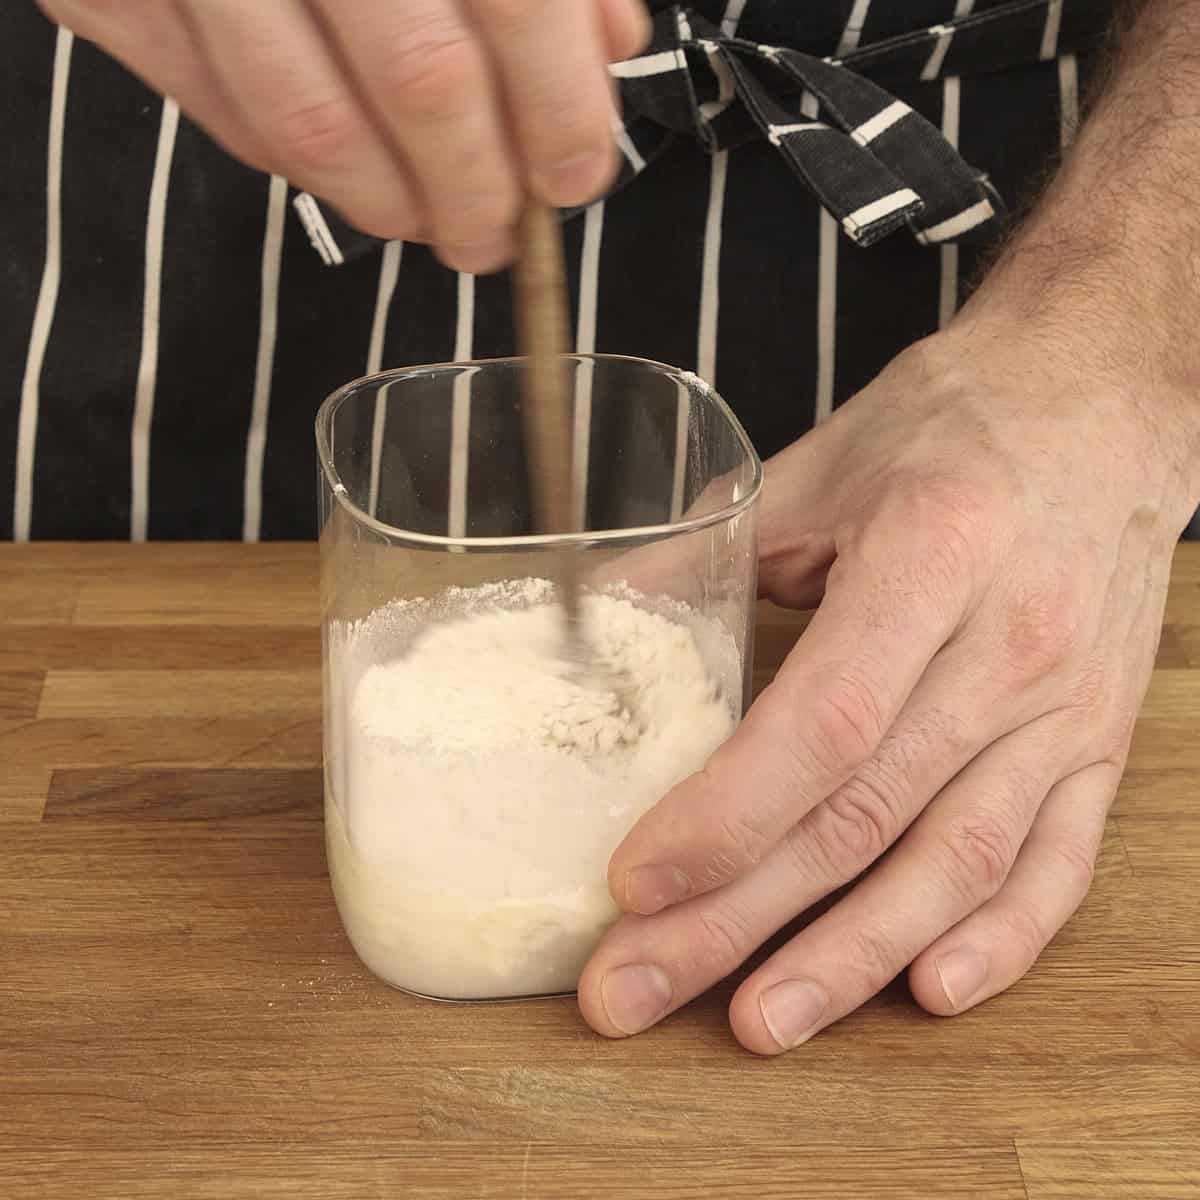
- Mix it well with a spoon or wooden dowel (Chopsticks work great).
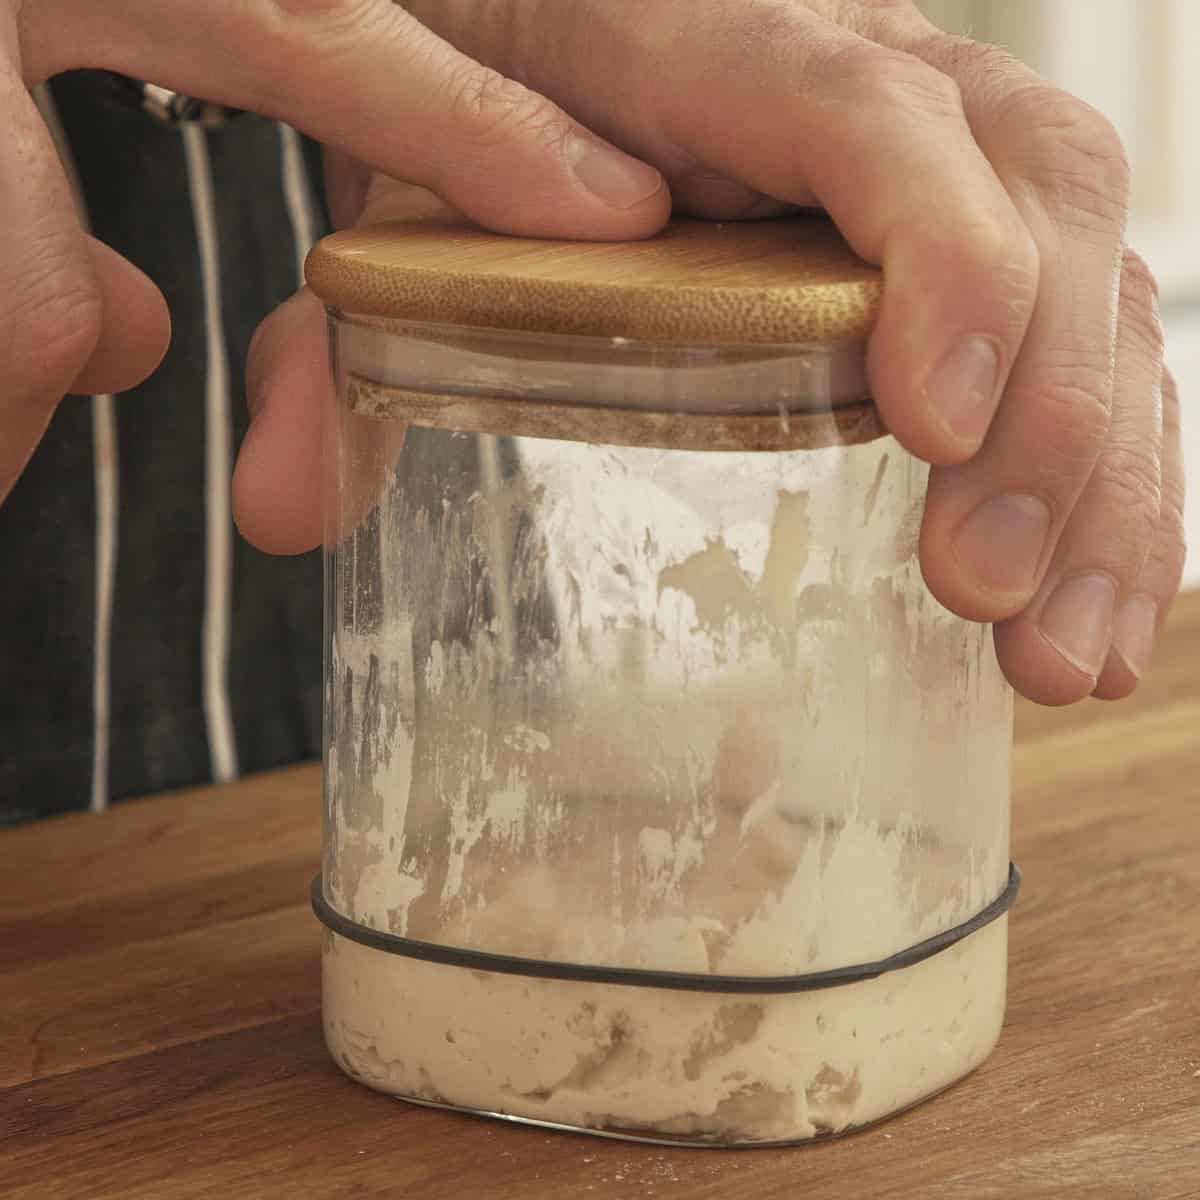
- Close the lid and place a rubber band around the jar level with the top of the mix. Let it mature and ferment at room temperature (around 24°C / 75°F) for 6 to 8 hours. The rubber band is to track how far it rises.
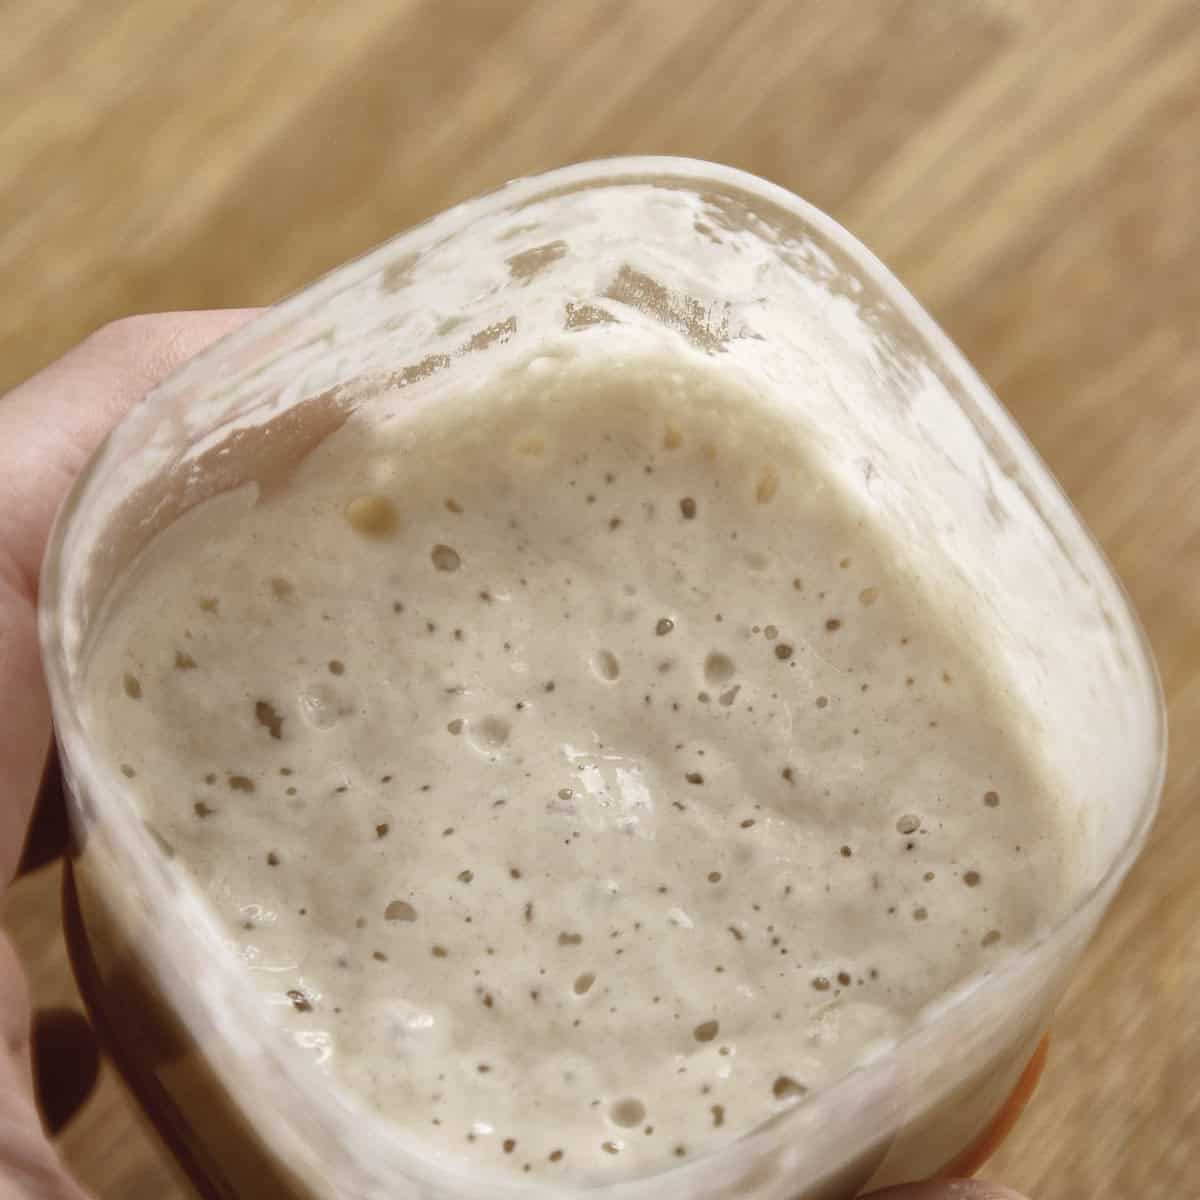
- Your levain is ready to use when it is highly bubbly, slightly domed on top, and has tripled in volume.
Why you should skip the "float test": Many recipes suggest dropping a spoonful of starter into a glass of water to see if it floats. This test is highly inaccurate. Dense wholemeal or rye flours can cause a perfectly active starter to sink. Rely on visual expansion instead: if the mixture has tripled in size and is full of active bubbles, it is ready.
Step 2: Mixing the dough and busting the autolyse myth
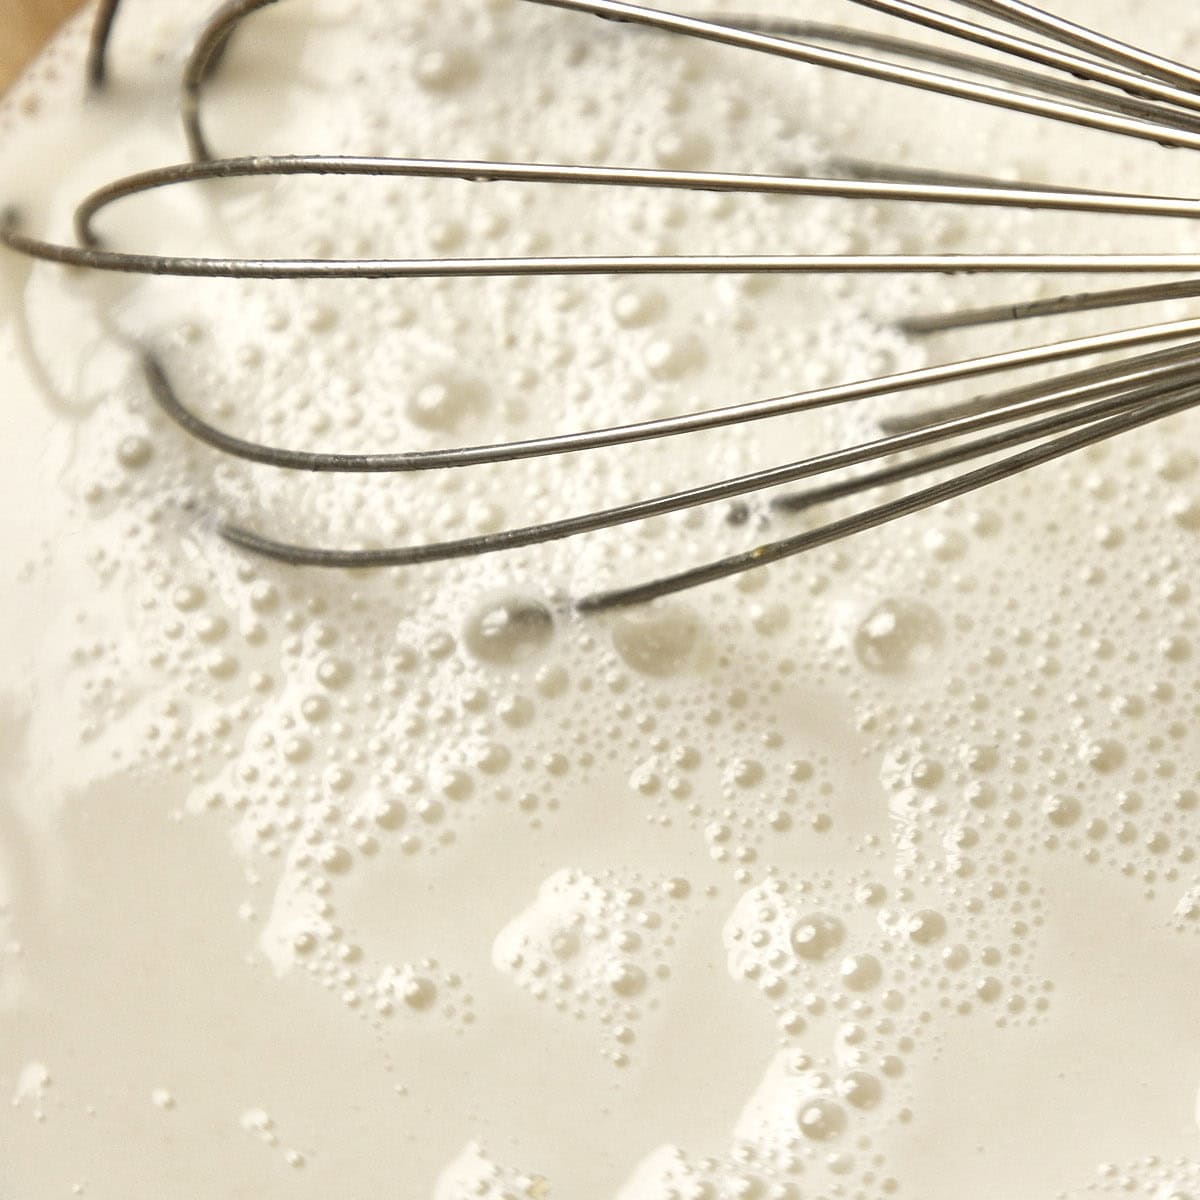
- Dissolve the levain: In a large mixing bowl, whisk together 375g of room temperature water, 100g of active levain, and 12g of fine sea salt until the starter is mostly dissolved and the liquid is milky.
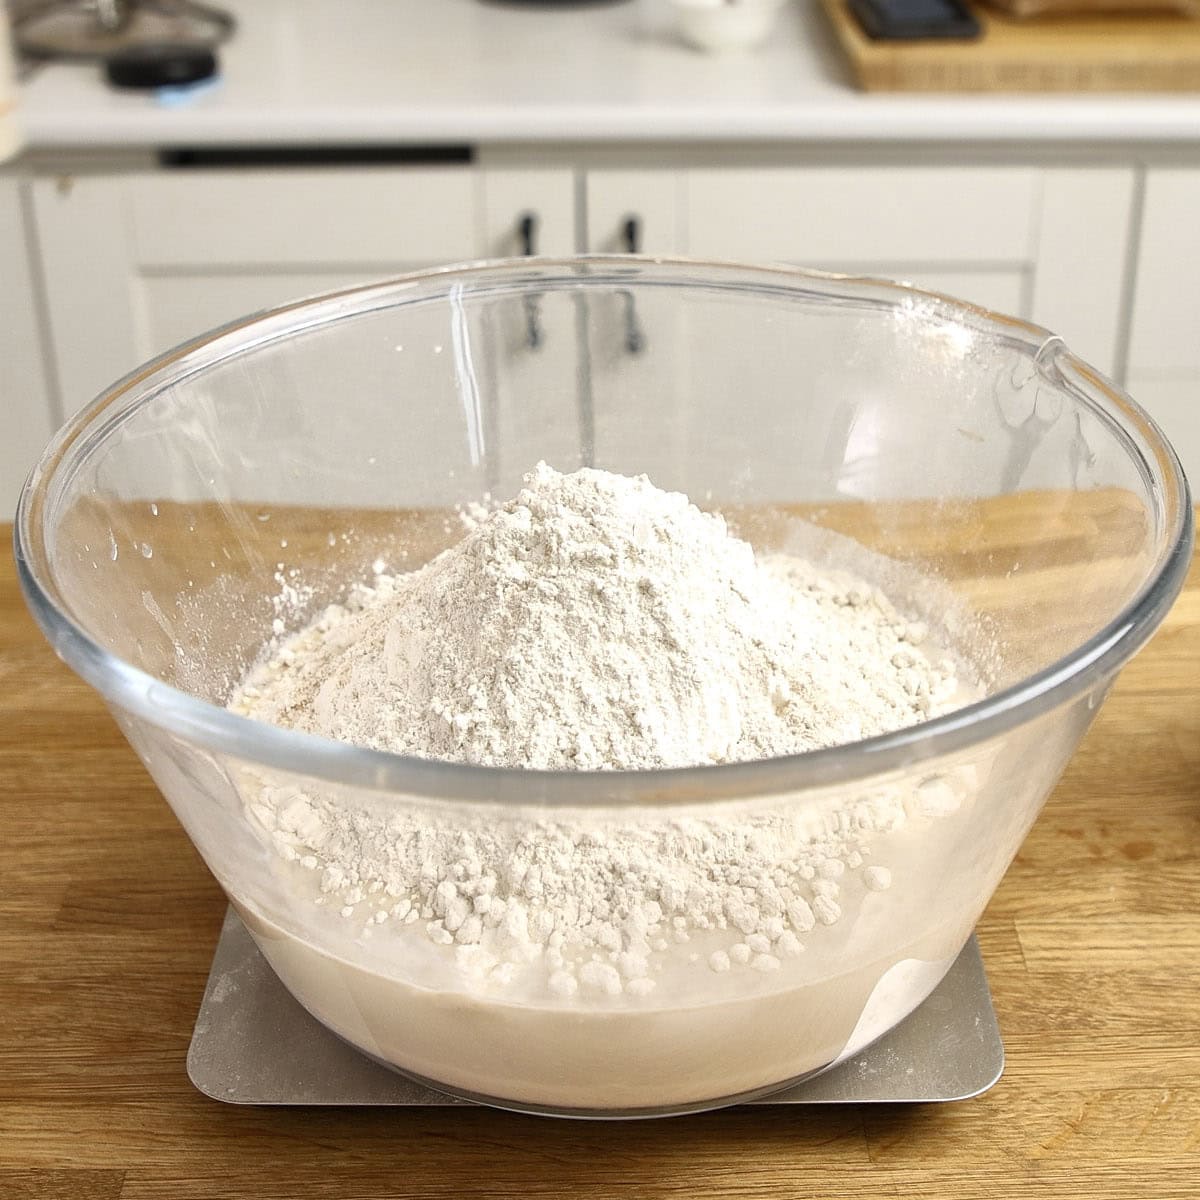
- Add the flours: Place your bowl on a digital scale and add 450g of strong white bread flour, 25g of rye flour, and 25g of wholemeal flour.
- Begin mixing: Using a dough whisk or a sturdy spoon, stir the wet and dry ingredients together to begin hydrating the flour.
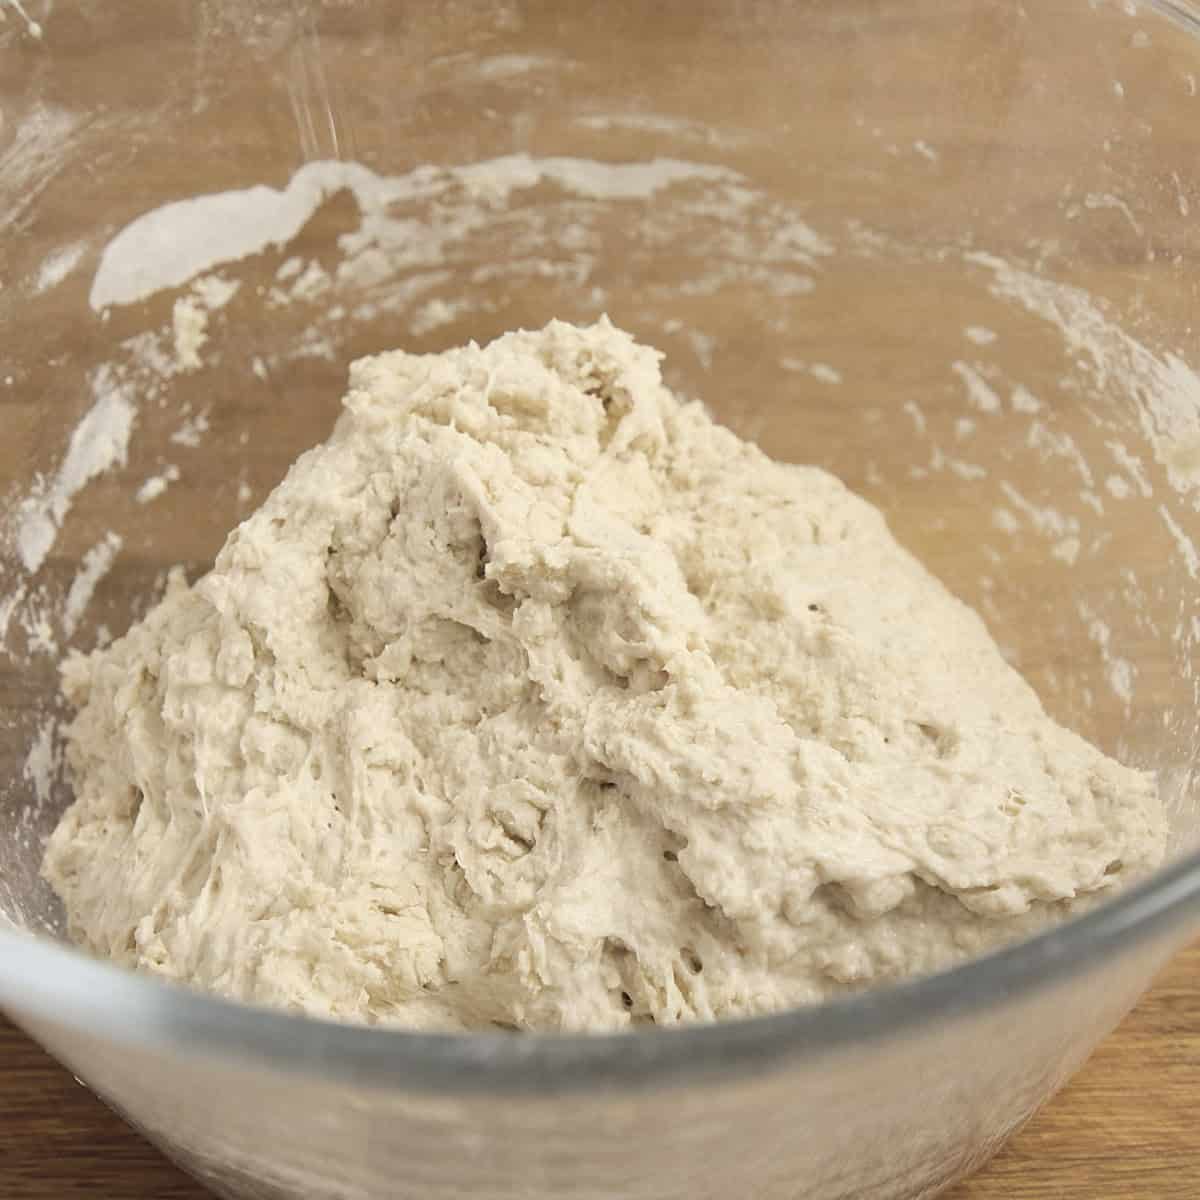
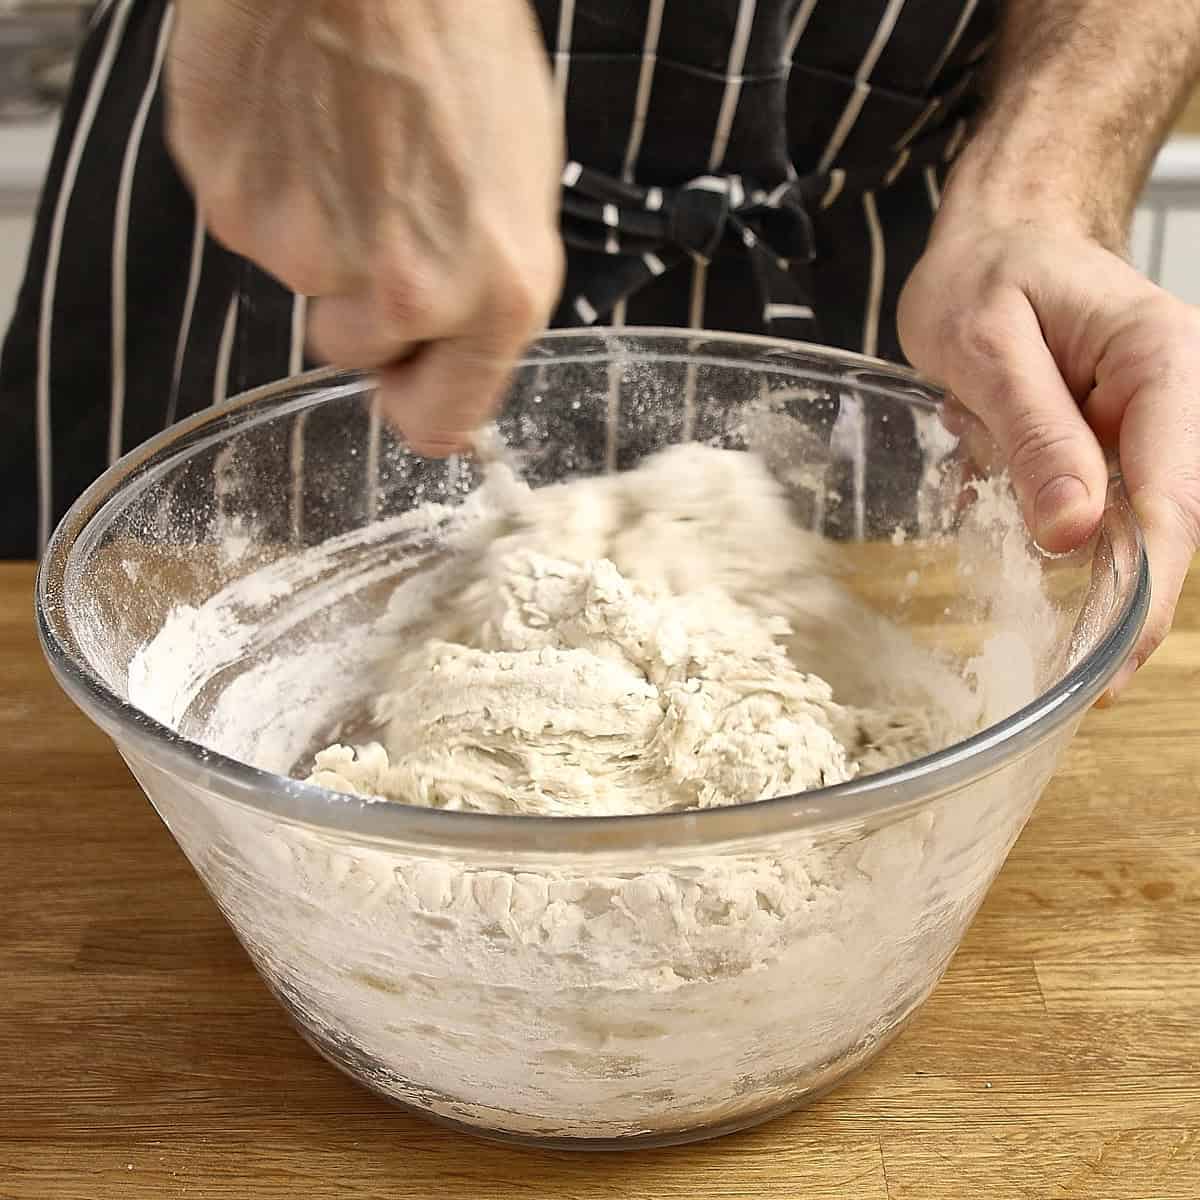
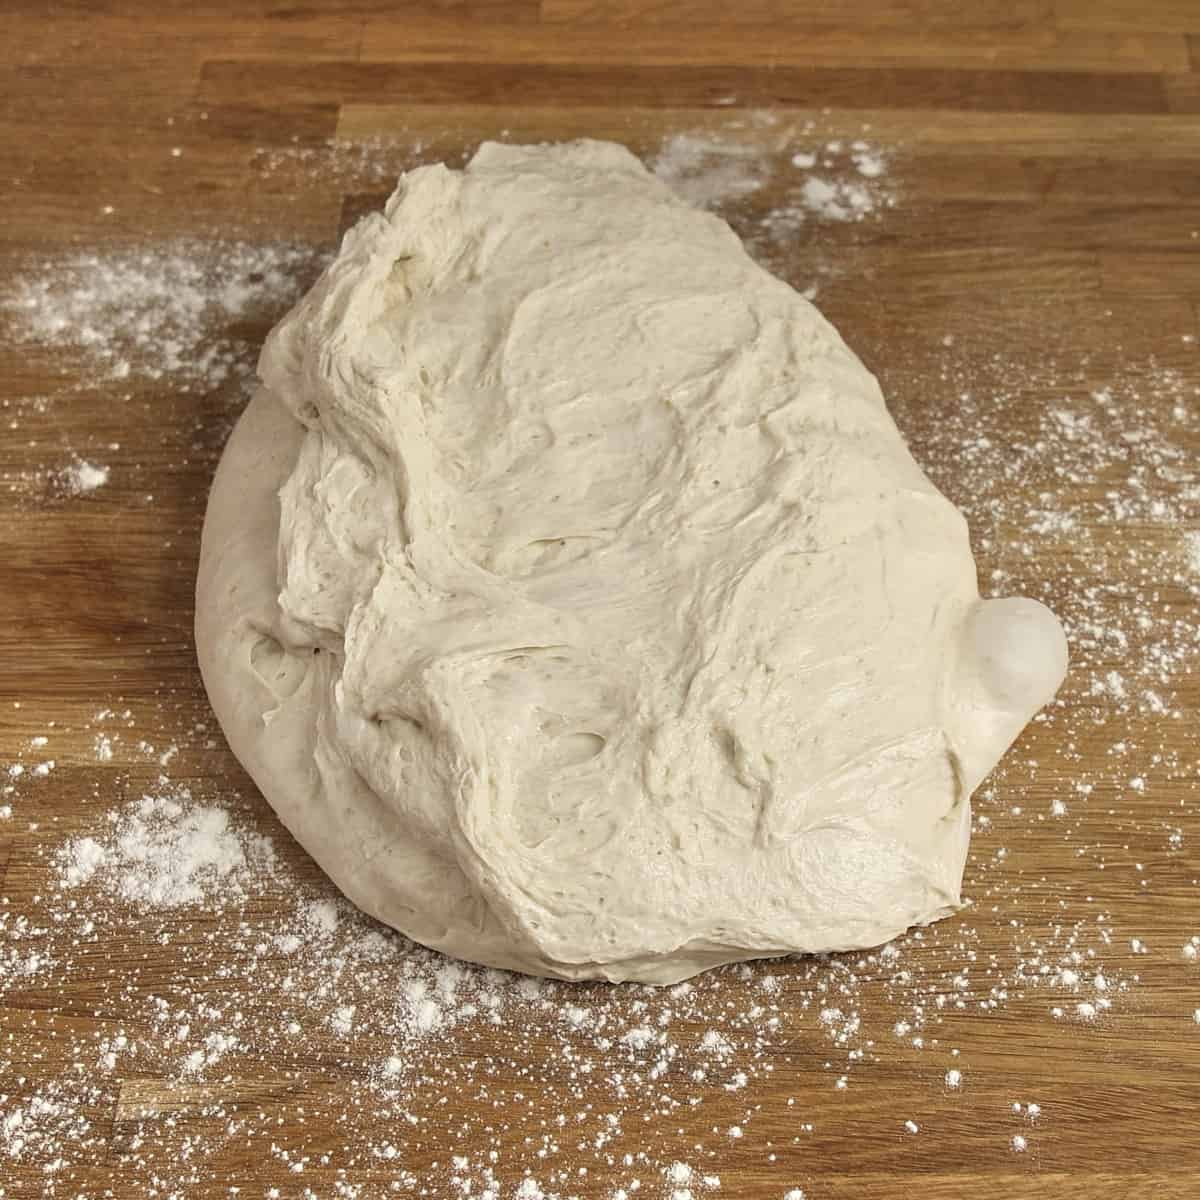
- Form a shaggy dough: Continue mixing until all the water is absorbed. The dough should look rough and shaggy, with absolutely no dry spots of flour remaining at the bottom of the bowl.
Why we skip the "autolyse" (and save you an hour)
If you have read other sourdough blogs, you have probably seen a step called the "autolyse." This is where you are instructed to mix only the flour and water together, wait an hour, and then awkwardly try to squish the sticky starter and salt into the stiff dough later.
Here is the truth: For a standard homemade artisan loaf, you do not need to do this.
While a true autolyse has its place in commercial bakeries dealing with highly specific, ultra-stiff doughs, mixing everything together right from the start is infinitely better for home bakers. Here is why:
- It is mess-free: Trying to squeeze salt and starter into already-developed dough is a sticky, frustrating nightmare for beginners.
- It prevents disaster: Mixing everything up front guarantees your salt is evenly distributed and ensures you don't accidentally forget to add it later (a classic beginner mistake that results in tasteless bread).
- It hydrates perfectly anyway: By mixing all the ingredients into a shaggy dough and letting it sit for 30 minutes (Step 3), the flour fully hydrates, and the gluten begins to form naturally with zero extra effort on your part.
Step 3: "Drunk cat fold" and rest
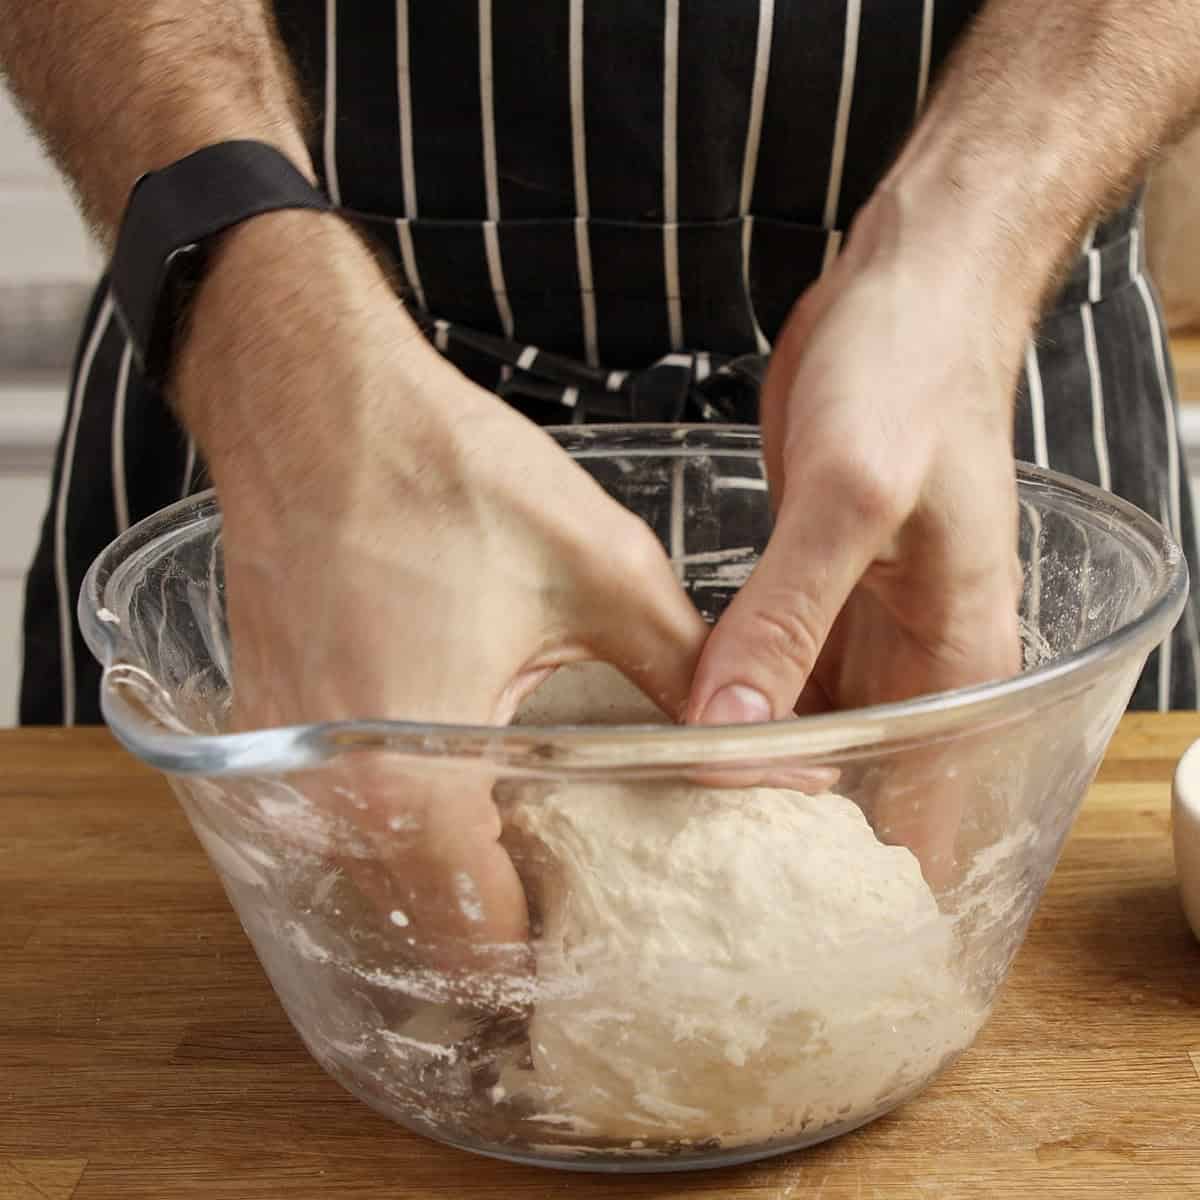
- Grab the dough: Wet your hands to prevent sticking, then grab it from the middle with both hands.
- Lift and stretch: Pull the dough straight up, letting the heavy ends hang freely (the "drunk cat").
- Fold underneath: Lower the dough back into the bowl, letting the hanging ends fold in underneath the center mass.
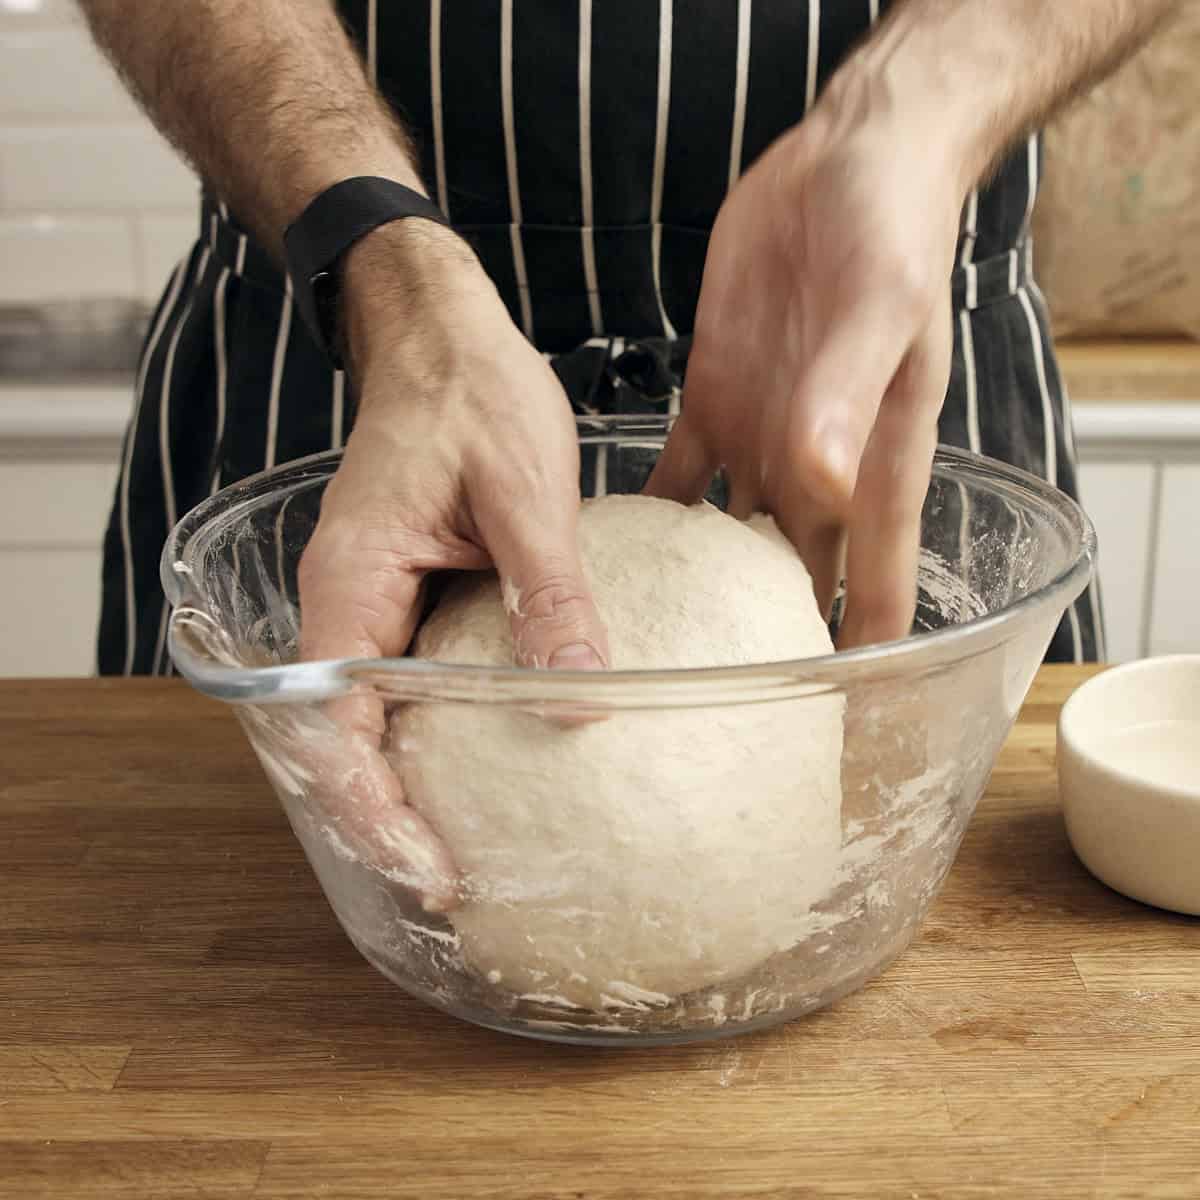
- Tuck into a ball: Gently tuck the edges underneath to roughly shape the dough into a cohesive ball.
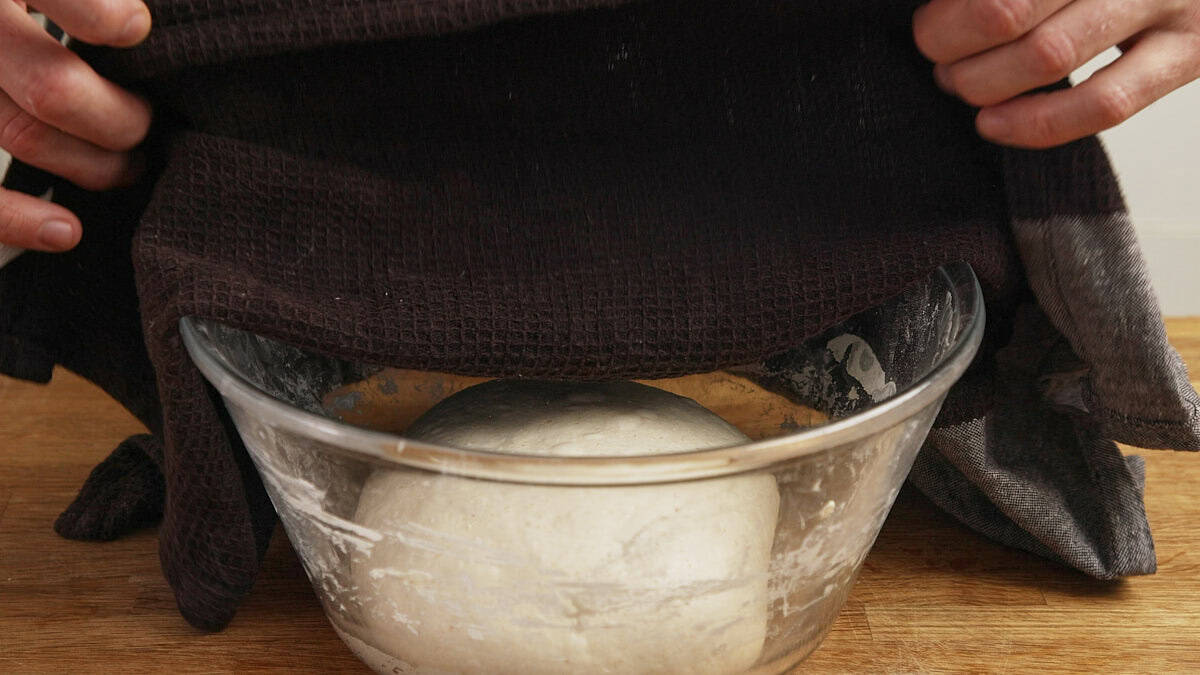
- Cover and rest: Place a damp kitchen towel over the bowl to trap moisture. Let the dough rest untouched at room temperature for 30 minutes.
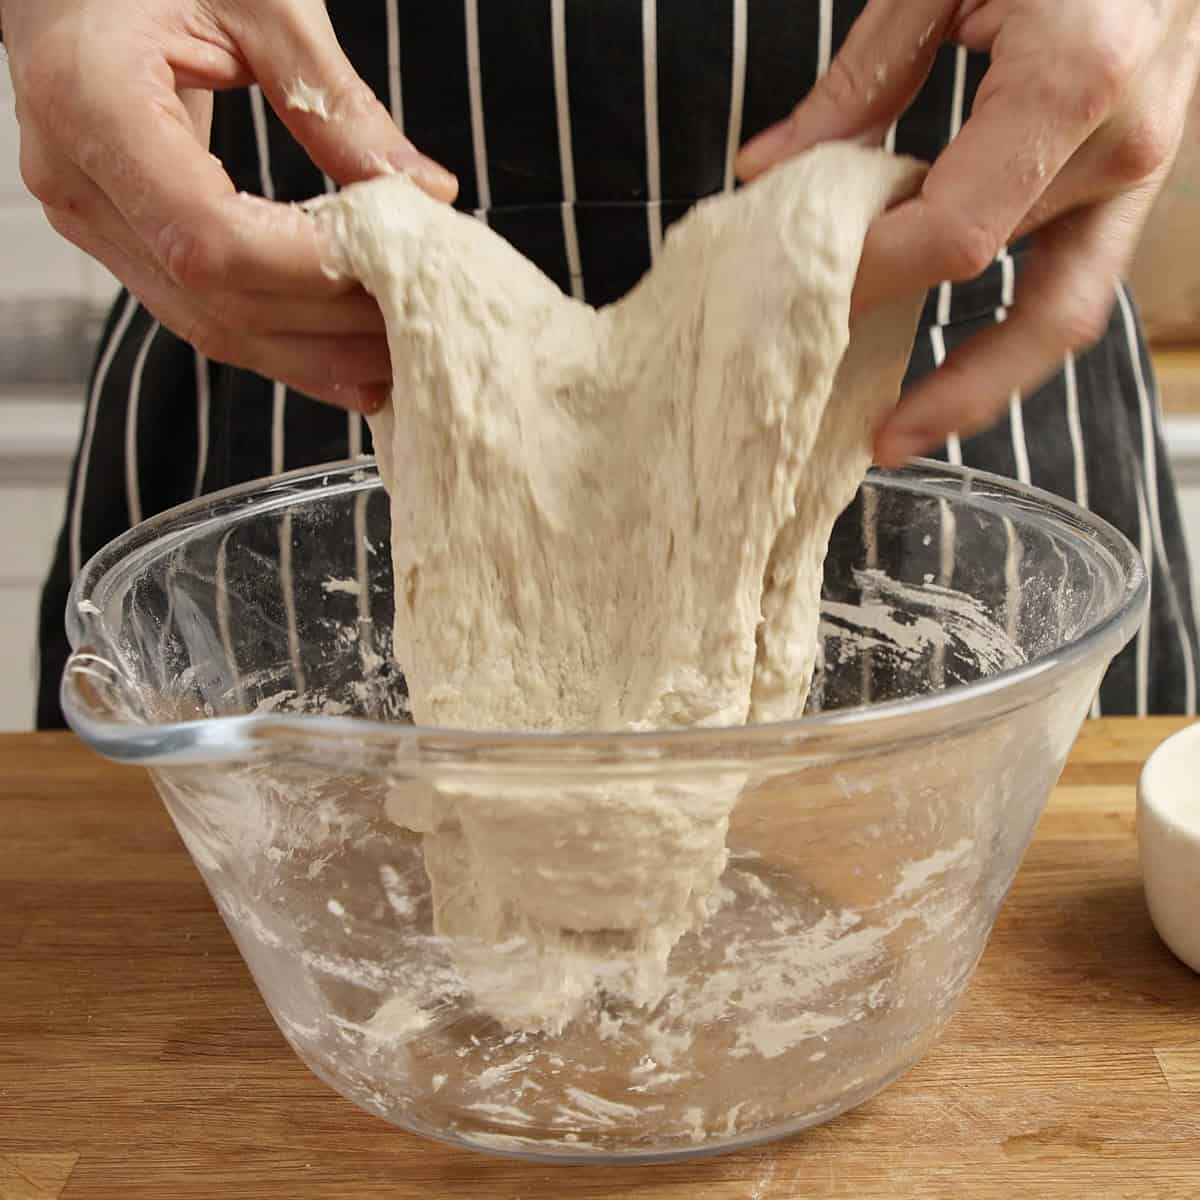
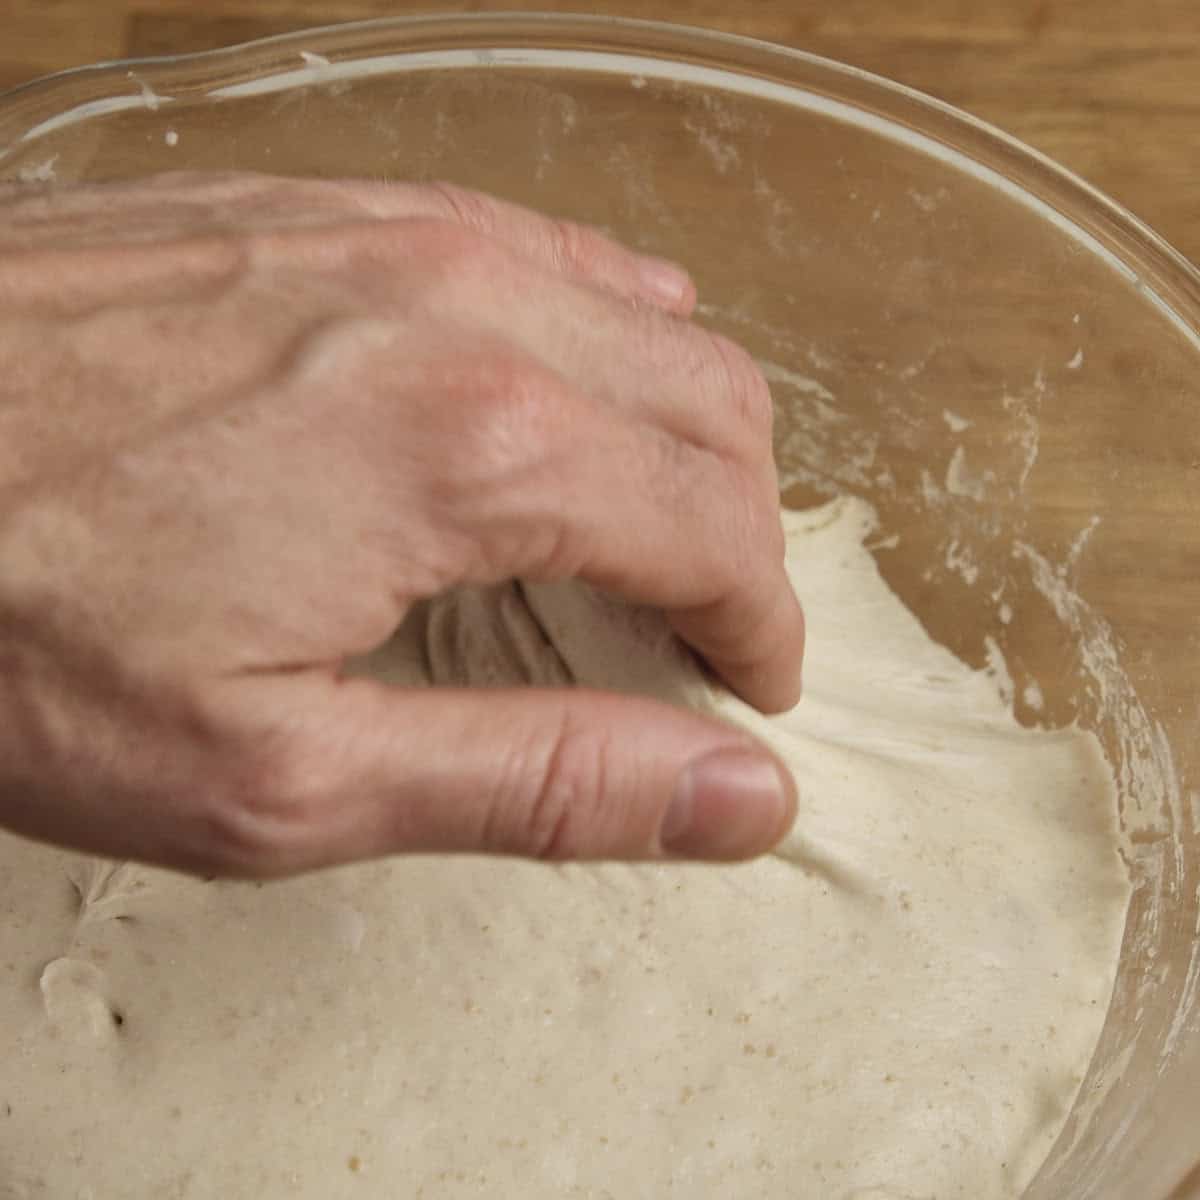
Step 4: Build gluten with slap and folds
Because this dough has high hydration, traditional counter kneading will result in a sticky mess. Instead, we use a gentle stretching technique to build gluten strength.
Repeat this 3 or 4 times, then cover the bowl and rest for another 30 minutes. You will do a total of 4 folding sessions. With each session, the dough will become noticeably smoother and more elastic.
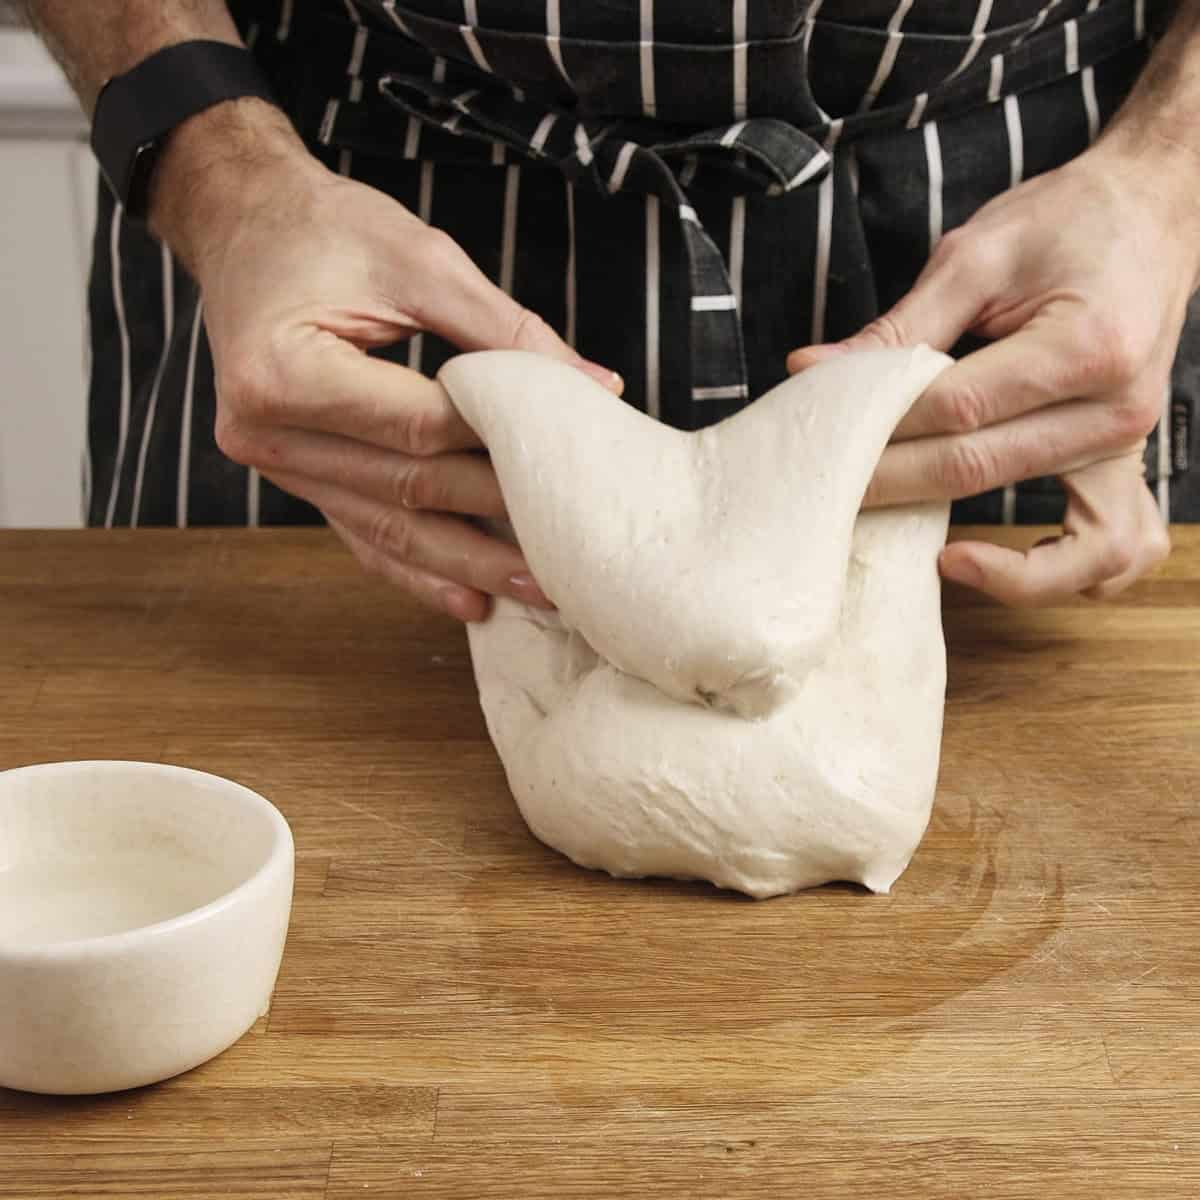
- Lift and stretch: Wet your hands. Grab the dough from the middle with both hands and lift it upward to stretch it out.
- Slap and fold: Slap the bottom end of the dough down onto the counter and fold the top half over toward yourself.
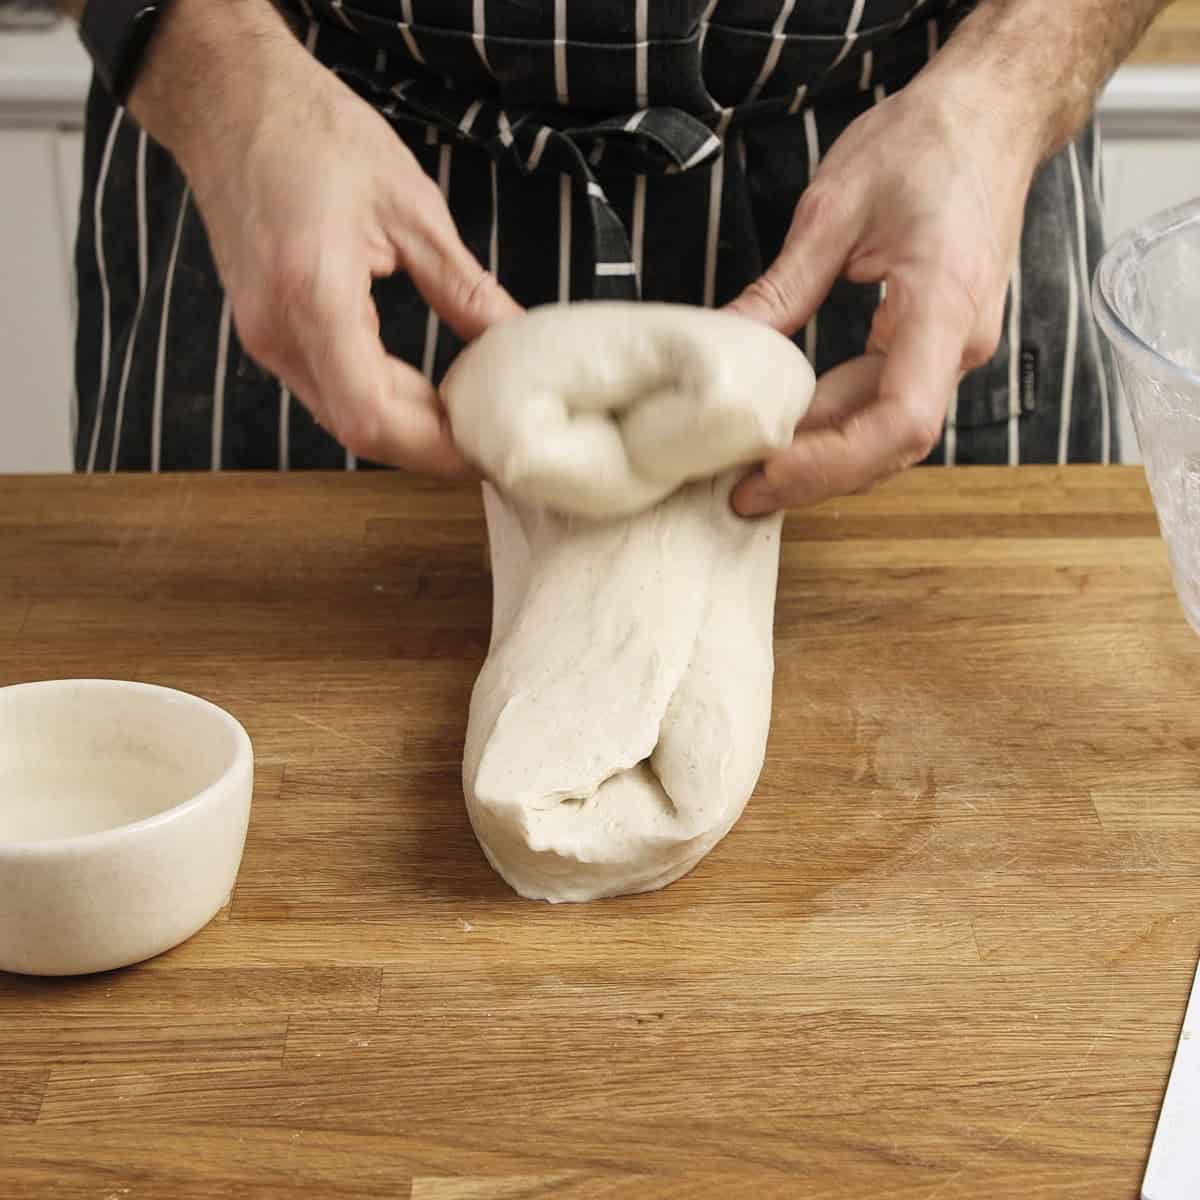
- Turn and repeat: Give the dough a quarter-turn, grab it from the middle again, and lift it up.
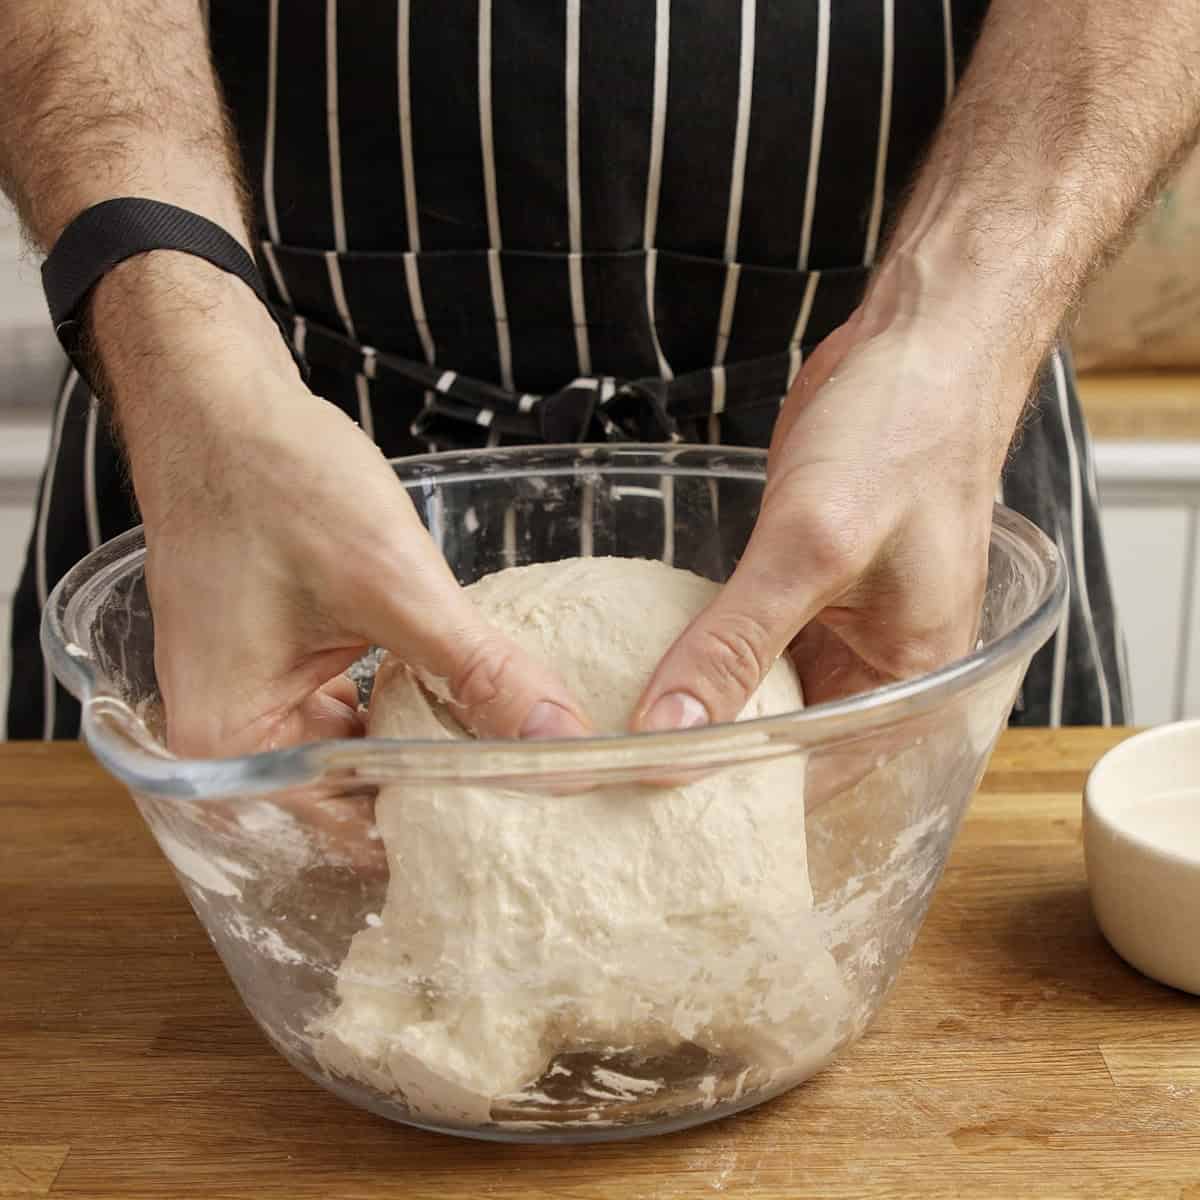
- Build tension: Slap the dough down and fold it over once more. Repeat this motion 2 or 3 times until the dough resists stretching.
- Shape a ball: Gently tuck the edges underneath to gather the stretched dough into a tight, smooth ball.
- Cover and rest: Return the dough to the bowl, cover it with a damp kitchen towel, and rest for 30 minutes.
Pro tip: Keeping track of the number of folds
It is incredibly easy to lose track of your folding sessions over a two-hour period. Do not panic if you forget whether you are on your third or fourth fold.
To eliminate the guesswork, simply place a piece of tape or scrap paper next to your workstation. Every time you finish a stretch-and-fold session, make a quick tally mark with a marker. Once you have four marks, you are done and ready to move on to the bulk fermentation.

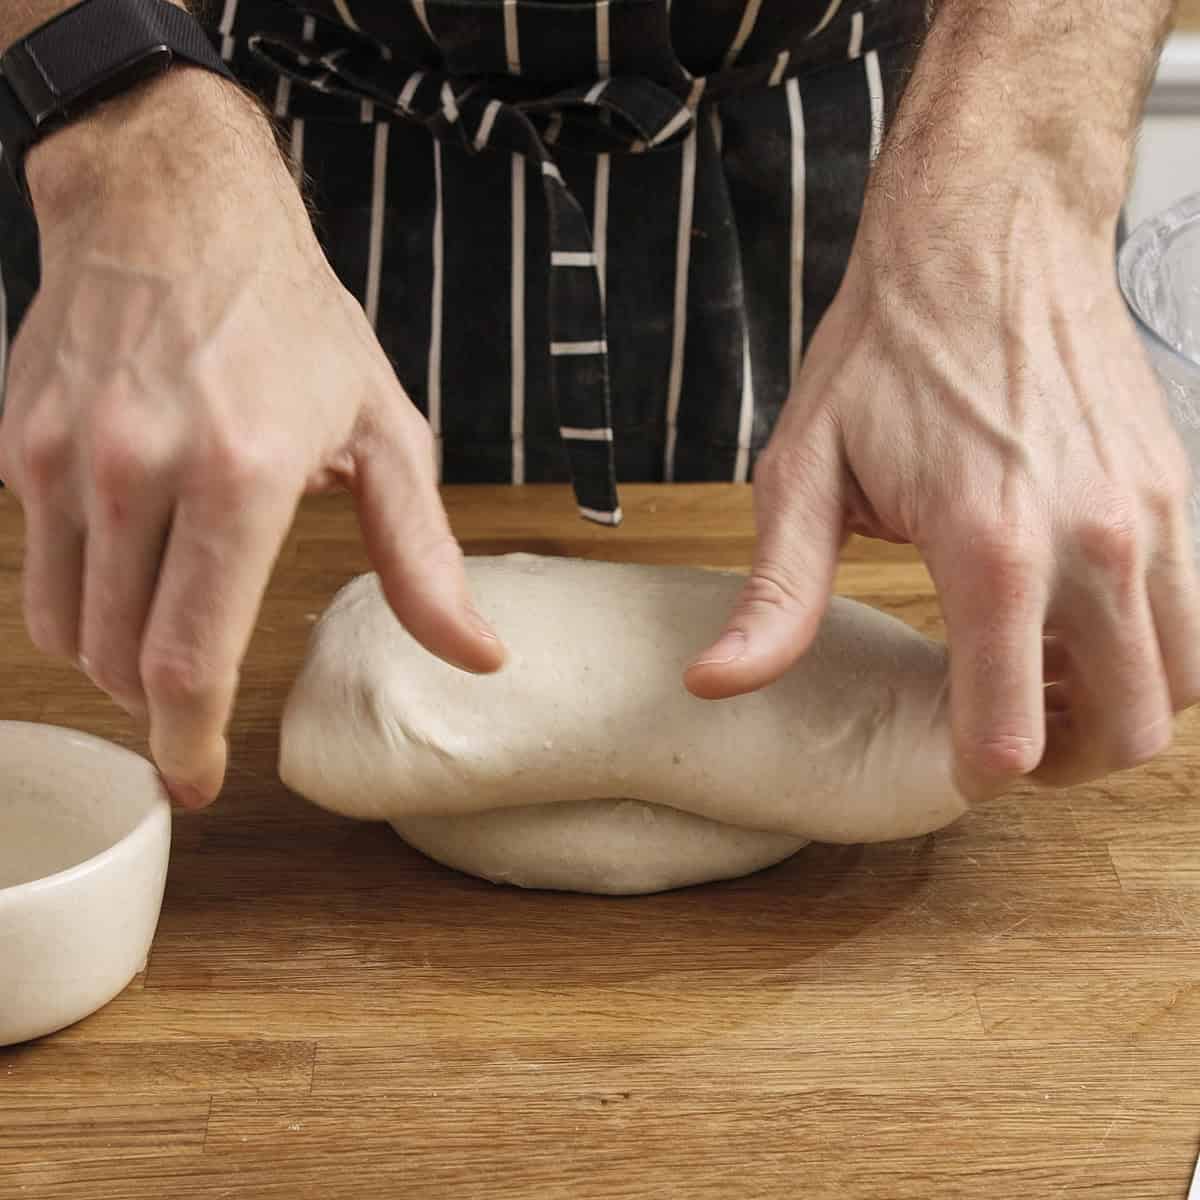
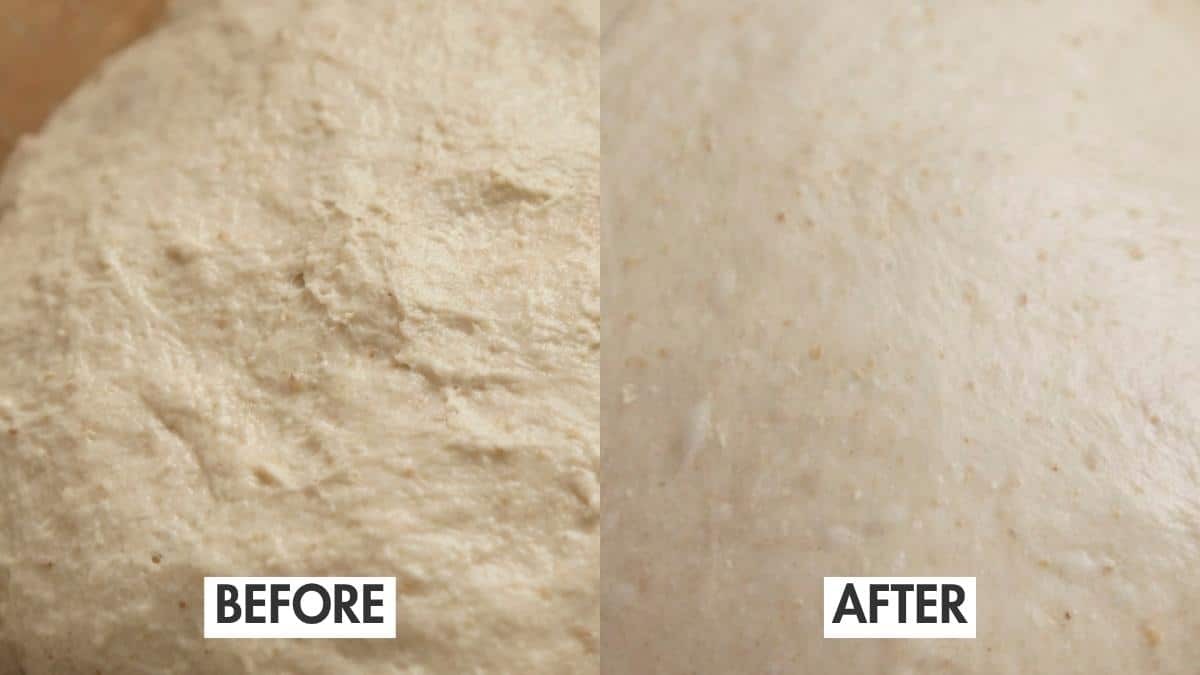
Checking the texture
By the end of your folding sessions, the dough will feel incredibly soft, pillowy, and elastic. Gently pressing into it should feel like pressing into a soft cushion, and the surface should stretch easily without tearing or sticking too much to your fingers.
Visual cues (Before and After): Notice the transformation. After your 4 folding sessions, the gluten will be fully developed. The dough goes from a rough, tearing, shaggy mass (Before) into a highly elastic, smooth, and cohesive dough (After).
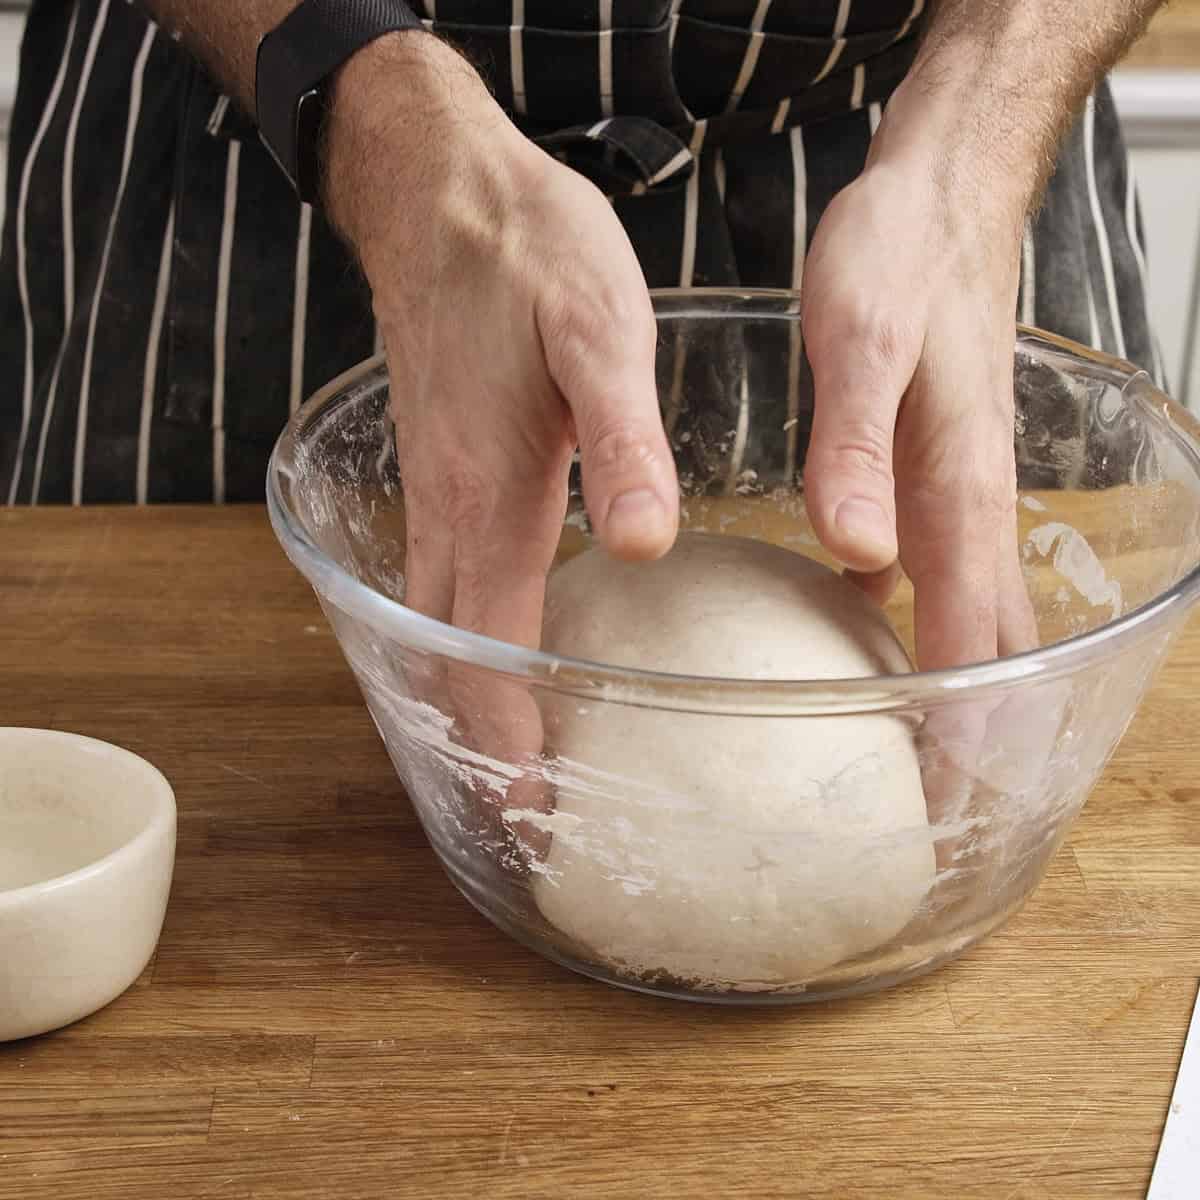
Step 5: Nail the bulk fermentation
Bulk fermentation is the critical period where your dough rests in the bowl. Getting this wrong is the most common reason sourdough fails.
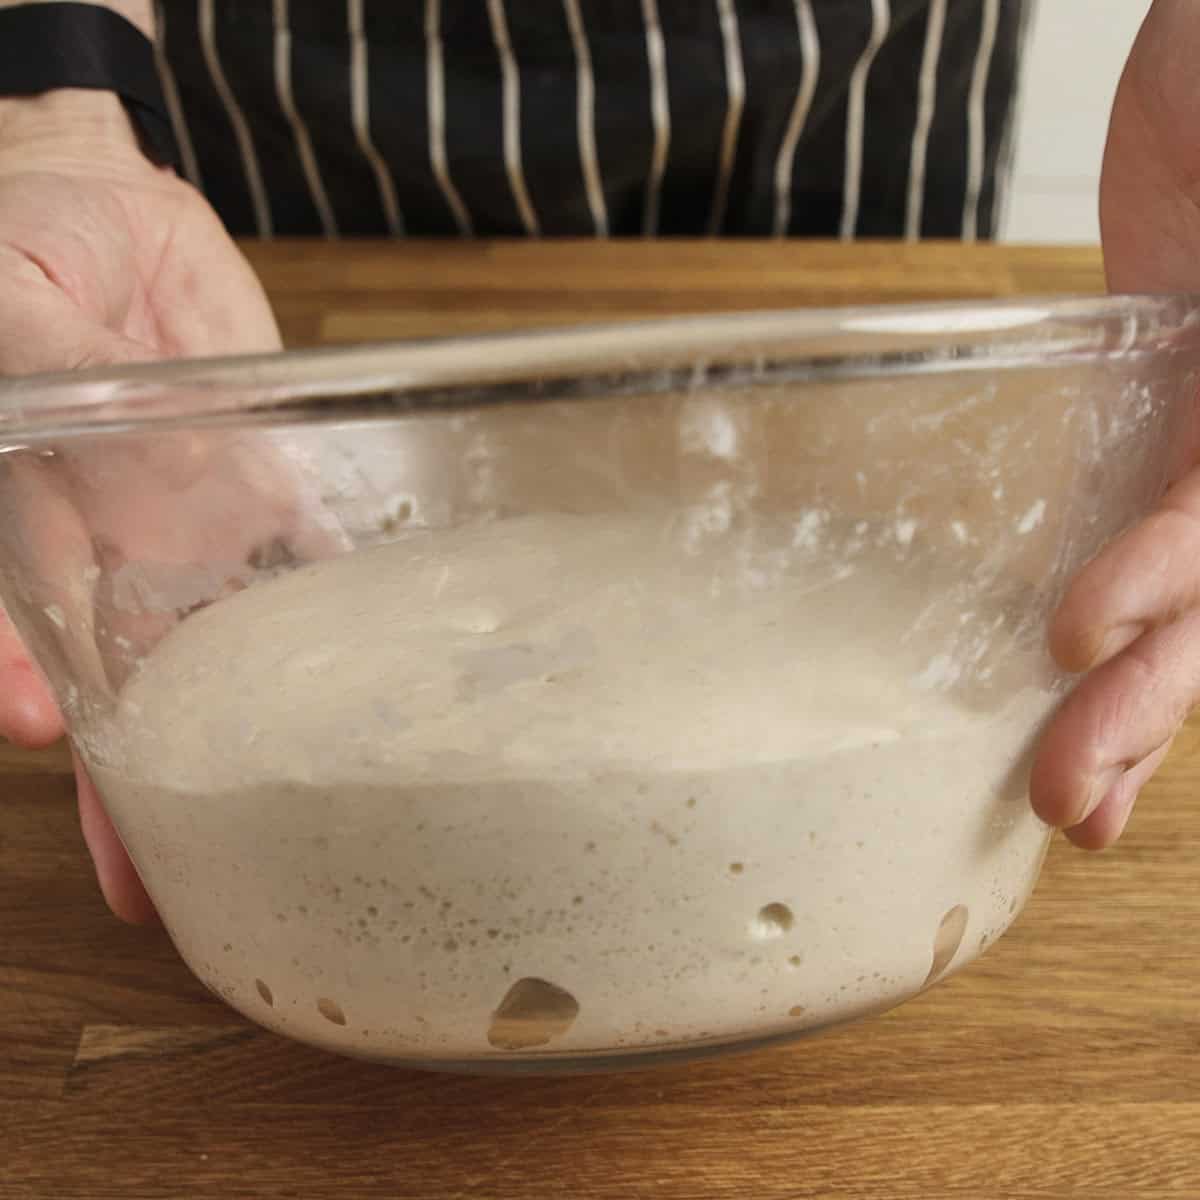
- Check the jiggle: Give the bowl a gentle shake. The dough should wobble like set gelatin and appear distinctly domed on top.
- Check the sides: Gently pull the dough away from the edge. Properly fermented dough will often pull away cleanly and stick noticeably less to the sides of the bowl.
Cover your dough and let it sit in a warm spot (24°C-27°C / 75°F-80°F).
Never let your dough double in size. For a beginner working with this hydration, letting the dough double at room temperature guarantees it will over-proof, turning into a soupy puddle. Stop the bulk fermentation when the dough has risen by roughly 75% (visibly larger, but not quite doubled).
You must watch the dough, not the clock. Your dough is ready when it meets these three physical cues:
- It has risen by roughly 75%.
- The top surface is distinctly domed, not flat.
- The dough jiggles like set gelatin when you shake the bowl.
Pro tip: Use a straight-sided container
It's difficult to judge a 75% increase in a curved mixing bowl if you're new to baking. After your final fold, transfer your dough to a straight-sided glass or plastic container (like a Cambro) to easily track the exact vertical rise.
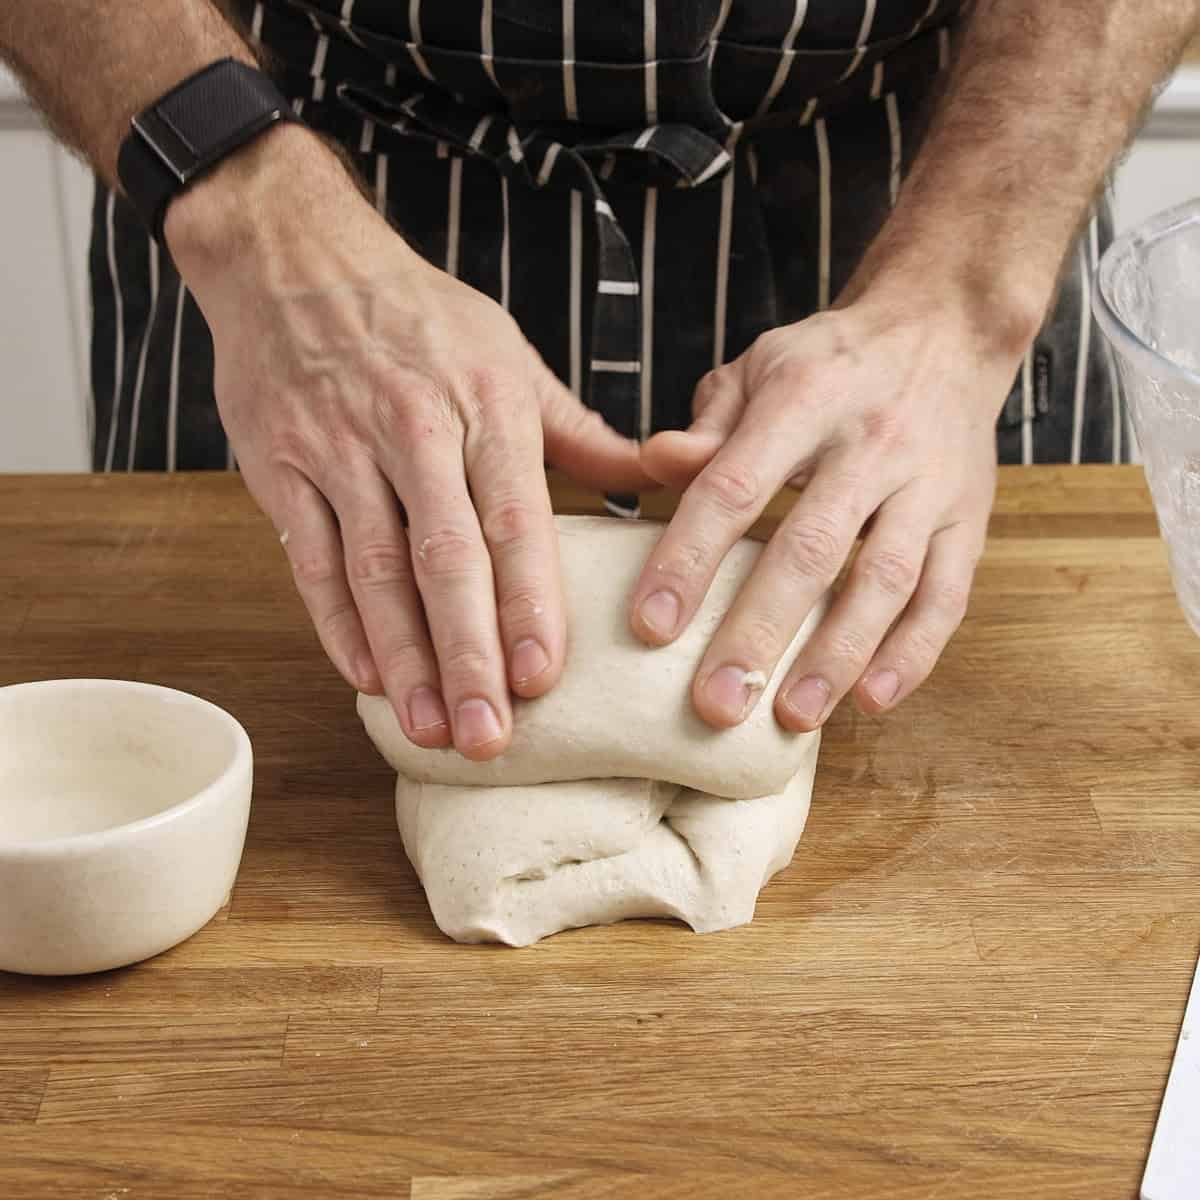
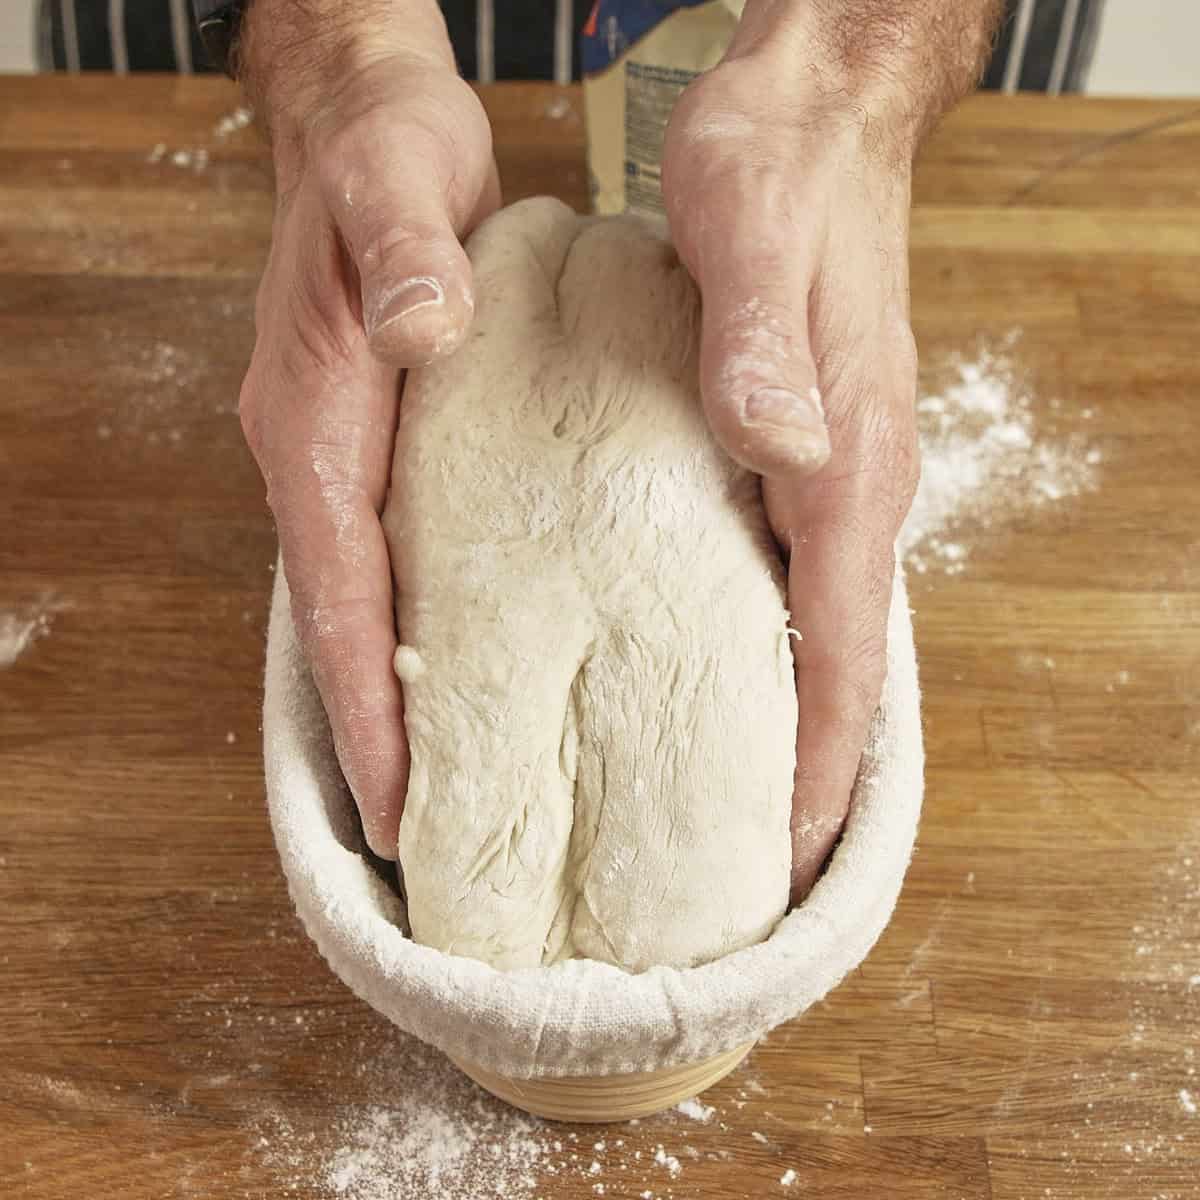
Step 6: Shape the dough and cold retard
We skip the "pre-shape" and "bench rest" demanded by older methods and shape the dough once.
- Flatten the dough: Turn the fermented dough out onto a lightly floured surface.
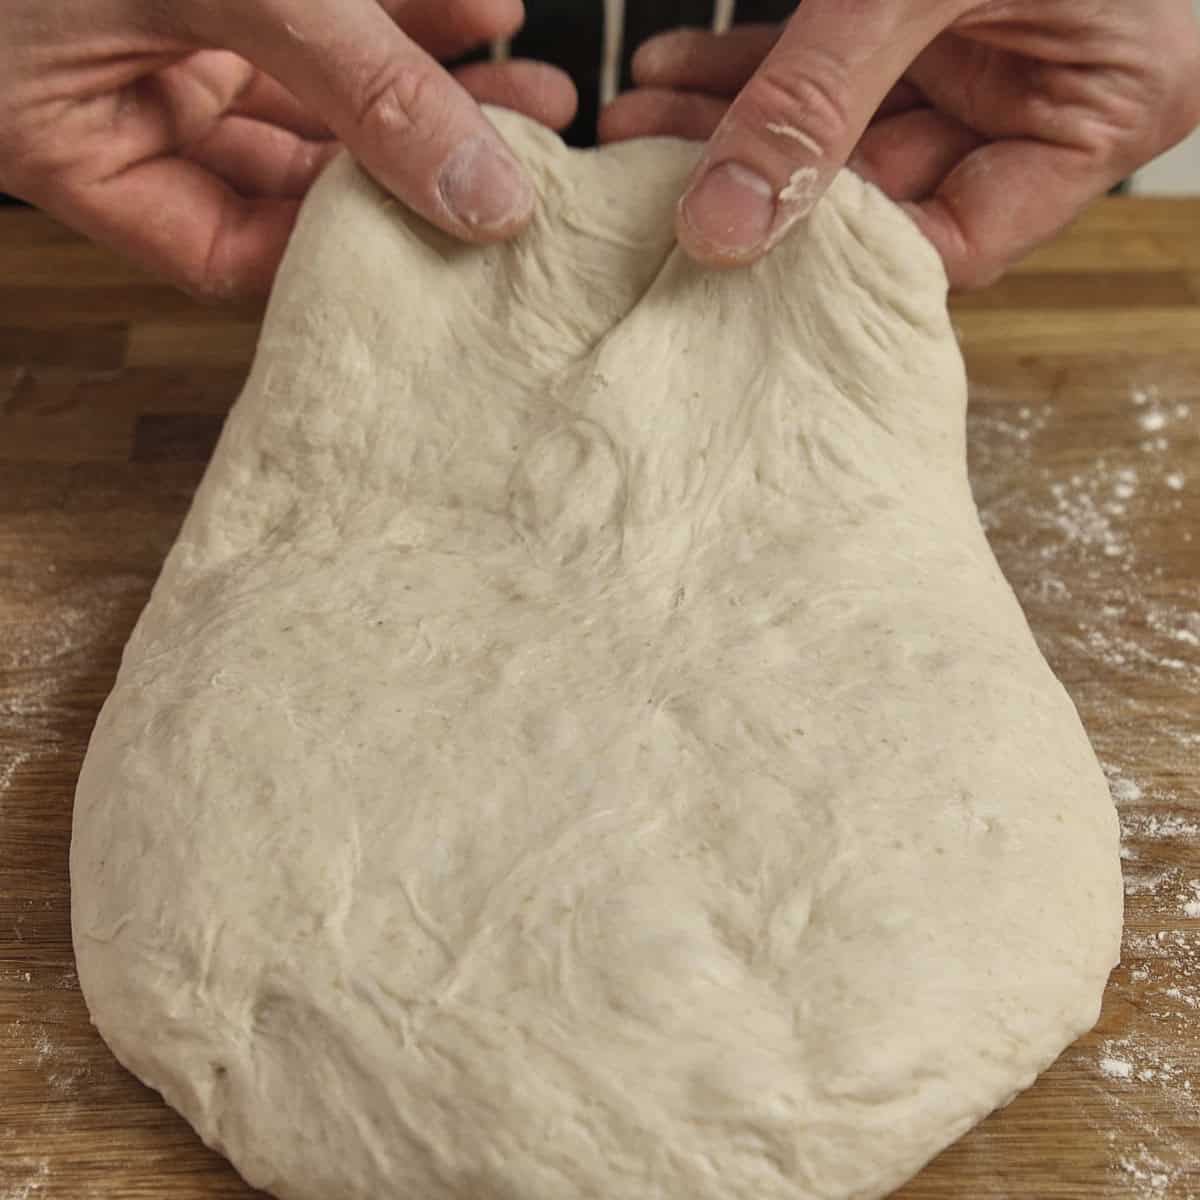
- Stretch the top: Gently grab the top edge of the dough and pull it away from you.
- Fold to the center: Fold that stretched top section down into the middle.
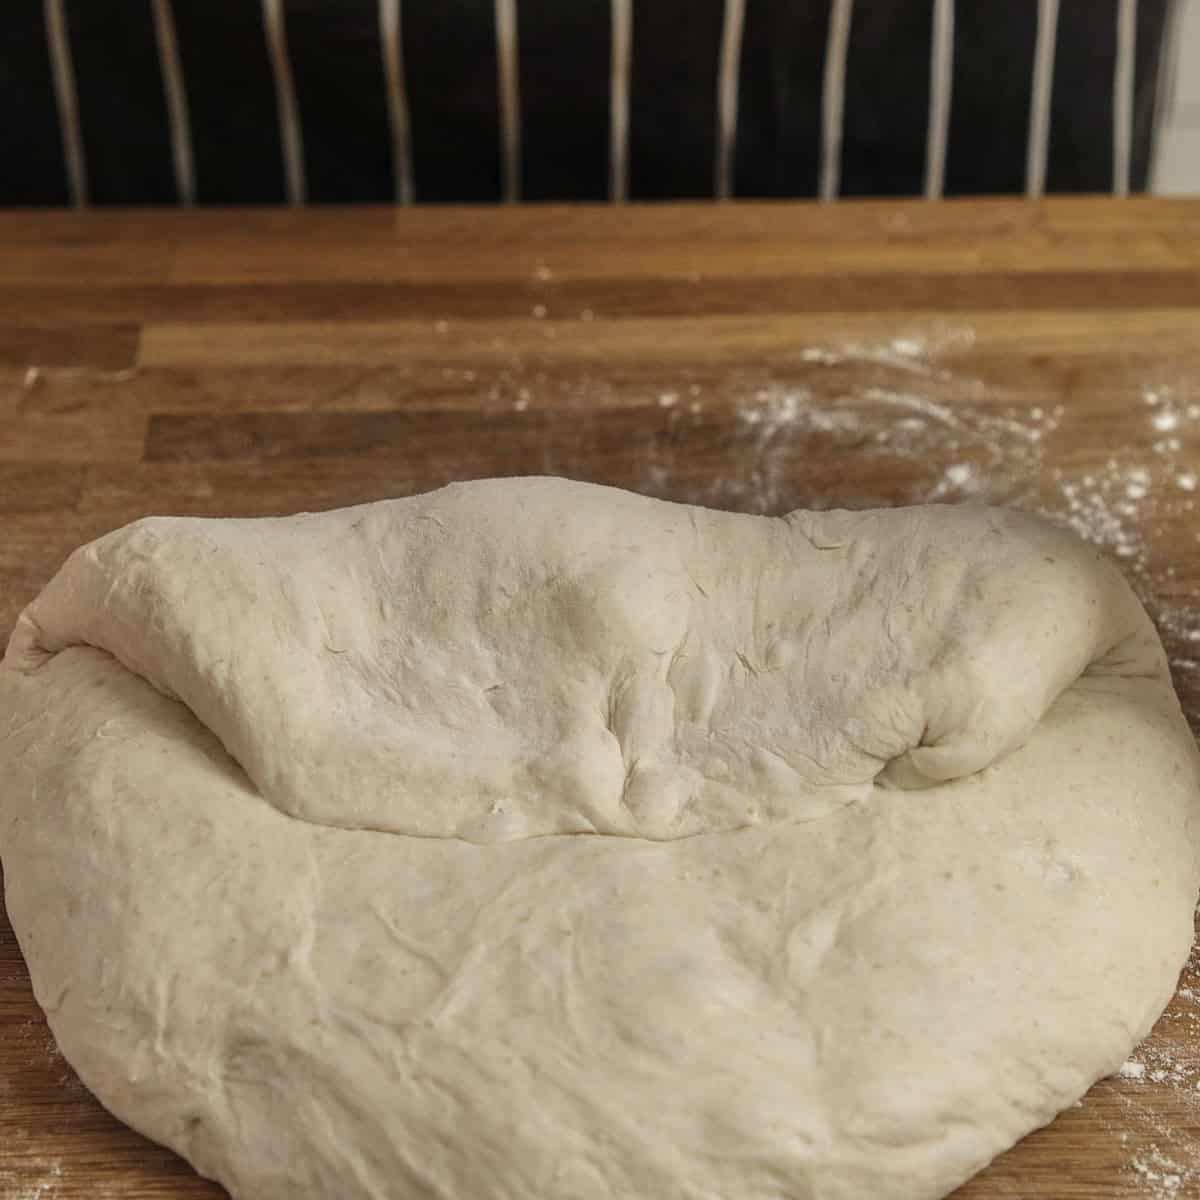
- Fold the right side: Stretch the right side outward and fold it tightly over the center.
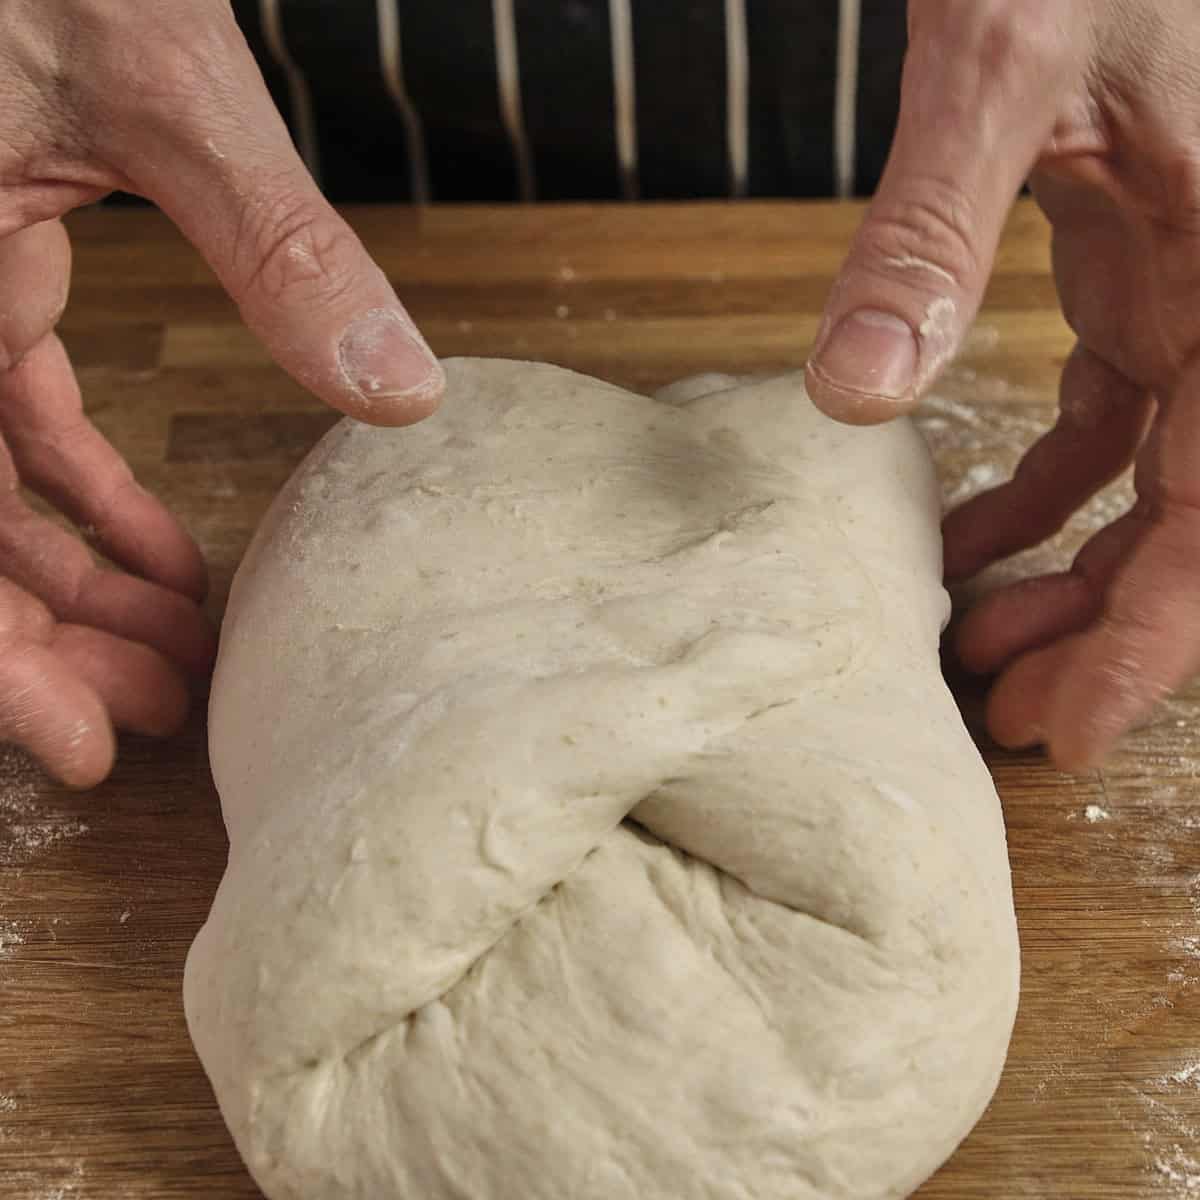
- Fold the left side: Stretch the left side outward and fold it completely over the right flap.
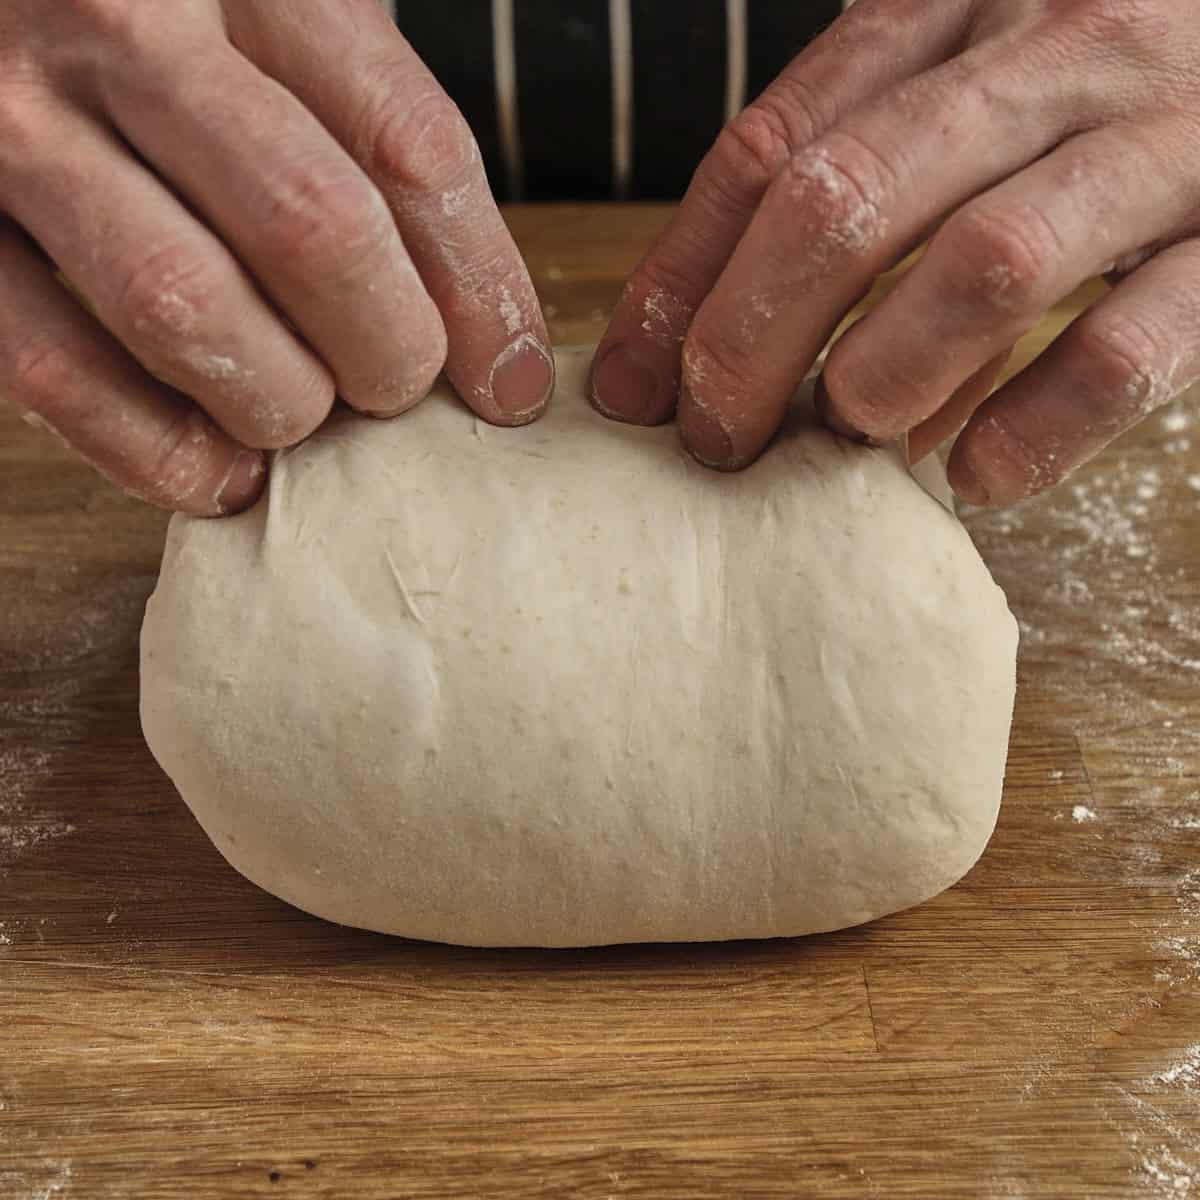
- Roll it down: Starting from the top, gently roll the dough tightly toward yourself.
- Complete the roll: Finish the roll so the dough forms a neat, tight log (batard). Pinch the seam at the bottom.
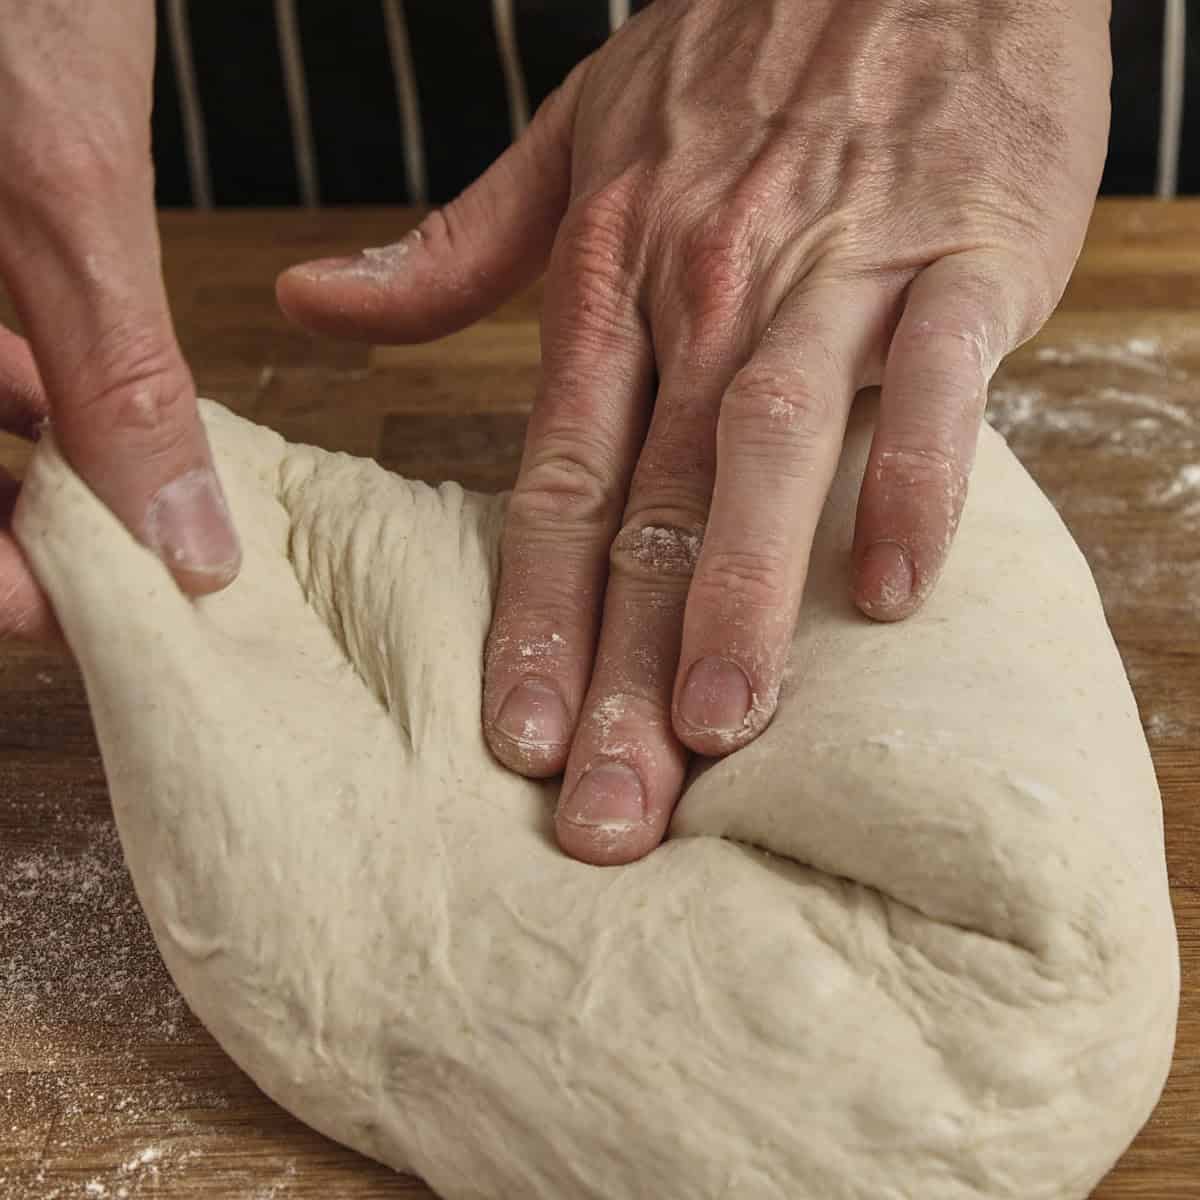
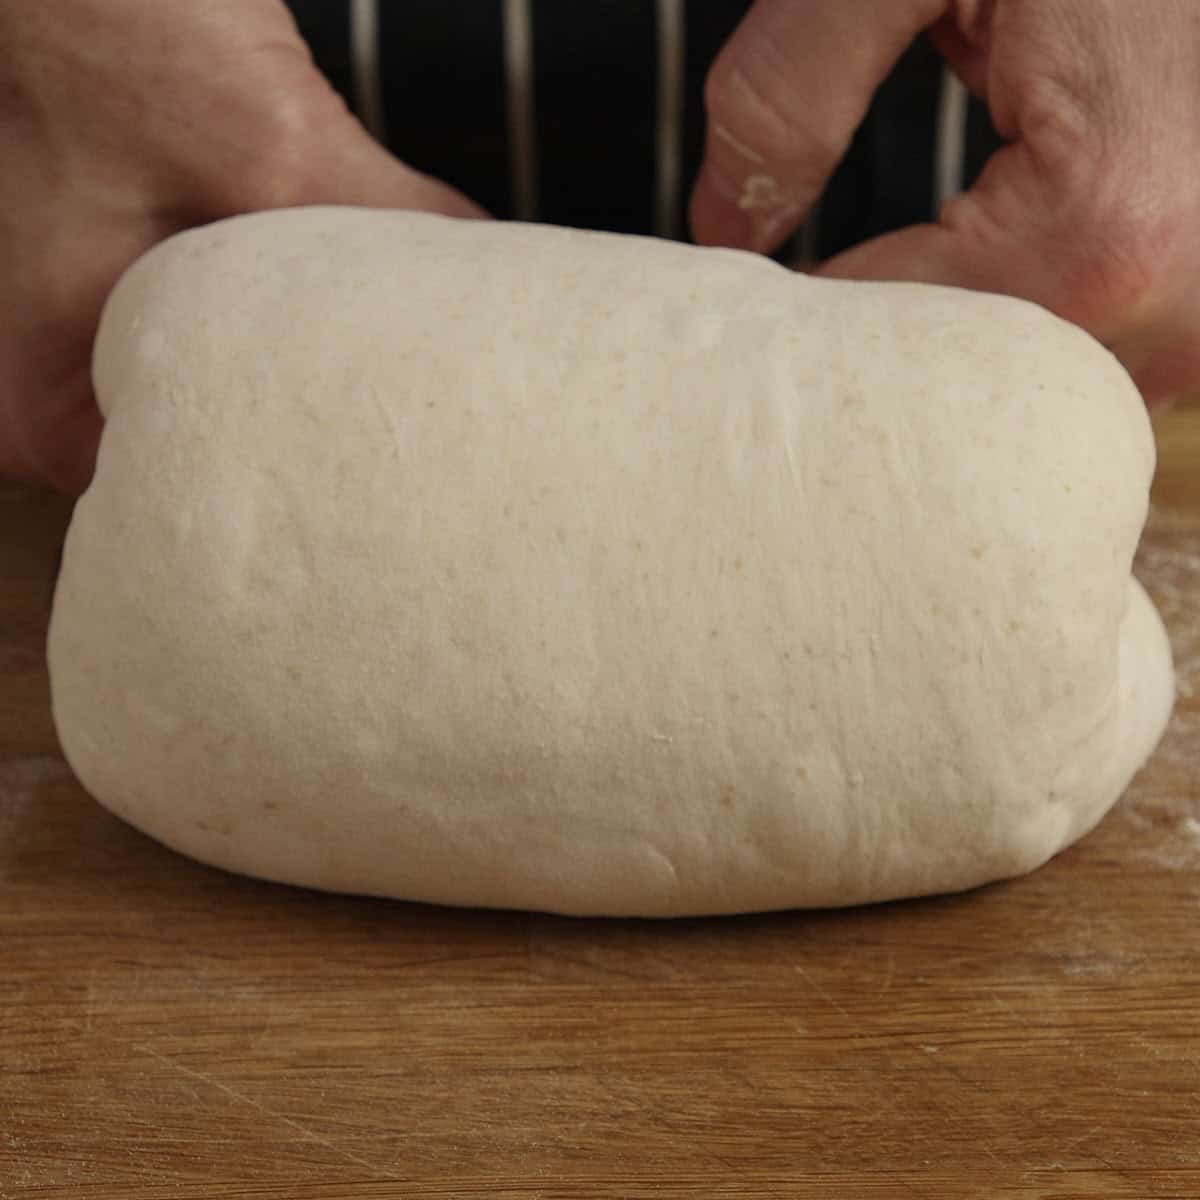
- Build tension: Cup the dough with both hands and gently drag it toward you across the bare counter to tighten the outer skin.
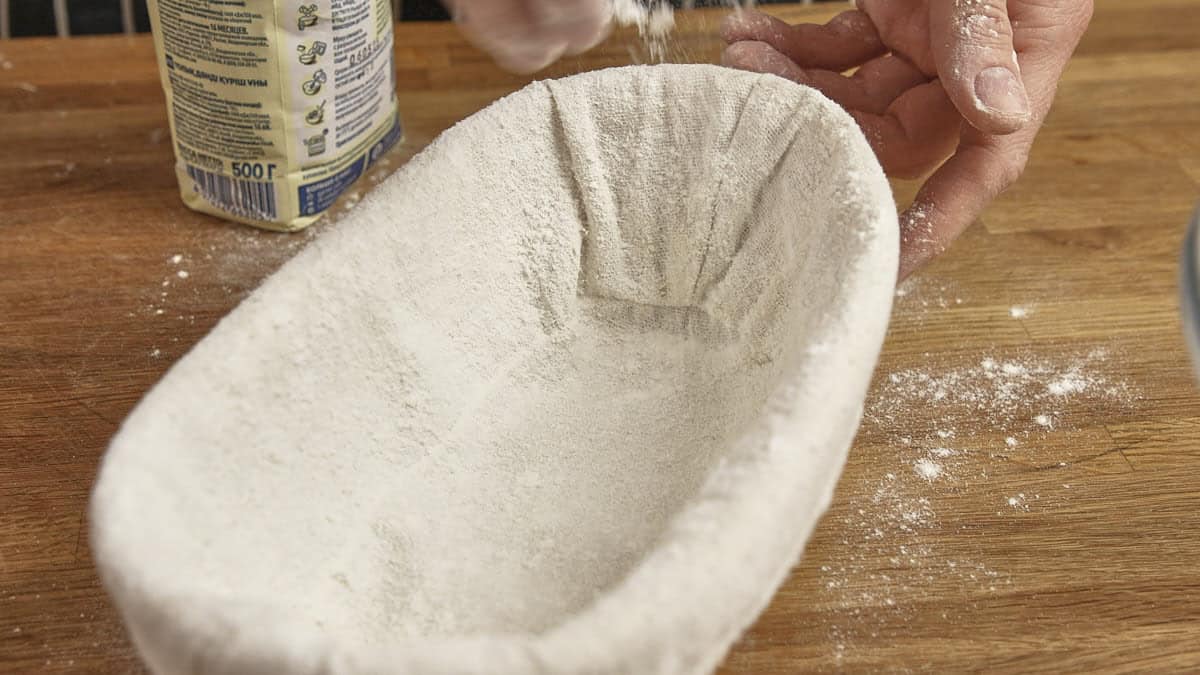
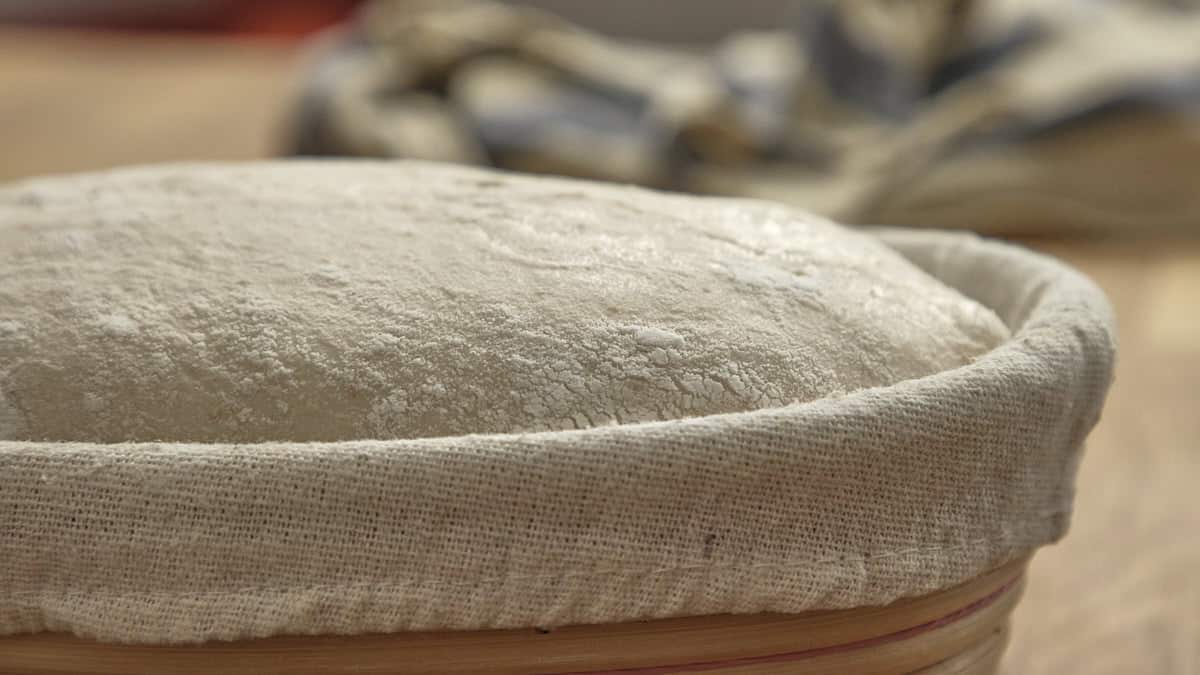
- Dust the basket: Heavily dust a cloth-lined proofing basket (banneton) with rice flour.
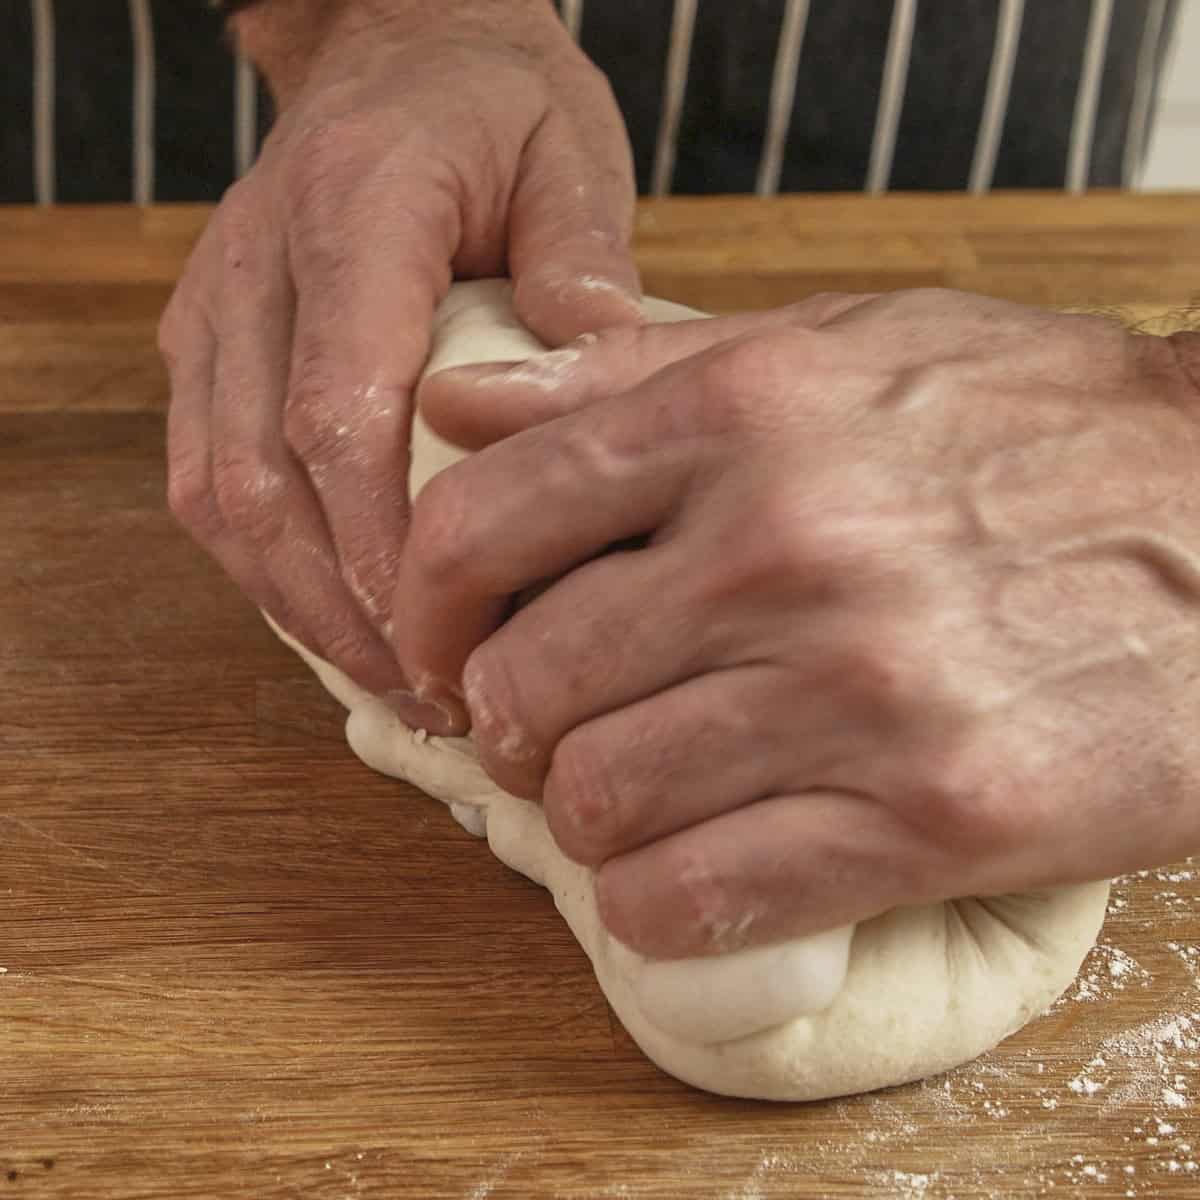
- Place in the basket: Carefully lift the shaped dough and place it into the basket, seam-side up.
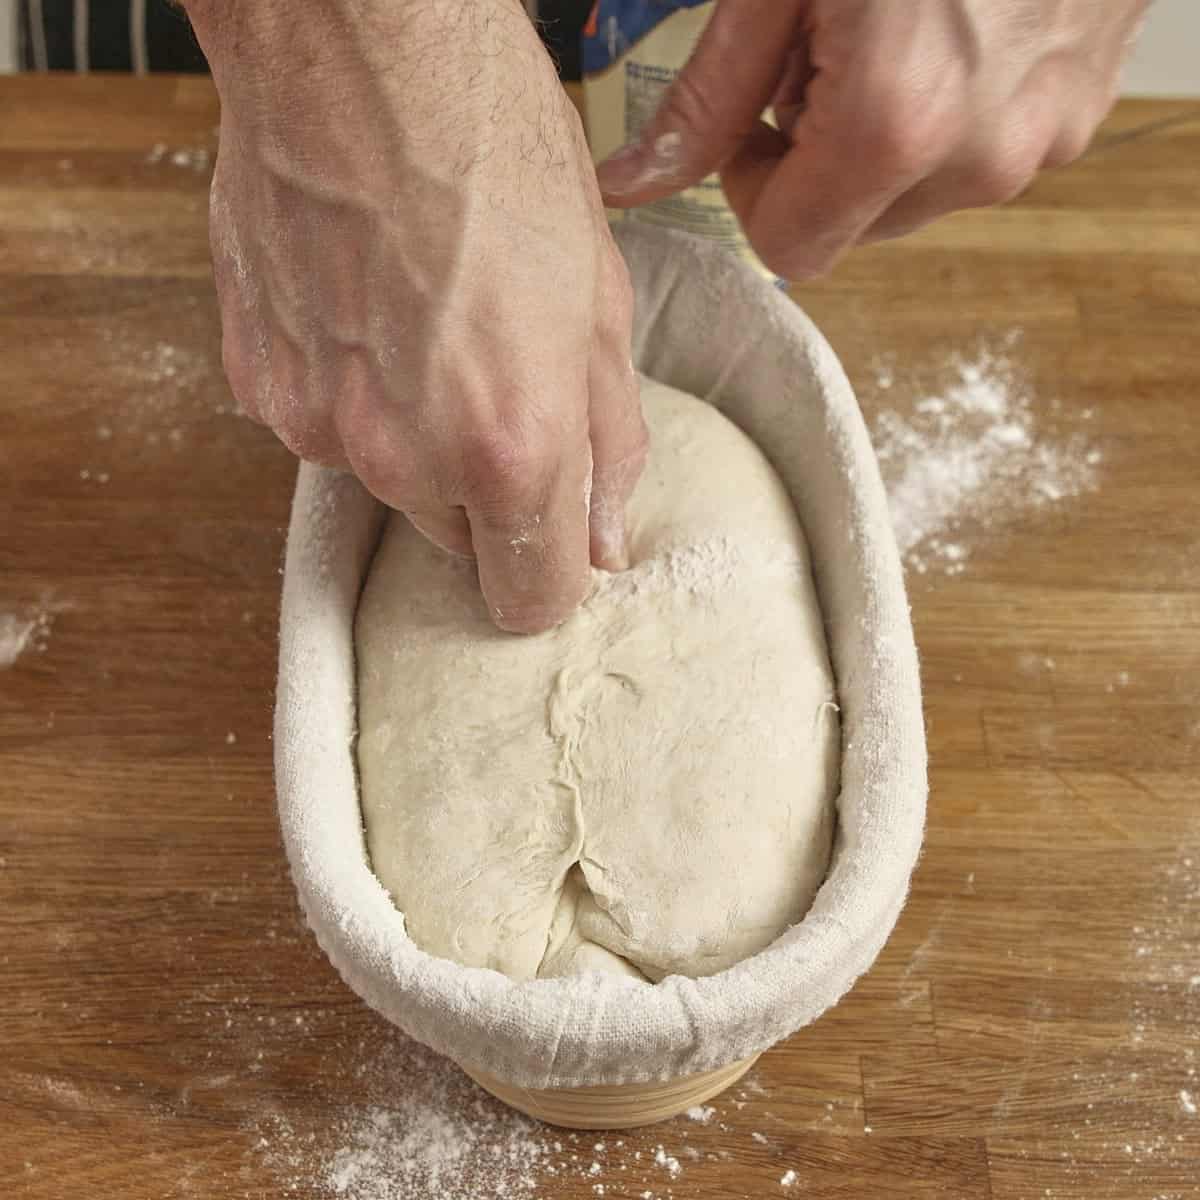
- Pinch the seam: Pinch the seam of the dough tightly closed to lock in the surface tension.

- Dust the exposed dough: Lightly dust the top of the dough with a little more rice flour to prevent it from sticking to the bag.
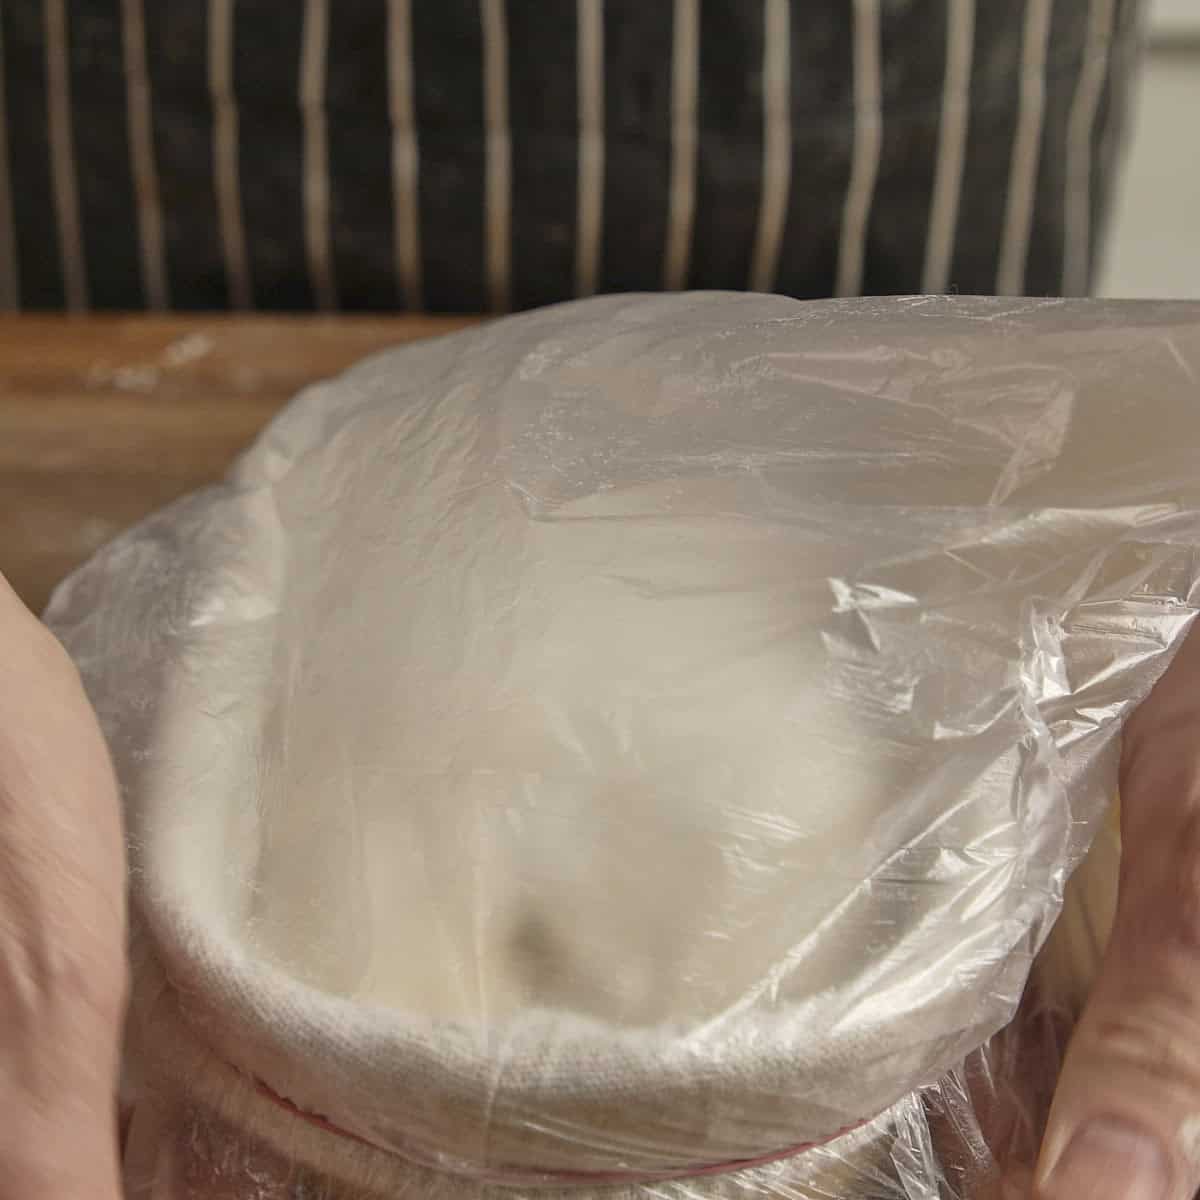
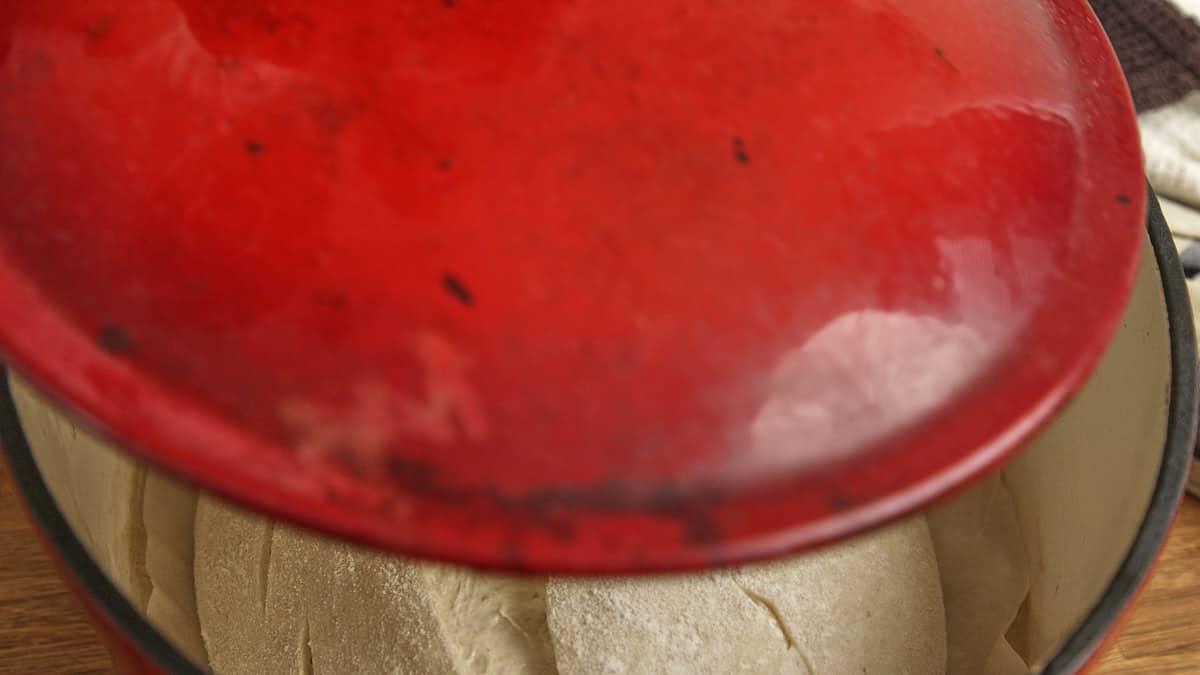
- Cover and chill: Seal the entire basket inside a plastic bag to trap moisture, and place it in the refrigerator.
How to stop dough from sticking to the basket? Always dust your basket well with rice flour. Standard wheat flour will absorb moisture and turn to glue in the fridge, causing your dough to tear or stick. Rice flour acts like tiny ball bearings, ensuring a clean release.
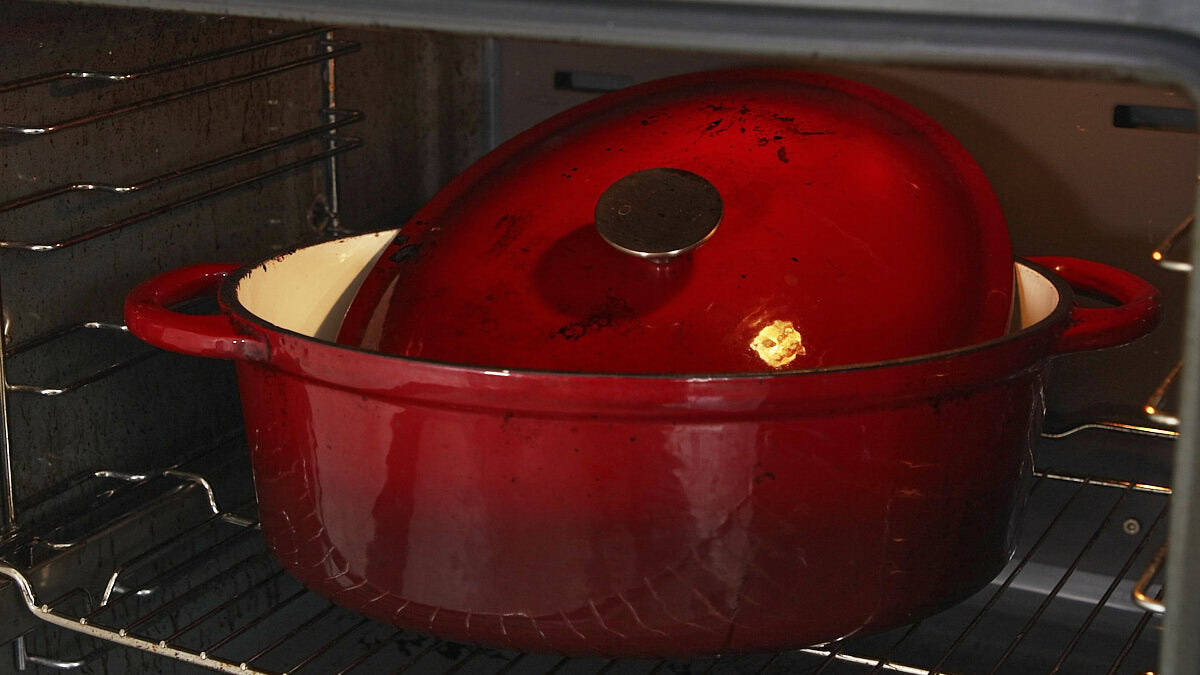
Step 7: Preheat the oven (Do this first!)
The next day, when it's time to bake, leave your dough in the refrigerator for now.
Place your empty Dutch oven (with the lid on) into the oven and preheat it to 250°C (480°F). Let it heat up for one full hour.
Cast iron takes a long time to absorb heat, and a scorching-hot pot is the absolute secret to achieving a massive oven spring.
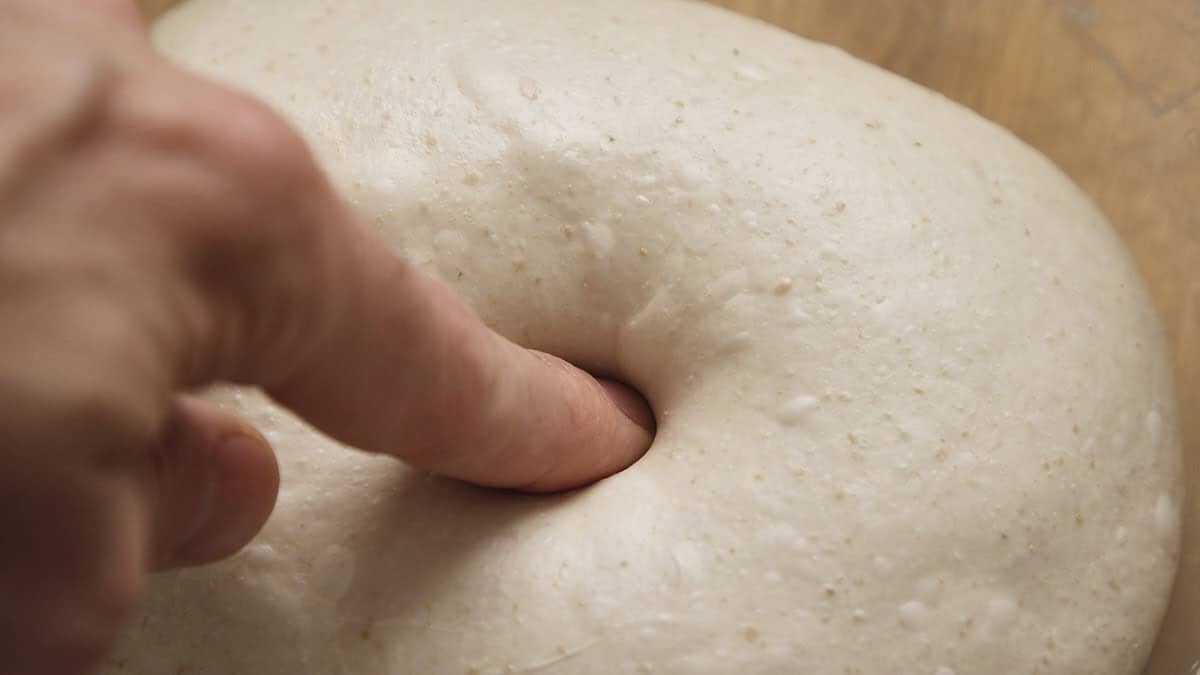
How to tell if your cold dough is ready to bake (The Poke Test)
When you take your basket out of the fridge the next morning, the dough should look domed and hold its shape.
Do not panic if it hasn't doubled in size overnight. The cold fridge temperature slows the yeast down. To verify it is perfectly proofed and ready for the oven, perform a quick "poke test."
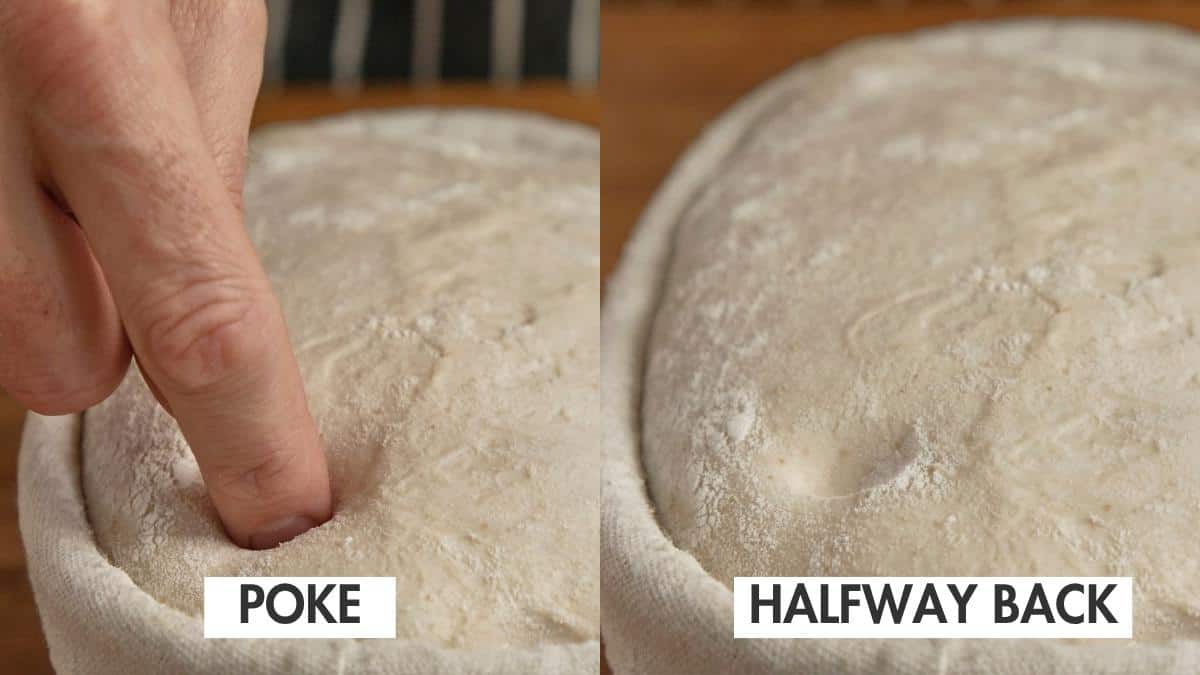
- Flour your finger: Lightly dust your index finger to prevent it from sticking to the cold dough.
- Poke the dough: Press your finger gently but firmly about half an inch into the surface.
- Watch the spring-back: You want the dough to spring back slowly and stop halfway, leaving a permanent, shallow dimple (as seen in the photo). This means it is perfectly proofed and ready to score.
Troubleshooting
- If the indent springs back instantly and completely disappears, it is under-proofed. Let it sit at room temperature for a few hours or extend the fridge-proof if you have time.
- If the indent stays completely sunken with zero spring, it is slightly over-proofed. Handle it very carefully and get it into the hot oven asap to prevent a flat, spread-out loaf.
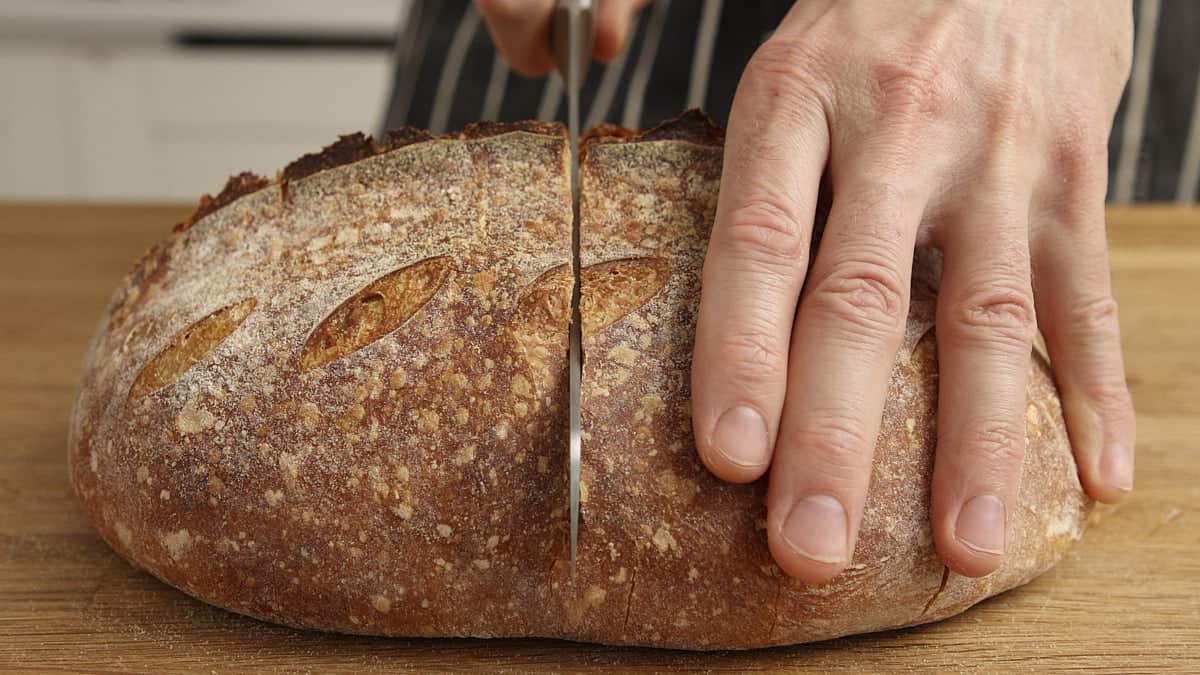
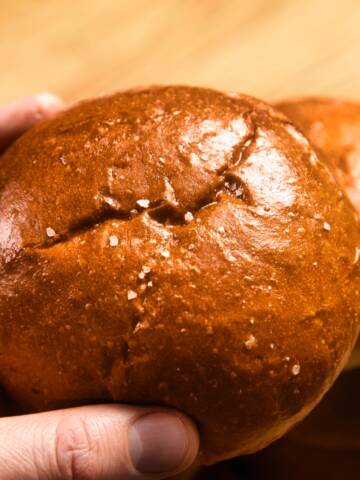
Step 8: Score and bake in a Dutch oven
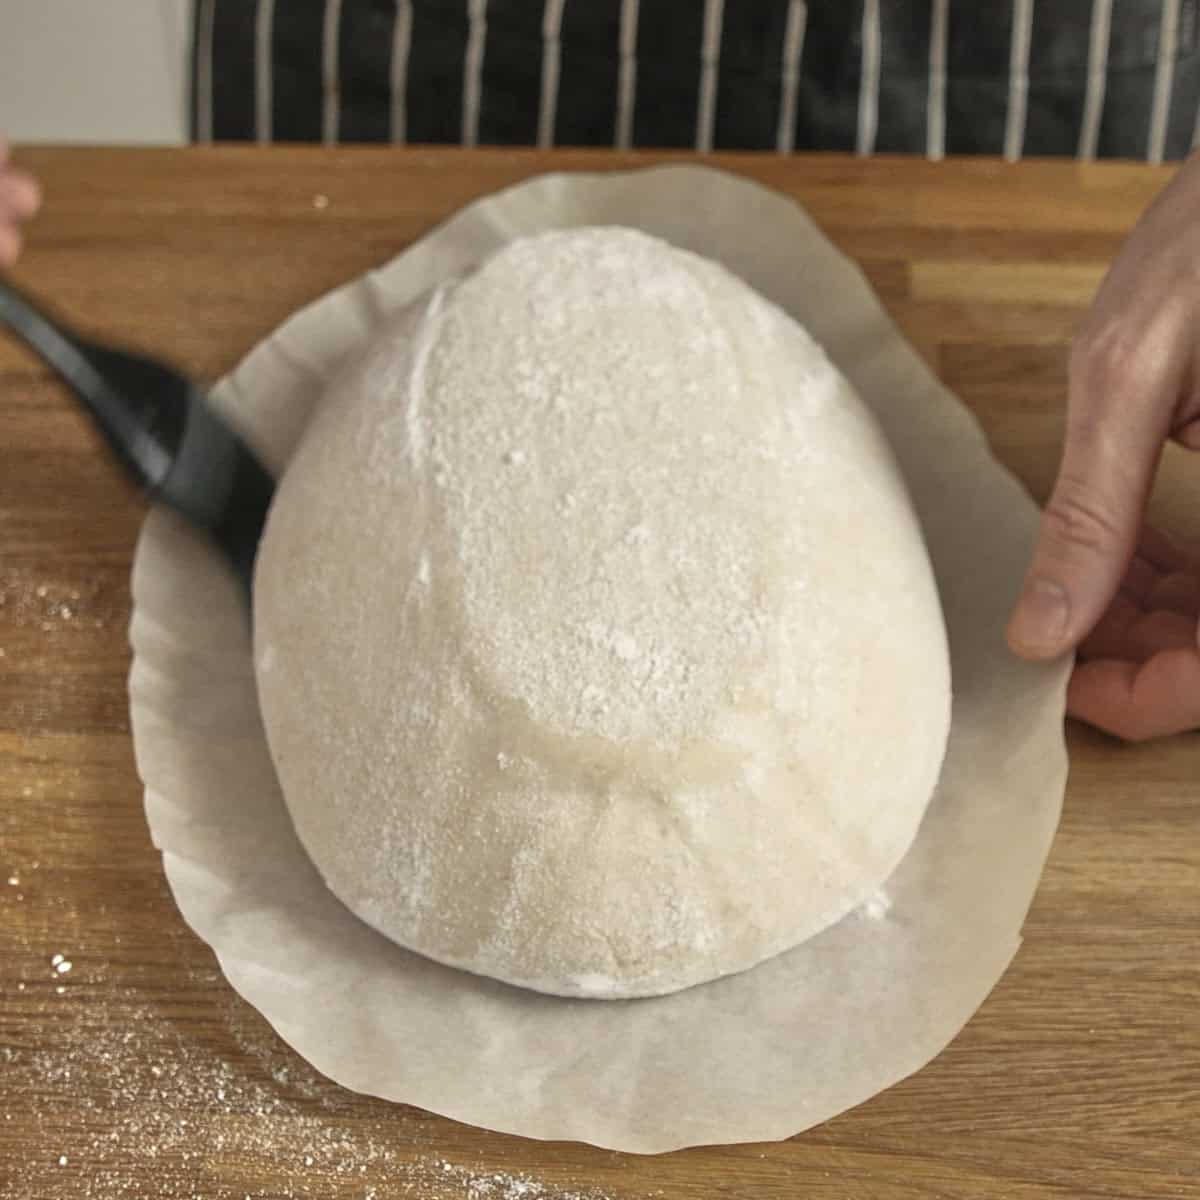
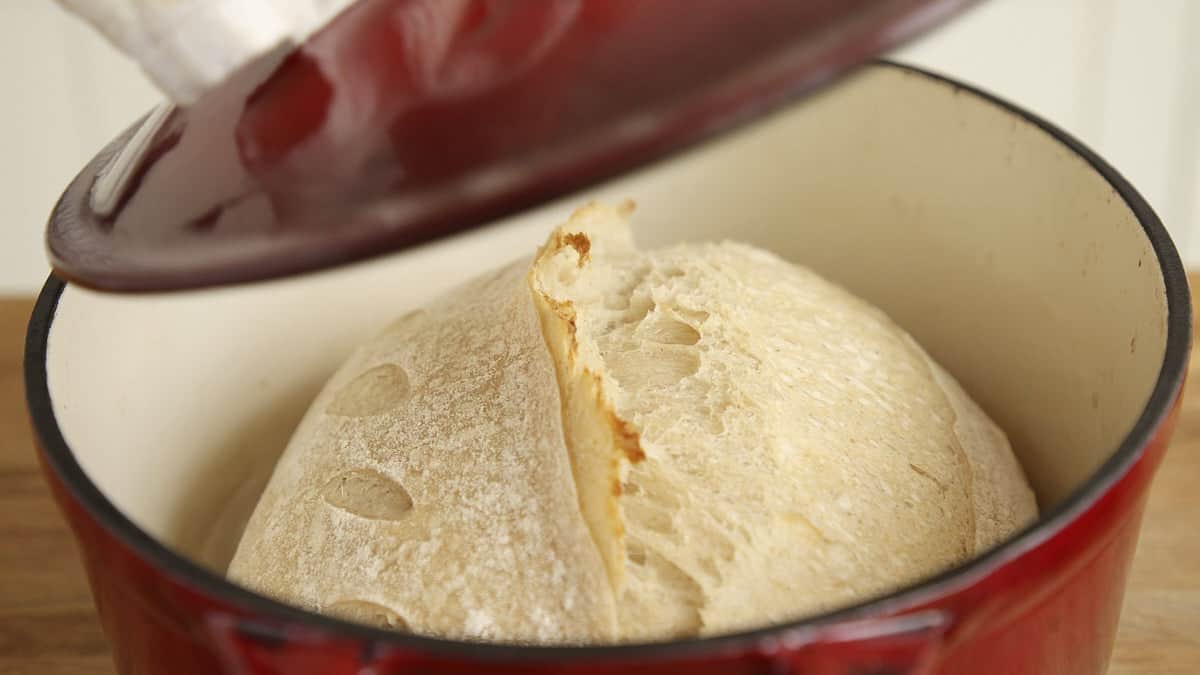
- Turn out the dough: Place a sheet of parchment paper over the top of your basket and carefully flip the whole thing over. Gently lift the basket away to reveal your dough.
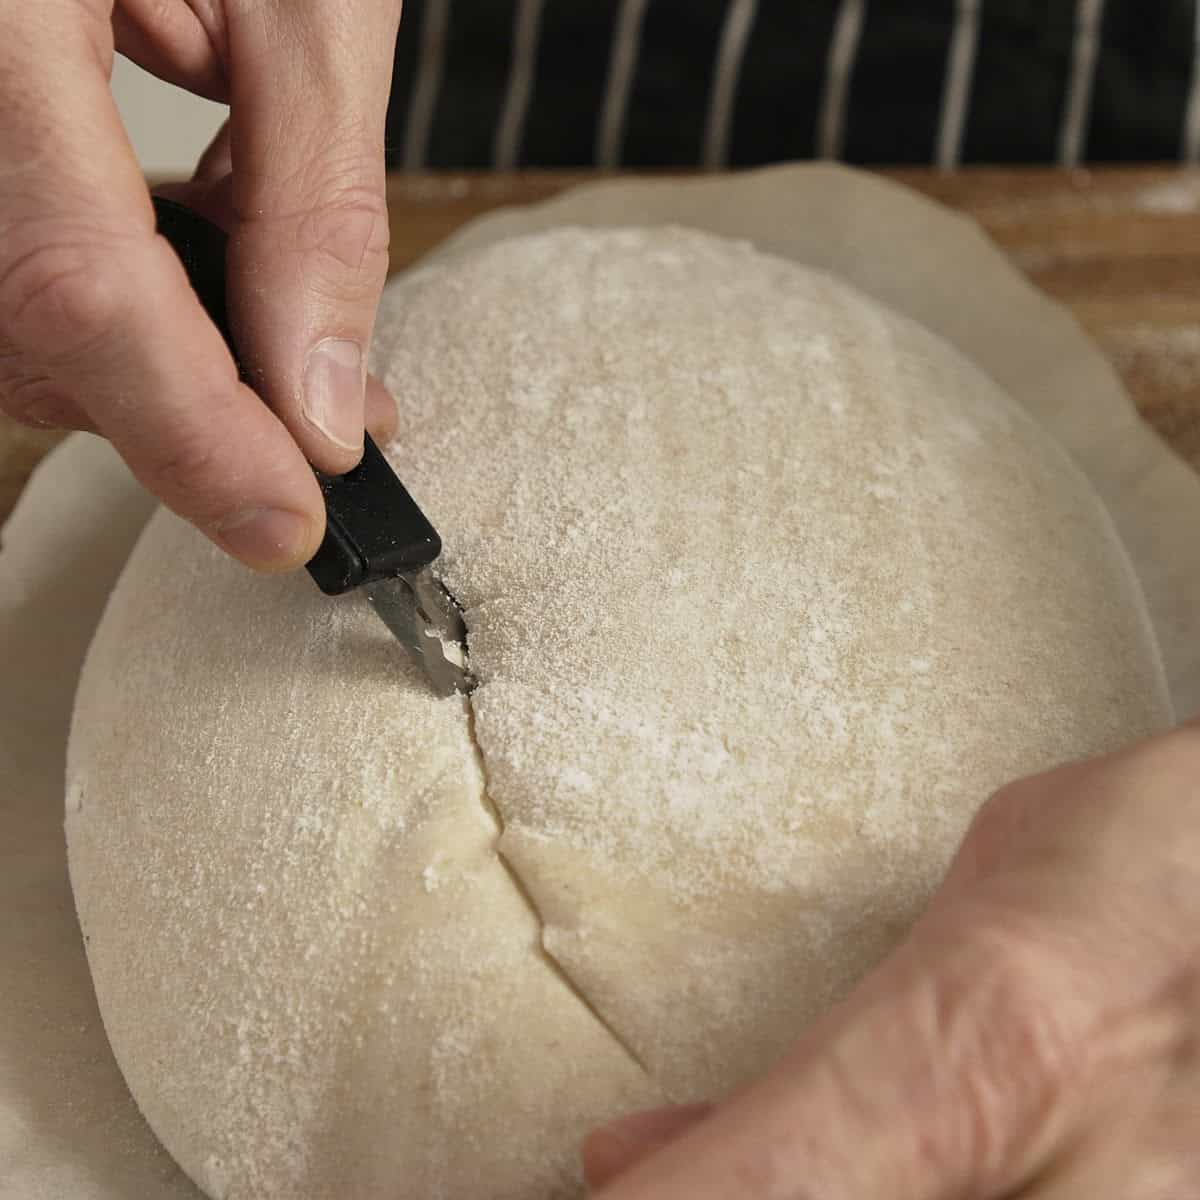
- The main score: Using a very sharp razor blade (a lame), make one continuous, confident cut down the length of the dough. Hold the blade at a slight 45-degree angle to help create that signature "ear."
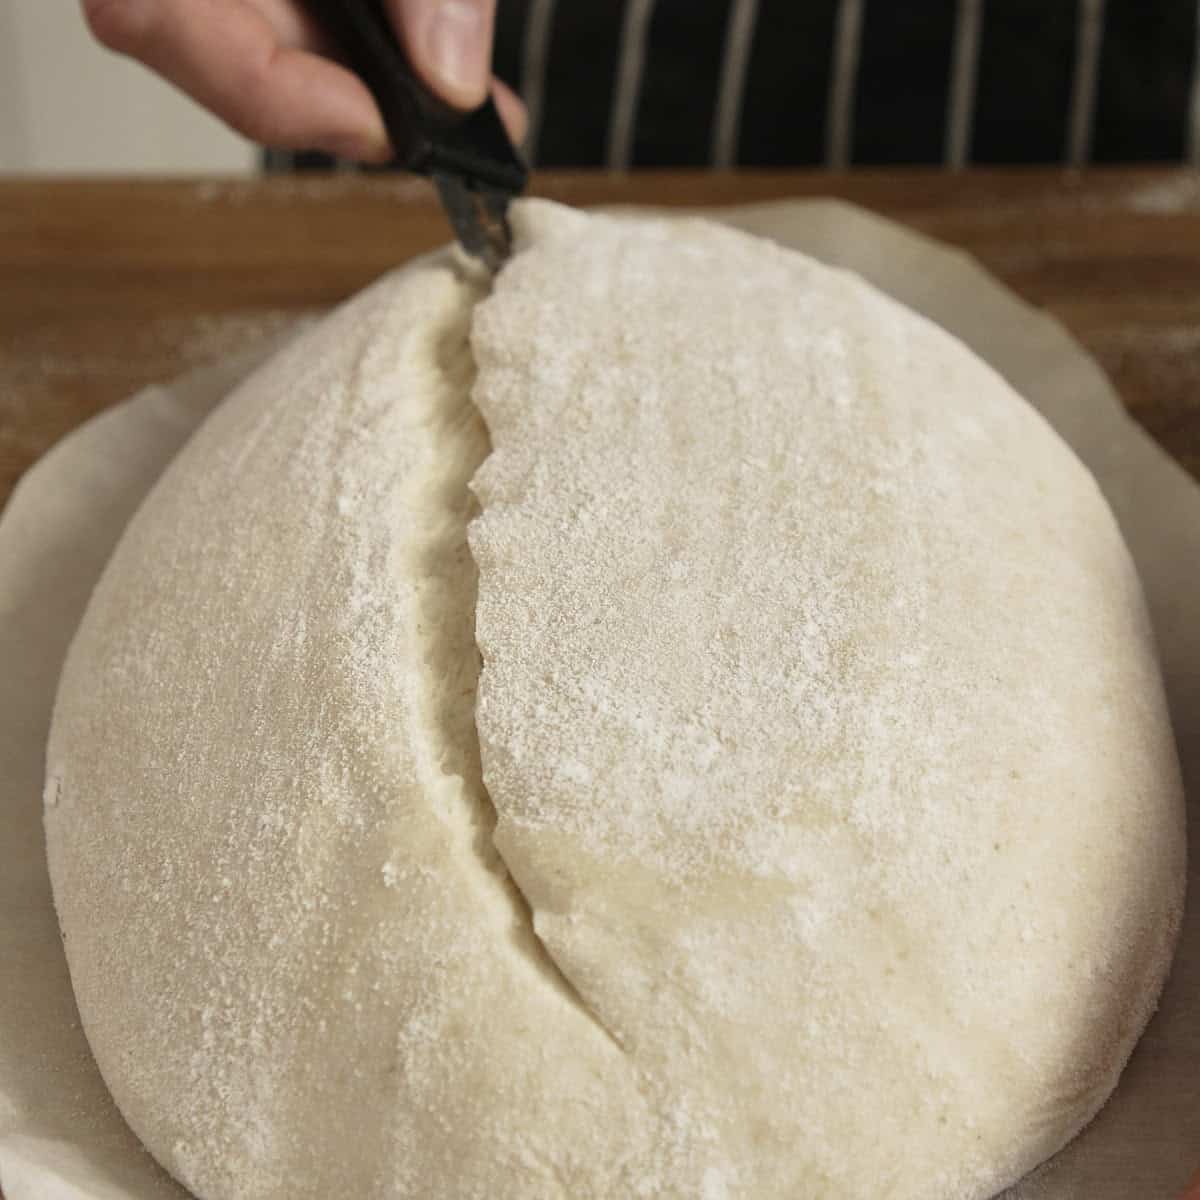
- Check the depth: The cut should be about half an inch (1-2 cm) deep from end to end. This acts as a crucial pressure valve, allowing the bread to rise rather than blow out the sides.
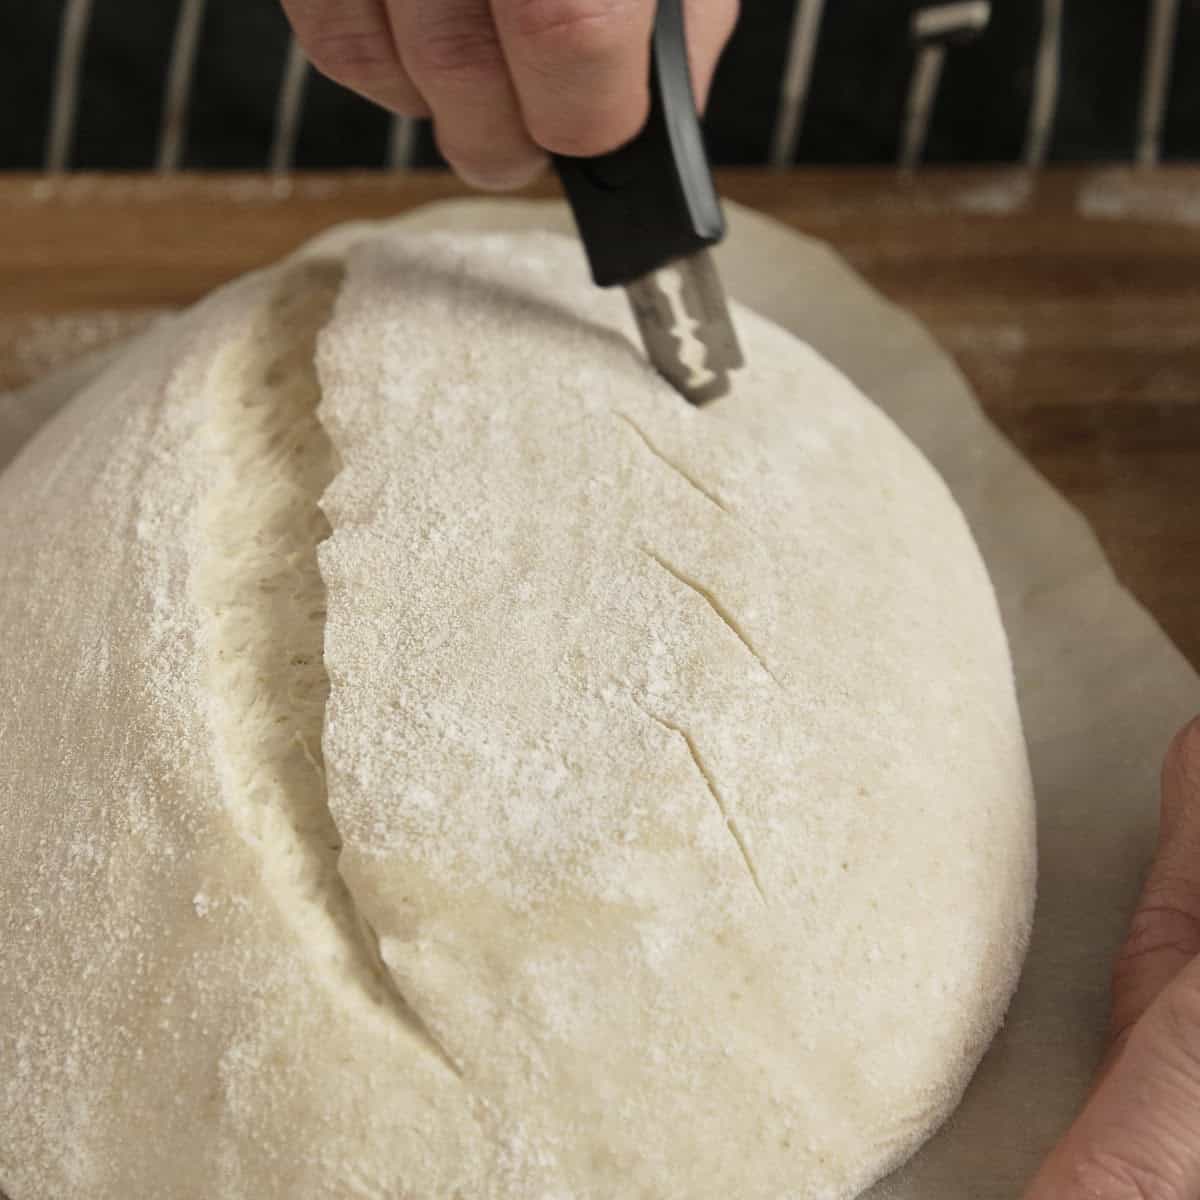
- Decorative cuts (optional): If you like, make a few small, shallow snips along the opposite side of your main score to create a beautiful, rustic pattern as it bakes.
- Transfer to the pot: Carefully grab the corners of the parchment paper and lower the cold, scored dough directly into your scorching hot Dutch oven. Be very careful not to burn your knuckles!
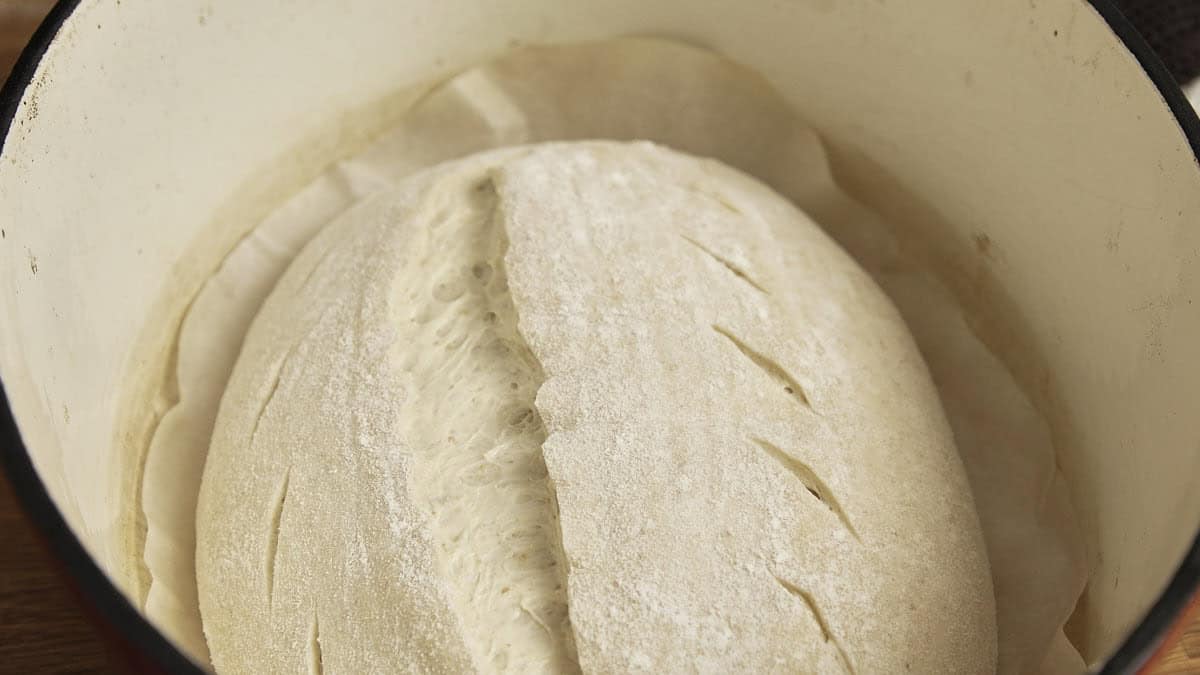
- Cover and bake: Place the hot lid on immediately to trap the moisture escaping from the dough. This steam is what creates the blistering crust. Bake covered at 230°C (445°F) for 20 minutes.
- Remove the lid: After 20 minutes, carefully take the hot lid off. The trapped steam has done its job, giving the dough a massive "oven spring" and expanding that cut into an ear. Drop the oven temperature to 200°C (390°F).
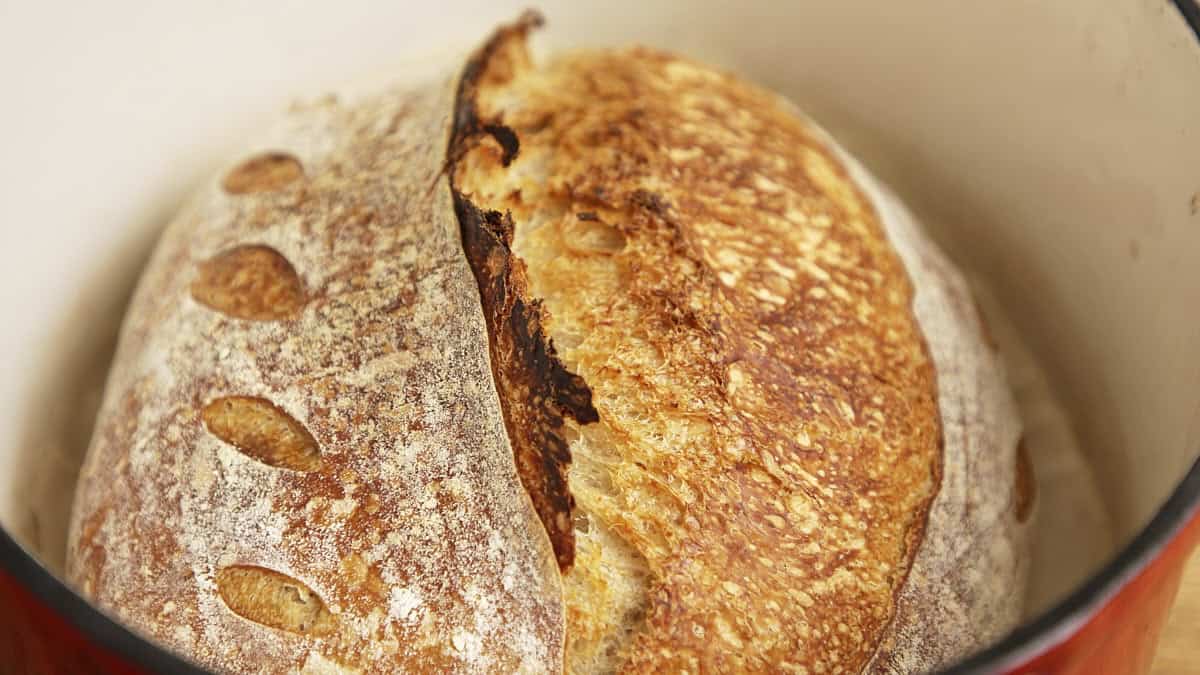
- Bake uncovered: Bake without the lid for an additional 20 to 25 minutes. You are looking for a deep, caramelized, dark golden-brown color. Do not pull it out early-a dark crust is exactly what you want for maximum flavor.
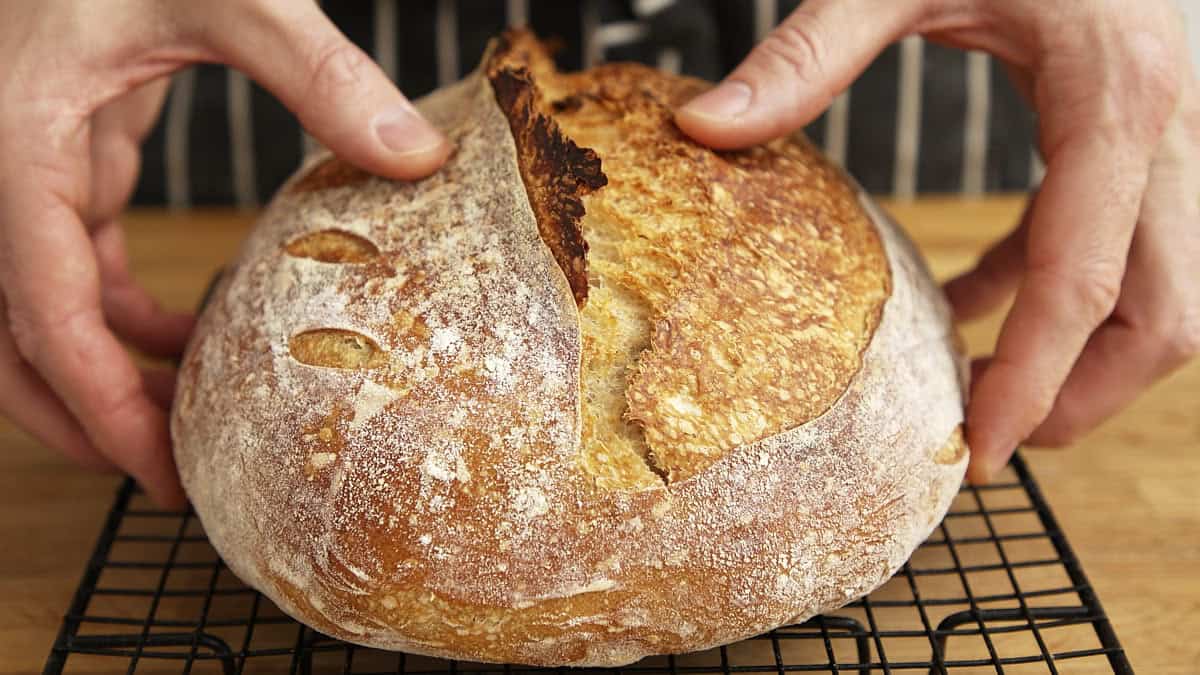
- Cool on a wire rack: Carefully transfer the hot loaf from the Dutch oven onto a wire rack. This allows air to circulate underneath so the bottom crust stays incredibly crunchy.
- The hardest part (waiting): Never slice into a hot sourdough loaf. The interior is still actively cooking and releasing steam. Let it cool for at least two full hours before cutting into it with a serrated bread knife.
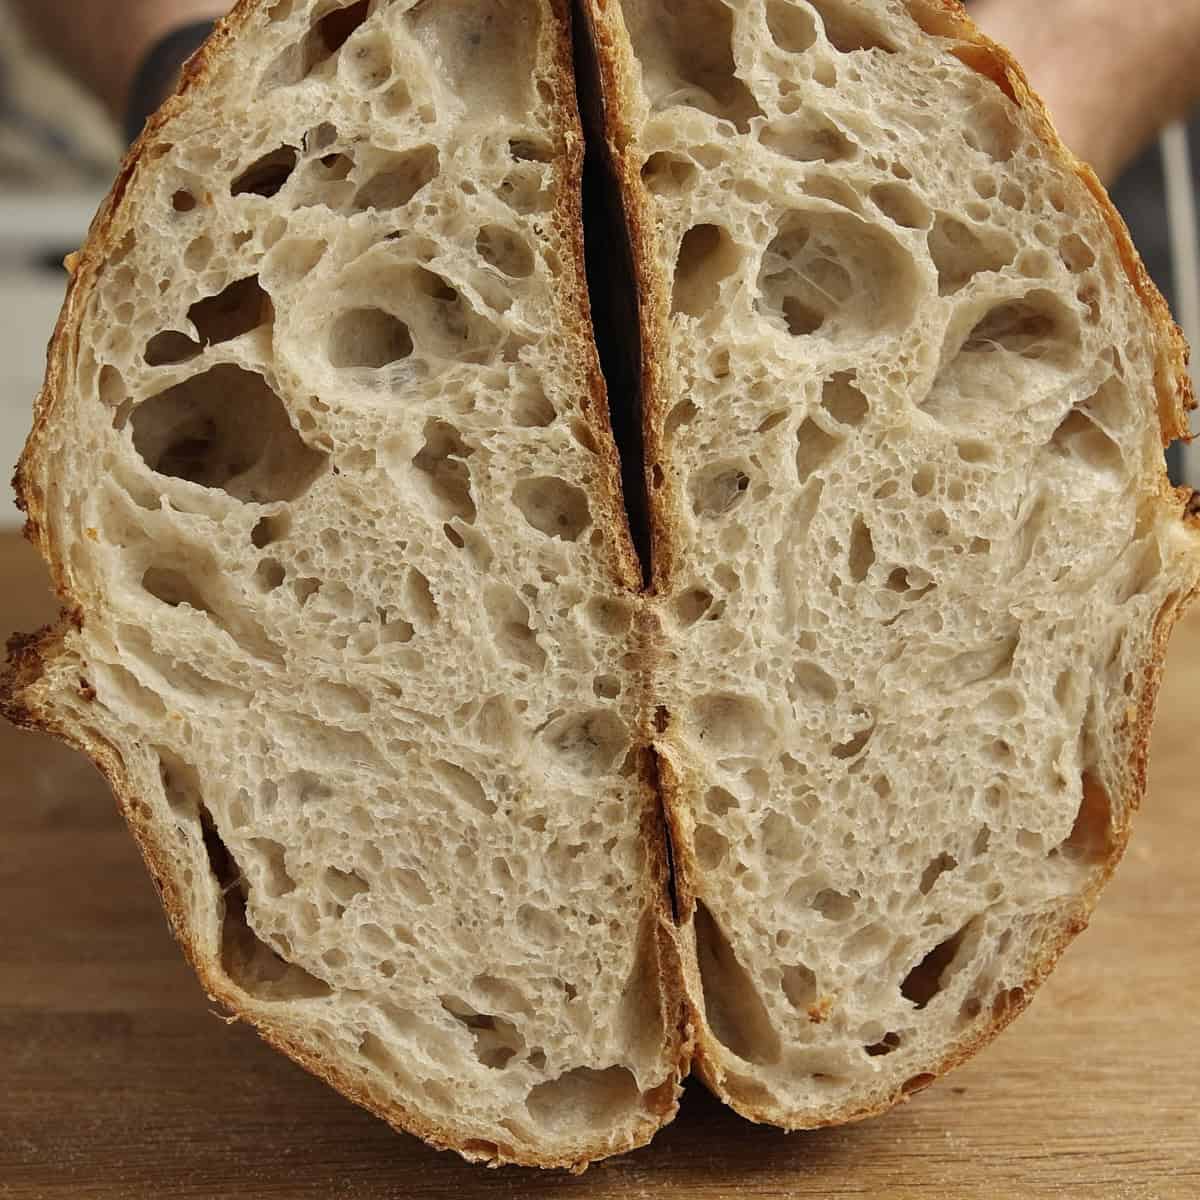
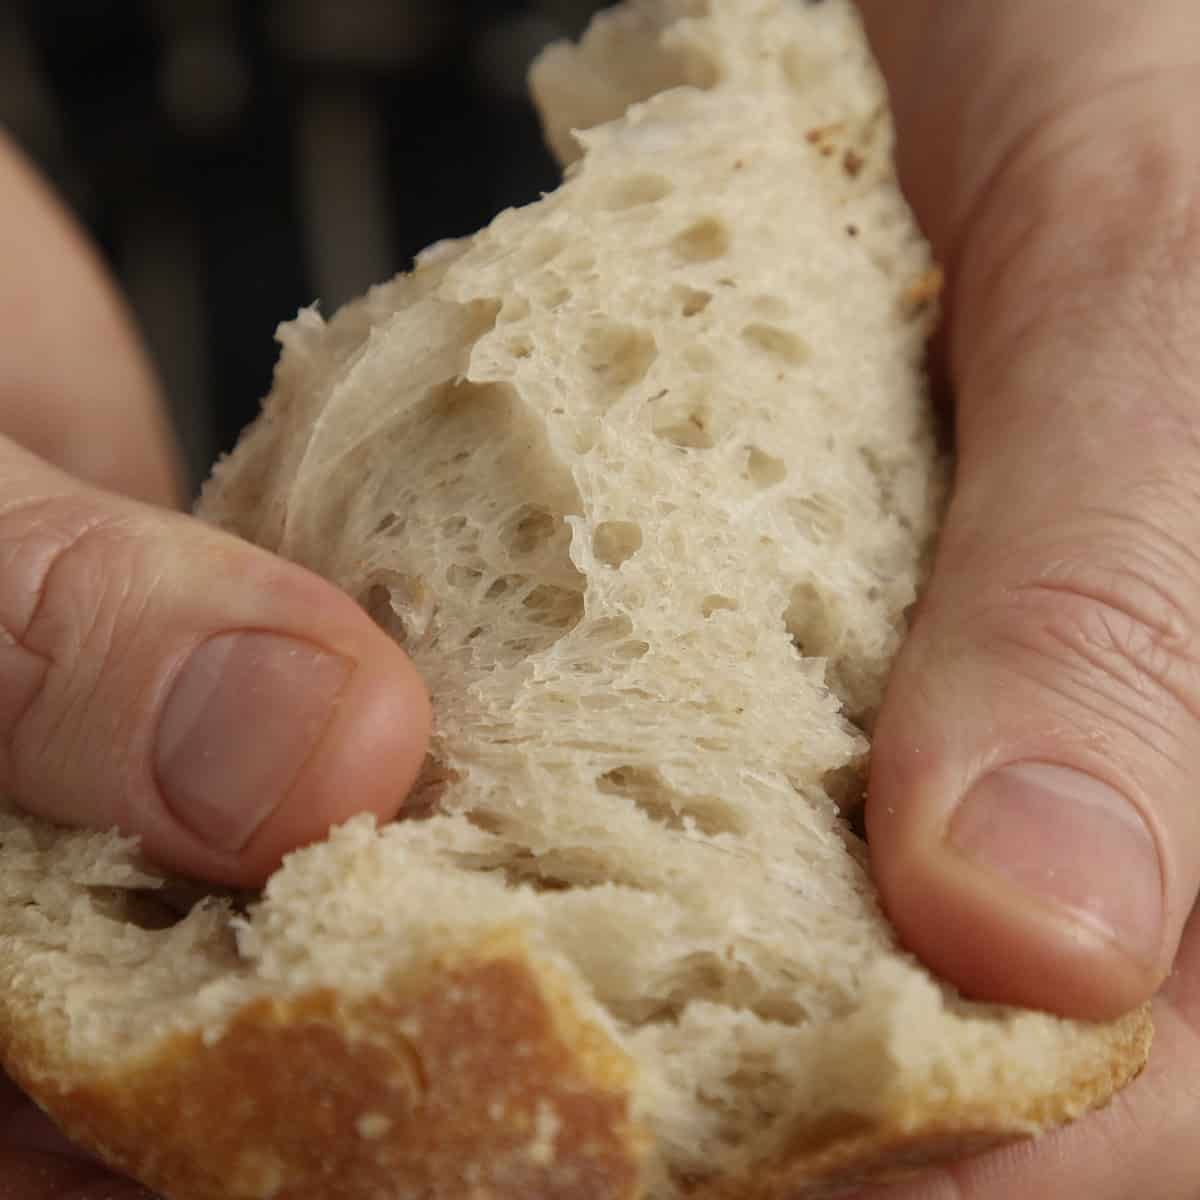
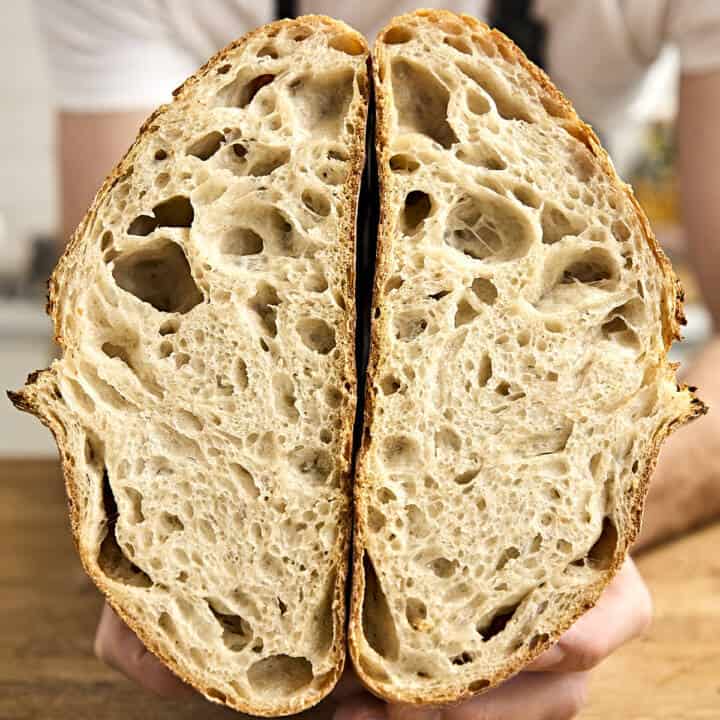
The crumb reveal: Slicing into the fully cooled loaf should reveal a beautifully open, lacy crumb with varied air pockets. This airy interior is the direct result of your folding and bulk fermentation.
The perfect texture: Pull a slice apart to check. The interior should be incredibly soft, springy, slightly chewy, and glossy, contrasting perfectly with the thick, caramelized crust.
Watch how to make it
How to store and refresh sourdough bread
Sourdough naturally lasts longer than store-bought bread, but it will dry out quickly if left exposed to the air. Here are the best ways to keep it fresh:
- Refresh a soft crust: Storing bread in a tin or plastic will soften the crust. To get the crunch back, lightly mist the loaf with water and bake it directly on the oven rack at 200°C (390°F) for 5 to 10 minutes.
- Freeze for the long term (The best method): Once completely cool, slice the entire loaf. Store the slices in a sealed zip-lock bag, squeezing out as much air as possible. Toast them directly from frozen.
- Store at room temp (For 1 to 3 days): For the first 12 hours, leave the loaf cut-side down on a wooden board to keep the crust crispy. After 12 hours, move it to a bread tin or wrap it tightly in plastic to keep the crumb from drying out.
- Never refrigerate it: The fridge alters the starch structure, causing sourdough to go stale rapidly. Keep it on the counter or in the freezer.
What to do with stale sourdough bread
If your loaf goes stale before you finish it, do not throw it away!
- Make sourdough croutons: Toss cubes of stale bread with olive oil, salt, and garlic powder. Bake at 190°C (375°F) for 10 minutes. These are the ultimate upgrade for Caesar salad.
- Blend into breadcrumbs: Pulse dry bread chunks in a food processor until fine, then freeze for crispy toppings on baked fish or pasta.
- The ultimate French toast: Stale sourdough absorbs the egg-and-milk batter perfectly without falling apart in the pan.
Easy sourdough variations to try next
Once you have mastered this foundational recipe, you can use the exact same dough to create incredible flavor variations. When adding ingredients (inclusions), the best time to incorporate them is during your second set of stretch and folds.
- Olive and Thyme: Pit and roughly chop 80g of Kalamata olives (pat them very dry) and mix with a few sprigs of fresh thyme.
- Roasted Garlic and Rosemary: Roast a whole head of garlic until soft, squeeze out the cloves, and roughly chop them with a tablespoon of fresh rosemary. Fold this directly into the dough.
- Jalapeño Cheddar: Add 100g of cubed sharp cheddar cheese and 50g of pickled or fresh sliced jalapeños. Ensure the jalapeños are patted completely dry with a paper towel to avoid adding excess water to your dough.
- Seeded Crust: After shaping your dough into a tight ball, lightly mist the top with water or roll it on a damp towel. Then, gently roll the top of the dough in a shallow plate filled with sesame seeds, poppy seeds, or a seed mix before placing it, upside down, into your floured basket.
Sourdough troubleshooting & FAQs
This is the classic sign of over-fermentation. If the dough is left in a warm room for too long during the bulk ferment, the acids produced by bacteria break down the gluten network. The dough loses its structure and turns into a sticky puddle. You cannot shape it into bread, but you can spread it into an oiled pan and bake it as a flatbread or focaccia
Yes. Place the scored dough on a parchment-lined baking sheet. To replicate the steam of a Dutch oven, spray the dough heavily with water from a spray bottle, then immediately cover it with an inverted roasting pan or a large, deep foil tray. Bake covered for 15 minutes, then remove the cover for the remainder of the bake.
Because cast iron retains intense heat, the bottom of the loaf can sometimes burn before the top is sufficiently browned. To prevent this, place a bare aluminum baking sheet on the oven rack directly beneath your Dutch oven to deflect direct heat away from the pot's base.
If handling a razor blade makes you nervous, take a clean pair of kitchen scissors and make 5 or 6 deep, angled snips in a line down the center of the dough. This provides an excellent escape route for the steam and creates a beautiful, rustic, spiked crust.
Never slice sourdough fresh from the oven. The bread is still actively cooking and releasing steam. If you cut into it while it is hot, the starches will coagulate, and the crumb will become permanently gummy. You must let it cool on a wire rack for at least two hours.
Common sourdough terms explained
- Active starter: A fermented mix of flour and water containing natural wild yeast and lactic acid.
- Levain/stiff starter: A portion of active sourdough starter mixed with specific ratios of flour and water, built specifically to be used in a dough recipe.
- Autolyse: A resting period where only flour and water are mixed to jumpstart hydration. (We skip this in our beginner method)
- Banneton: A special proving basket used to hold the dough's shape during its final proof.
- Bulk Fermentation: The primary, uninterrupted resting period where the dough does the majority of its rising.
- Cold Retard: Placing shaped dough in the refrigerator to slow fermentation and build complex flavors.
More bread recipes

If you found this post helpful or have learned something, please comment, subscribe, and follow me on social media for more delicious recipes.
Recipe

Easy Sourdough Bread (No kneading, No Autolyse, No Pre-Shape)
Ingredients
- 375 grams (1½ cups) water
- 100 grams (⅖ cup) rye starter
- 12 grams (2 teaspoon) salt
- 450 grams (3 ⅔ cups) white bread flour
- 25 grams (3 ½ tablespoon) whole wheat flour
- 25 grams (3 ⅓ tablespoon) rye flour
Instructions
Build the Levain (6-8 hours before mixing dough)
- In a jar, mix the 20g starter, 40g white flour, 10g rye flour, and 50g water. Cover loosely and leave at room temperature until it triples in volume, is highly bubbly, and domed on top. (Note: This makes 120g of levain. You will use 100g and have 20g left over to feed as your ongoing starter).
Mix the Dough & First Rest
- Place a large bowl on a digital scale. Whisk together the 375g water, 100g active levain, and 12g salt until milky. Add the 450g white flour, 25g rye, and 25g wholemeal. Mix with a dough scraper or your hands until a rough, shaggy dough forms with absolutely no dry spots.
The "Drunk Cat" Fold
- Wet your hands. Grab the dough from the middle, lift it up so the ends hang down, and fold it in on itself to roughly shape a ball. Cover the bowl with a damp towel and rest at room temperature for 30 minutes.
Slap and Folds (4 Sessions total)
- After 30 minutes, wet your hands. Grab the dough, slap the bottom end against the counter, and fold the top over toward you. Give it a quarter turn and repeat 2 or 3 times until the dough feels tight and resists stretching. Place it back in the bowl, cover, and rest 30 minutes. Repeat this exact folding and resting process 3 more times. 5. Bulk Fermentation (Watch the dough, not the clock)
- After your final fold, cover the bowl and let it sit at room temperature (24°C-27°C / 75°F-80°F). Do not let it double in size. The bulk ferment is finished when the dough has risen by roughly 75%, is visibly domed on top, and jiggles like set gelatin when you shake the bowl.
Shape and Cold Retard
- Turn the dough onto a lightly floured surface. Fold the top down to the middle, fold the sides into the center, and tightly roll it from top to bottom into a log. Drag it gently toward you to create surface tension. Place it seam-side up into a proofing basket heavily dusted with rice flour. Pinch the seam shut, seal the whole basket in a plastic bag, and refrigerate for 12 to 24 hours.
Preheat the Oven (Do this first!)
- Leave the dough in the fridge. Place your Dutch oven (with the lid) into the oven and preheat to 250°C (480°F) for one full hour.
The Poke Test & Scoring
- Once the oven is screaming hot, take the dough out of the fridge. Gently poke it with a floured finger. If the indent springs back slowly and stops halfway, it is ready. Turn the dough out onto a piece of parchment paper. Using a sharp razor (lame), make one confident, deep score (about ½ inch) down the center at a slight angle.
Bake
- Use the parchment paper to carefully lower the dough into the hot Dutch oven. Put the lid on and bake covered at 230°C (445°F) for 20 minutes. Remove the lid, drop the temperature to 200°C (390°F), and bake uncovered for another 20 to 25 minutes until deeply browned.
Cool Completely
- Transfer the loaf to a wire rack. Let it cool for at least 2 full hours before slicing to prevent a gummy crumb.
Video
Notes
-
Ingredients & Substitutions
- Flour substitutions: If you don't have rye or wholemeal flour, simply replace them with an additional 50g of strong white bread flour. Your loaf will still bake beautifully.
- Water quality: Heavy chlorine can inhibit yeast. Use filtered water, or leave an open jug of tap water on the counter overnight so the chlorine can evaporate before mixing.
- The "float test" myth: Do not drop the starter in water to test it-dense rye and wholemeal flours can cause a perfectly good starter to sink. If your levain has tripled in volume and is full of bubbles, it is ready.
- Wet hands, not floured hands: Never add extra flour to the bowl to prevent sticking, as this lowers hydration and makes dense bread. Dip your hands in a bowl of water before handling the dough.
- Why rice flour? Standard wheat flour acts like glue in the fridge. Rice flour acts like tiny ball bearings. Heavily dusting your basket with rice flour is the only foolproof way to ensure a clean release.
- Dutch oven sizing: A 4-quart to 5-quart (roughly 4 to 5 liters) Dutch oven is ideal. It forces the dough to rise into a tall loaf rather than spread out wide.
- Tracking your folds: It's easy to forget how many folds you've done over two hours. Keep a scrap of paper nearby and draw a tally mark after each session so you know exactly when you hit four.
- Watch the dough, not the clock: The times listed are guidelines based on a warm kitchen (24°C / 75°F). Trust the physical cues (75% rise, domed top, jiggle) over your timer.
- The #1 rule of bulk fermentation: If your dough turns into a sticky, soupy puddle, it is over-fermented. For beginners, it is always safer to slightly under-proof than to let it double in size at room temperature.
- Schedule flexibility: The cold retard is a pause button. While 12 to 24 hours is standard, you can leave the dough in the fridge for up to 36 hours. A longer rest yields a more intense sour flavor.
- Prevent a burnt bottom crust: Cast iron retains intense heat. Place a bare aluminum baking sheet on the oven rack directly beneath your Dutch oven to deflect the direct heat away from the base.
- No razor? Use scissors: Do not use a standard kitchen knife to score-it will drag and deflate your dough. Instead, make a row of deep, angled snips down the center with clean kitchen scissors for a beautiful, spiked crust.
- Baking without a Dutch oven: Place the scored dough on a parchment-lined baking sheet. Heavily spray the dough with water, cover with an inverted roasting pan or deep foil tray, and bake for 15 minutes before uncovering.
- Never refrigerate sourdough: The fridge alters the starches and makes bread go stale rapidly. Keep it cut-side down on a wooden board for the first 12 hours to maintain the crust.
- The freezer method: For long-term storage, slice the fully cooled loaf and freeze the slices in a zip-lock bag. Toast them directly from frozen.
- Refreshing a soft crust: If you wrapped your cut loaf in plastic or a tin, the crust will soften. To bring back the crunch, lightly mist the outside of the loaf with water and bake directly on the oven rack at 200°C (390°F) for 5 to 10 minutes.
Nutrition
This site contains affiliate links. I may earn a tiny commission on qualifying purchases at no extra cost to you. By bookmarking these links you help support the upkeep of this site.


Jon says
This was difficult for me, but despite this I have a very tasty loaf of bread that has been given the seal of approval by my Ukrainian friend. That's better than any judgement I could make. 5 stars, thank you very much. 🙂
Charlé Visser says
Glad you got some good results!
deb says
Hi,could you bulk ferment at room temp until is rises and then cold proof until ready to bake ? If I want to add coco how much and at what stage ?
Anonymous says
could you bake in a dutch oven ?
Charlé Visser says
Sure thing. Better in a dutch oven.
Charlé Visser says
Yes of course but it’s better to rise long at cold. One of my readers fermented for 3 days in the fridge and the loaf came out amazing. Add 50 grams cocoa powder right at the start along with the flour
Lynn says
My dough was under proofed. Should I have let it sit longer than 45 minutes after proofing overnight in the refrigerator?
Charlé says
45 minutes serves as a guide and each person's dough will behave slightly different. That's just the nature of sourdough bread. Your fridge might be cooler or it might be colder where you live which would also affect the proving time. Or, you might have a less active culture of yeast and bacteria in your dough which means it proves slower. If your dough has not proven properly then just let it go for longer before you bake it. You can also direct message me on Instagram with your photos, pics or questions. I will gladly walk you through the proper steps as the happen.
Laura says
Same for me. My starter was pretty active and make a lot of sourdough. Would it help once baguettes rolled into shape to leave them out for a bit longer? What do you think
Tasted great though but very small and a bit hard
Charlé Visser says
If they are not proved enough then just let them sit out a bit and proof for longer. You could also prove them halfway before it goes into the fridge.
Claire says
Great detailed recipe and very easy to follow. My bread came out perfect. Thanks
Charlé says
Claire, bread can be a tricky one even with a detailed guide like this. Well done for nailing it the first time and thanks for the great feedback!
Denise says
If using a Dutch oven, do you still have to steam it or does the Dutchty do that for you?
Charlé Visser says
Dutchy does it for you. Spray the loaf with water before baking!